Authorization Server
This chapter describes the OpenID Connect authorization server — a comprehensive authentication and authorization system responsible for managing user identities, controlling access to applications, and implementing the Single Sign-On (SSO) mechanism in a multi-application environment.
System features:
- User authentication — verifying the identity of people using the system
- Account management — administering user accounts, assigning roles, and defining attributes
- Access control — precise management of permissions for applications and resources
- Single Sign-On (SSO) — a single set of credentials provides secure access to multiple applications simultaneously
- Multi-Factor Authentication (MFA) — an additional layer of security beyond a standard password
- Integration with external identity providers — support for logging in through platforms such as Google, Microsoft, and others
- Security event auditing — systematic recording and storing of logs for all significant events in the system
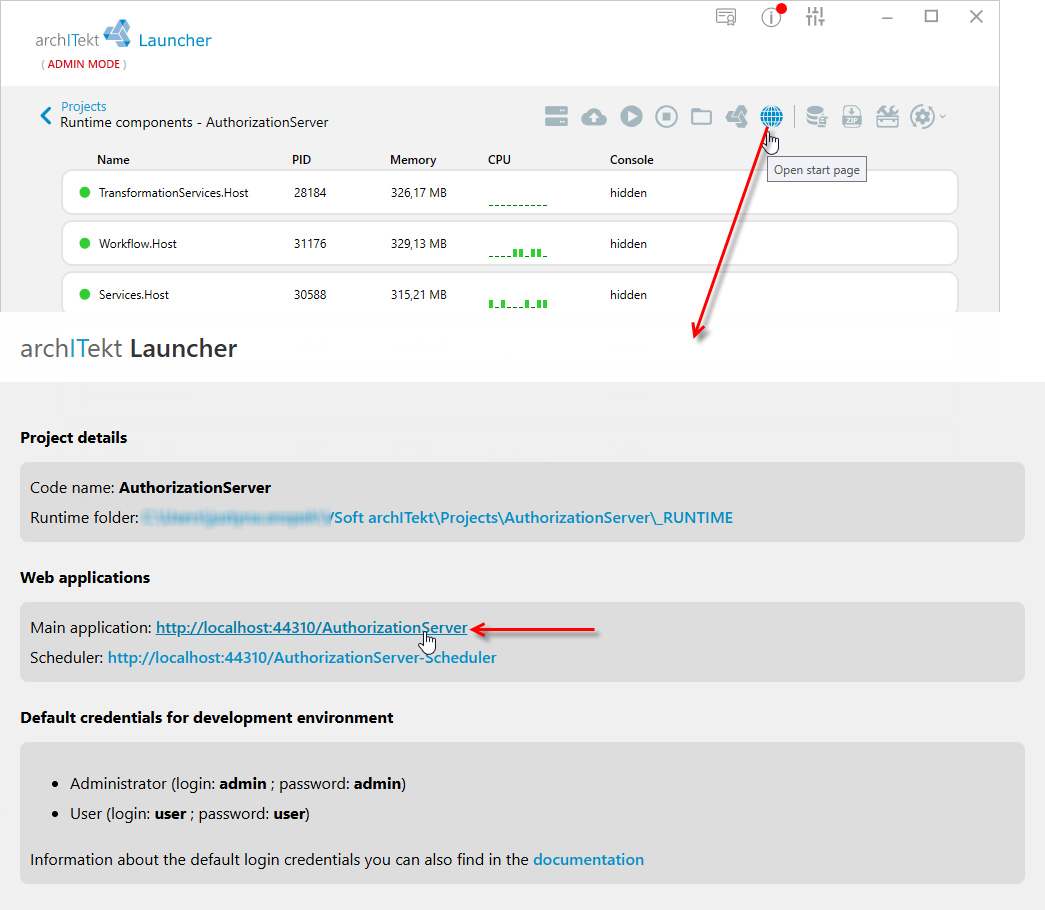
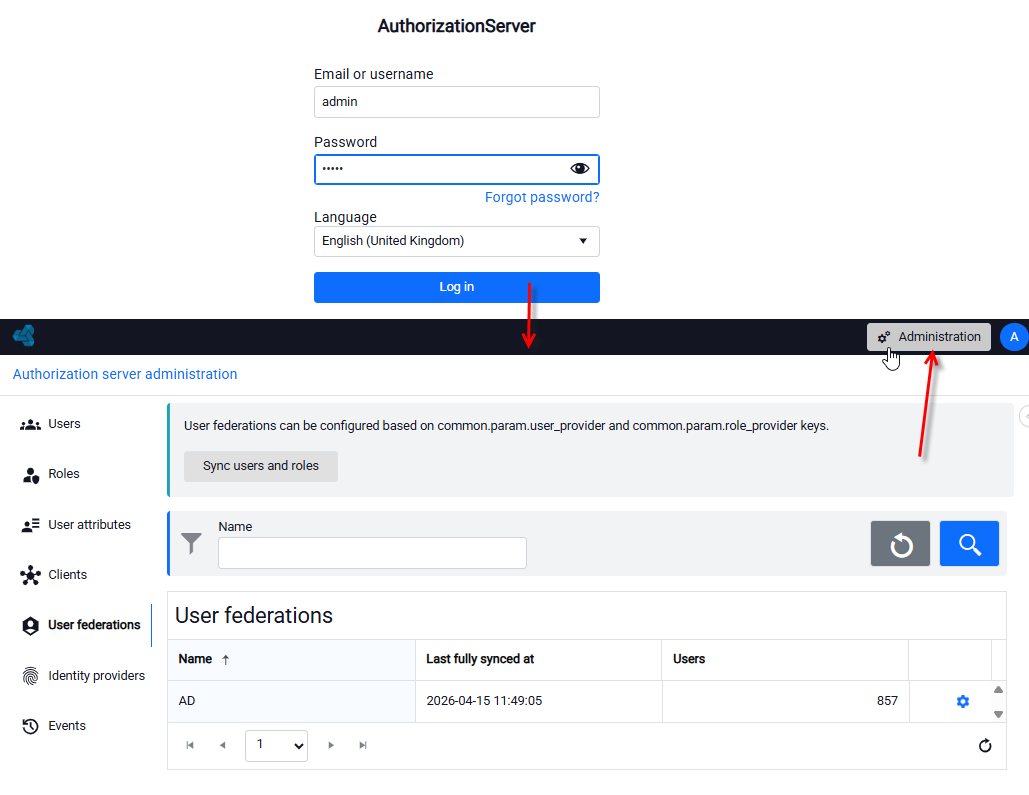
System access is available to the administrator after logging in to the web application.
- Go to VSoft archITekt Launcher and open the project page.
- Log in and navigate to the Administration panel.
What is OpenID Connect?
OpenID Connect (OIDC) is a modern authentication protocol that allows users to access multiple applications using a single set of login credentials. Its principle of operation resembles a "master key" — the user logs in once, and then gains access to all associated applications without having to re-enter credentials.
Key concepts
Authentication vs. Authorization
- Authentication answers the question: Who are you? — identity verification using a login and password.
- Authorization answers the question: What can you do? — determining permissions and access to resources.
Important terms:
- Token - A secure digital identifier confirming that the user has been authenticated — like a temporary pass.
- Client - An application that wants to authenticate a user (e.g., VSoft Scheduler).
- Scope - Defines what information or permissions are requested.
- Claim - Information about a user (e.g., email address, name, role).
- Grant - Permission to access resources, granted after successful authentication.
- Redirect URI - The web address to which the user returns after authentication.
- Logout redirect URI - The web address to which the user returns after logging out.
Authentication flows
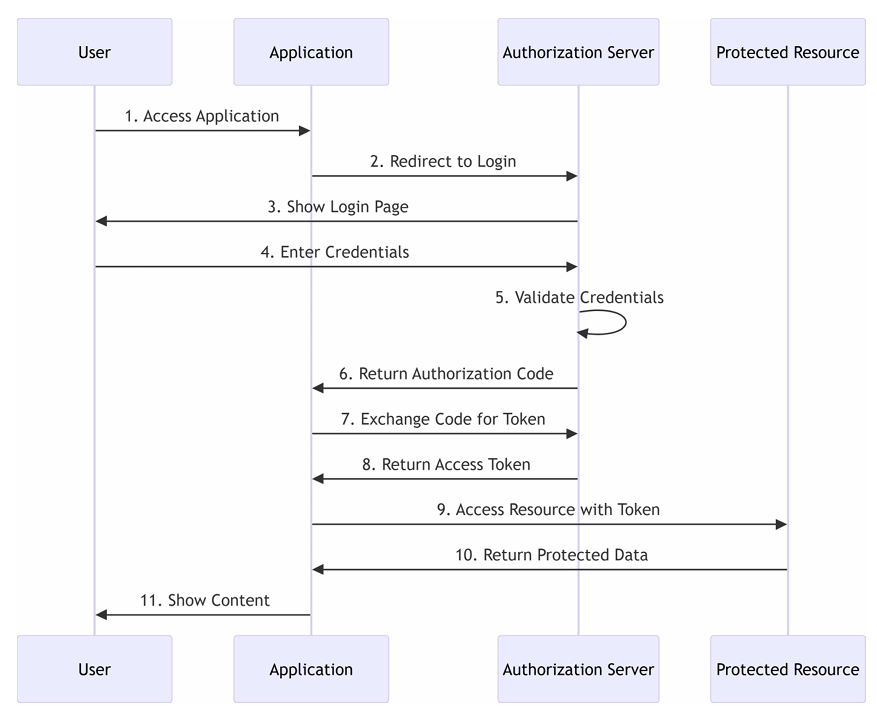
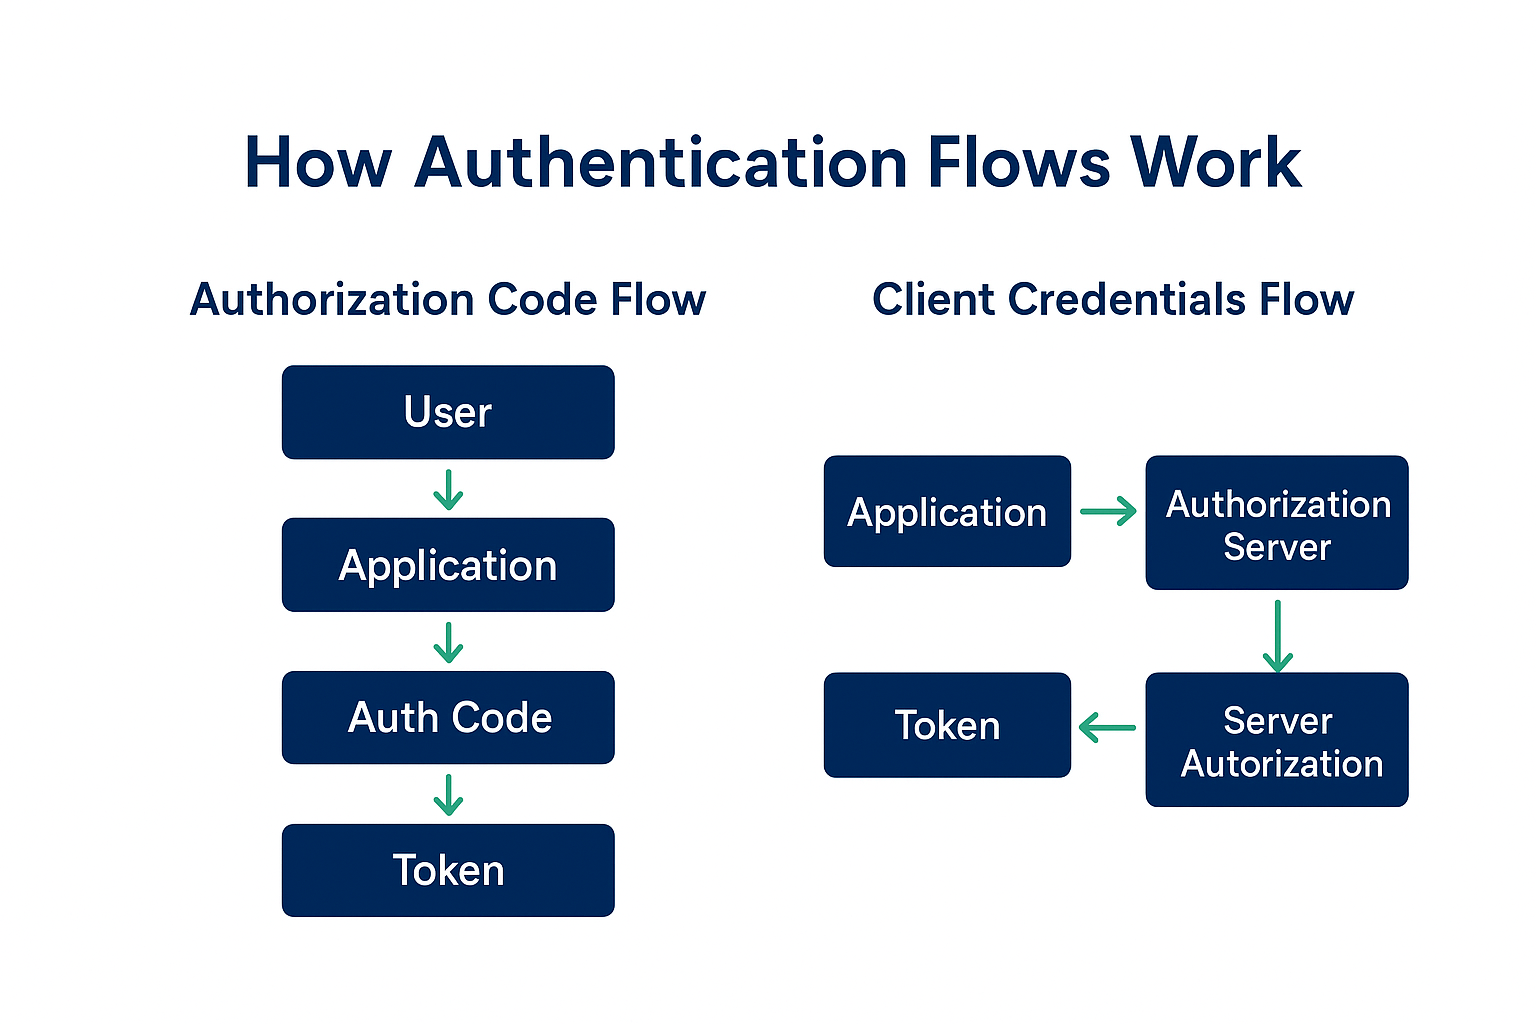
The authorization server uses different schemes (flows) depending on which application is requesting access to resources.
Authorization Code Flow
(Most commonly used example: Scheduler application)
- The user tries to access the application.
- The application redirects them to the authorization server.
- The user logs in by entering their username and password.
- The authorization server returns a temporary authorization code to the application.
- The application exchanges the code for an ID token and an access token.
- The application uses the received tokens to access protected resources on behalf of the user.
Client Credentials Flow
(Used for system-to-system communication; e.g., auth-api used by Workflow and VTS)
- The application authenticates without user involvement using a client ID and client secret.
- The authorization server returns an access token.
- This flow is mainly used for background tasks and service-to-service communication (API-to-API).
Users
The authorization server supports different types of users, each with specific characteristics and management capabilities.
User types
The system recognizes three different types of user accounts:
1. Local Users
- Local users are fully managed within the authorization server.
- Their credentials are stored locally, and they can independently change their password in the system.
- They provide full support for all functionalities, including Multi-Factor Authentication (MFA).
Typical use case:
internal employees and system administrators.
2. Federation Users
- Federation users are accounts synchronized from external directory systems (e.g., Active Directory) based on the
common.param.user_providerkey. - Passwords are managed exclusively in the external system, so there is no option to change them in the local system. The authentication process also takes place against the external directory.
- The system supports MFA, and user attributes and group memberships are synchronized during login or automatically (e.g., through data processing package tasks).
Typical use case:
corporate users utilizing existing directory infrastructure.
3. Identity Provider Users
- These accounts are linked to external identity providers (e.g., Google, Microsoft, Azure AD).
- Password management is handled entirely by the external provider, and the user cannot change their password in the local system. Authentication is delegated to the external system.
- In this case, local MFA is not available — multi-factor authentication mechanisms are handled by the identity provider.
Typical use case:
social login and B2B integrations.
Important notes
- Federation and IdP users change passwords exclusively in external systems
- IdP users cannot use local MFA because authentication takes place outside the system
- Local users offer the greatest flexibility and full functional support
Adding a local user
The most important data to enter are the basic user information and setting the password for the account.
- Click the Add user button.
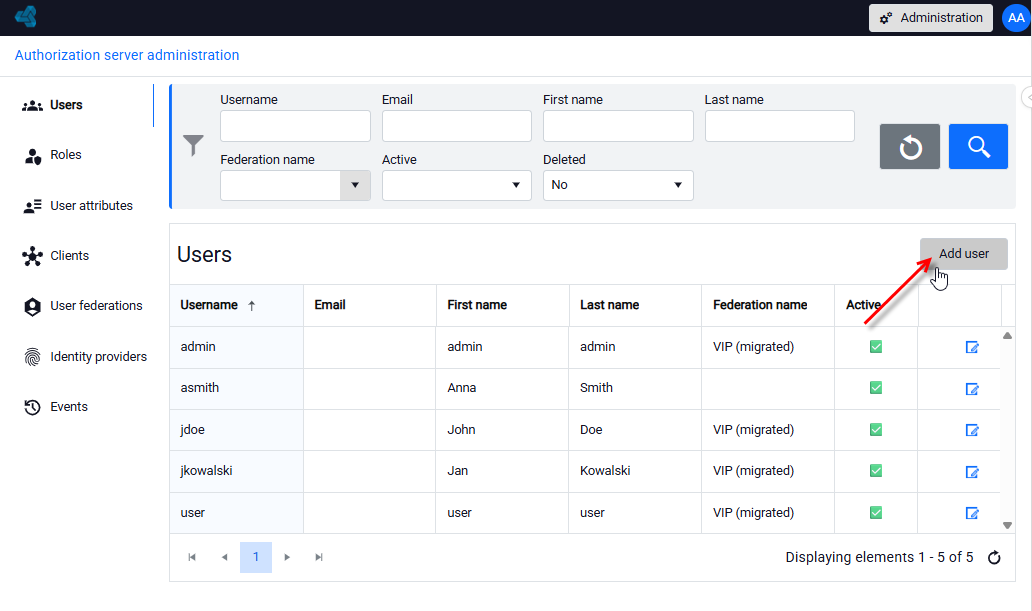
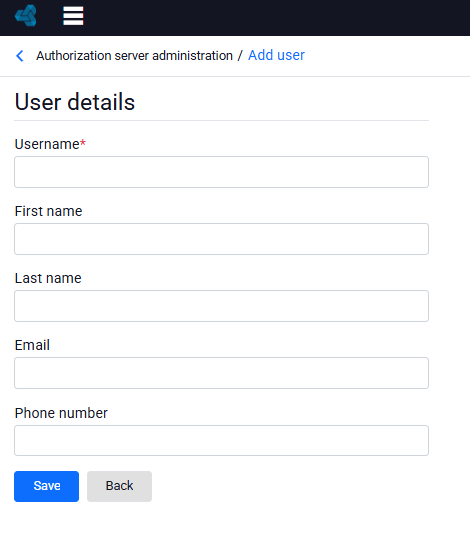
- In the next window, on the new account creation form, enter the basic data and click Save.
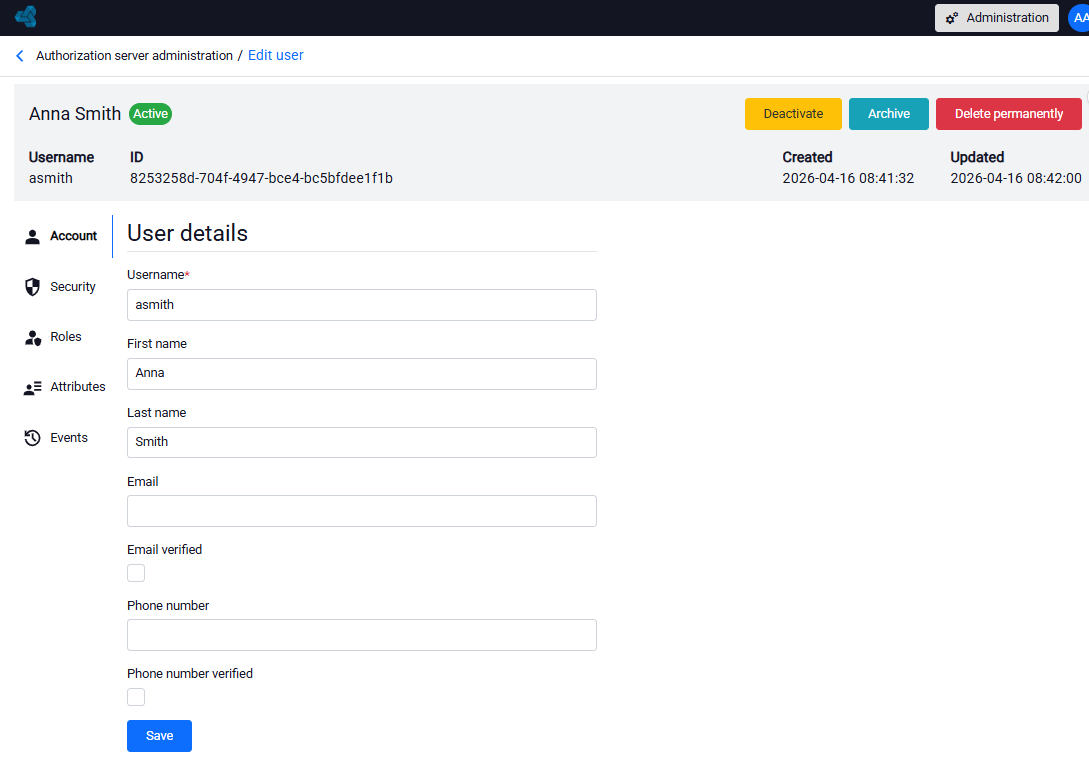
On the user edit screen, fields are available for managing basic data and verification status.
In particular:
- Email verified – this option allows you to indicate whether the user's email address has been confirmed.
- Phone number verified – similarly indicates whether the phone number has undergone the verification process.
Checking these fields indicates that the contact details have been confirmed and can be considered trustworthy (e.g., for system communication or security processes such as MFA).
- Confirm the changes made in the form by clicking the Save button.
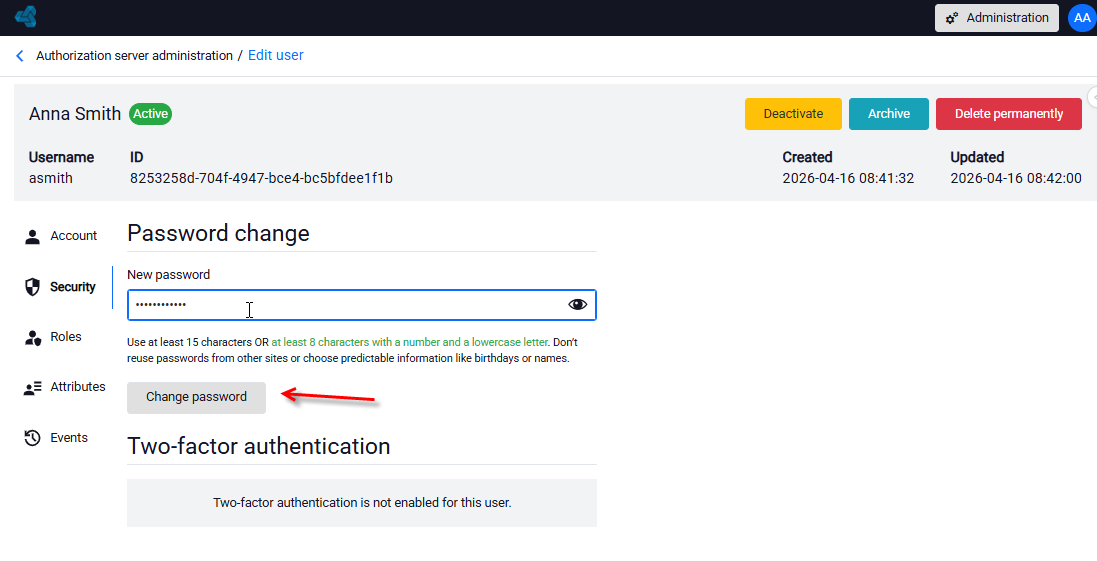
For the user to be fully active, a password must be set on the Security tab.
- Enter a password that complies with the password policy and click Change password.
Managing local users
Users who have been added locally in the authorization server (i.e., not originating from federation) can be managed directly by the administrator.
The administrator can perform the following operations on their accounts:
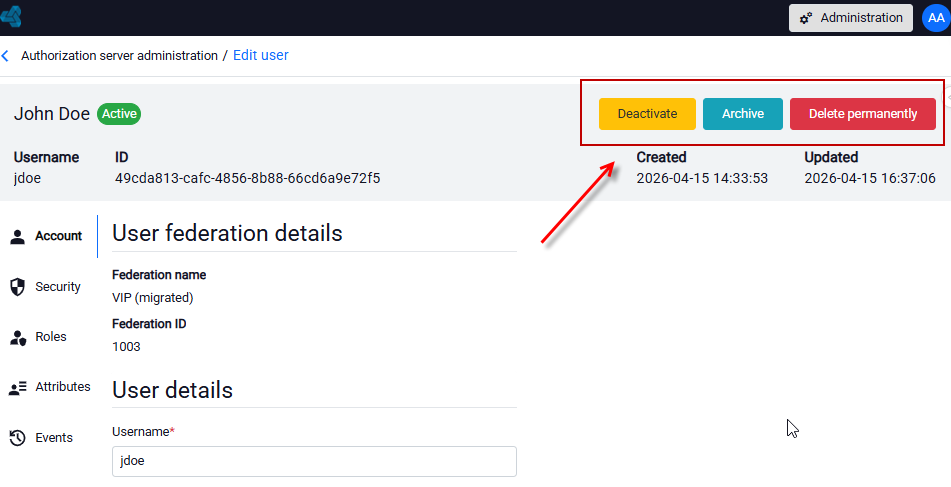
- deactivate the account – the user loses the ability to log in, but their data remains in the system; the user can be reactivated at any time,
- permanently delete the account – the user and all associations are completely removed from the database; this action cannot be undone,
- archive the account – the user's data remains available for audit purposes, but the account is not active; the user can be restored at any time.
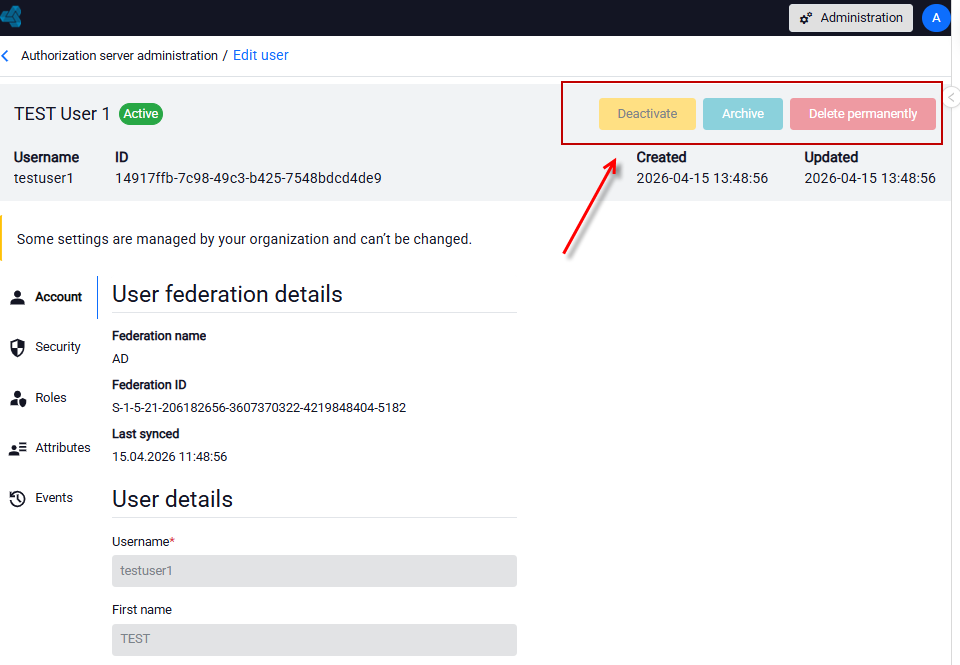
These operations are available exclusively to local users and users migrated from the previous VIP system.
Users retrieved from Azure AD (or another federation) are managed by the identity provider and cannot be deleted or edited locally.
Two-step verification
Every user, after logging into the system, can enable two-factor authentication for their account.
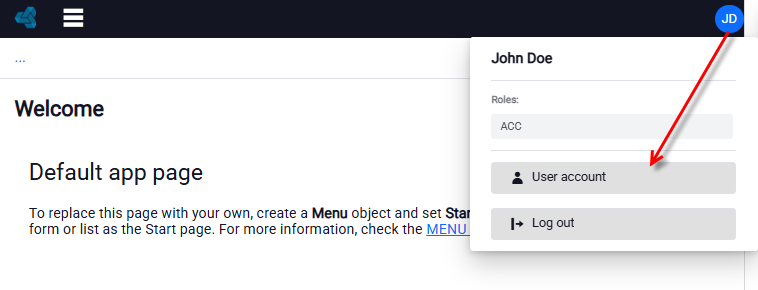
- Go to account settings and select User account.
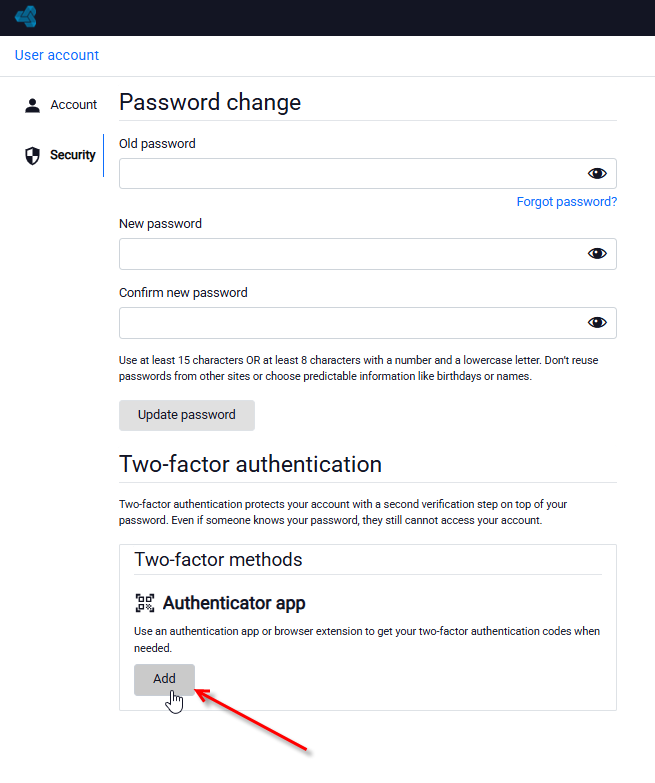
- Choose a verification method. In the Security tab, click Add in the Two-factor methods section. You can use:
- an authentication application,
- a browser extension.
Both solutions will allow generating codes needed for login.
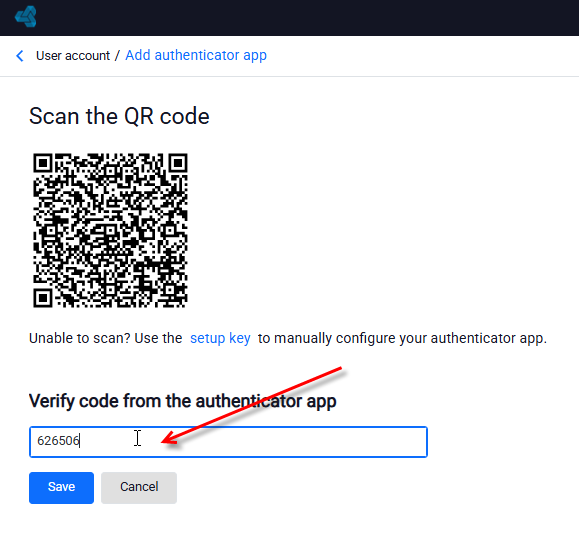
- Add an account in the authenticator application. Scan the QR code using the authenticator application.
- Enter the one-time code generated by the authenticator application and Save the data.
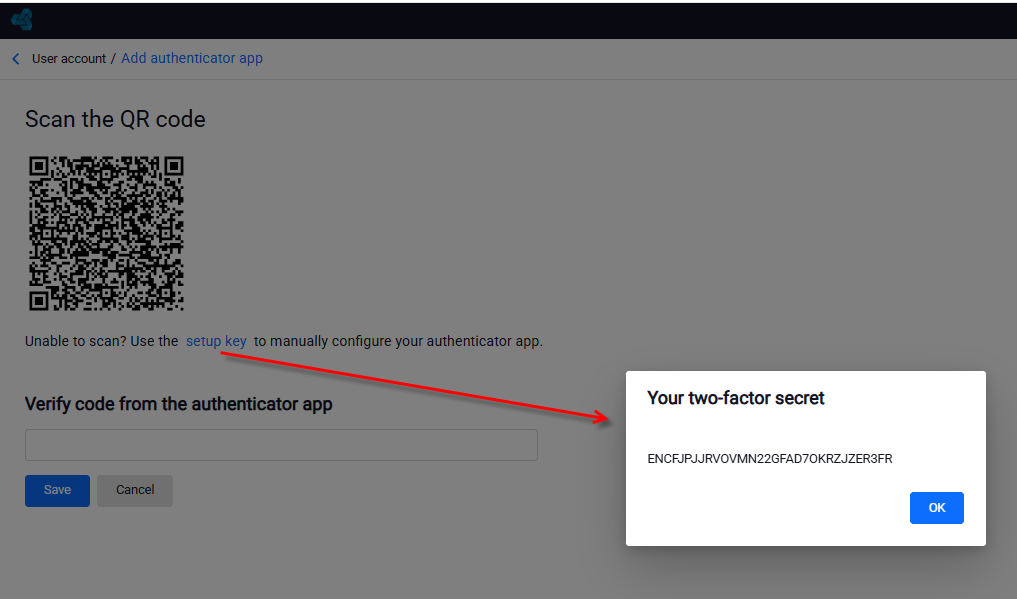
- If you cannot scan the code, click configuration key, copy it, and paste it into the application.
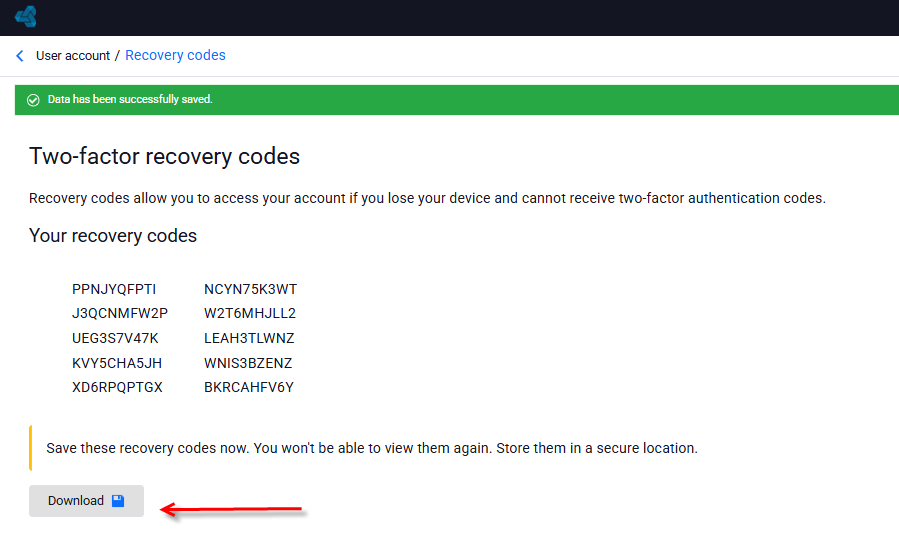
- After saving the changes, download the recovery codes. They will allow you to access your account in case of device loss or lack of access to the authenticator application.
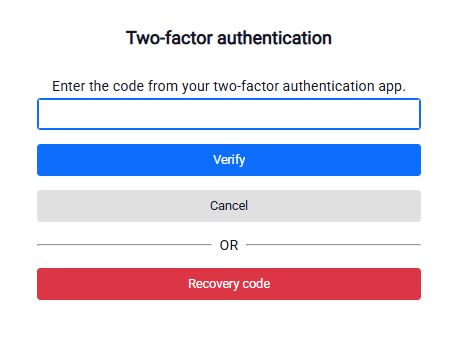
From now on, when logging into the system, after entering your login and password, you will see a window requiring the second verification step.
Enter the code from the authenticator application or — if needed — use one of the recovery codes (Recovery code option).
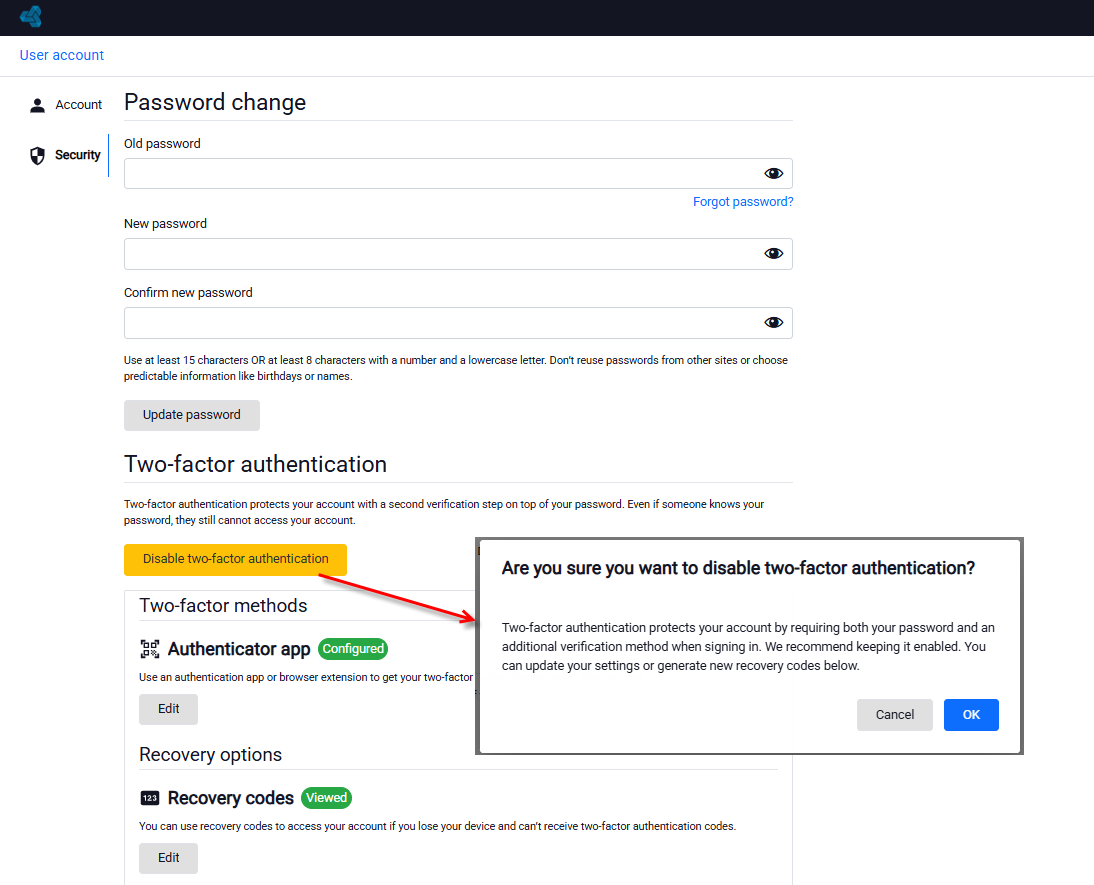
You can disable two-step verification at any time and generate new recovery codes.
- Go to your account details and the Security tab.
- Select the Disable two-factor authenticationoption.
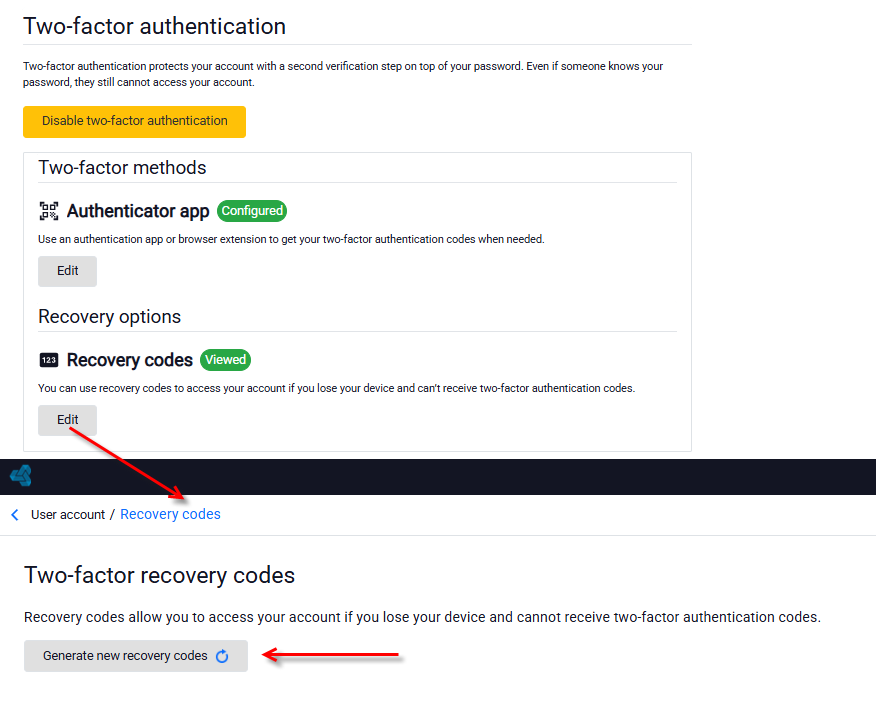
- Go to the Recovery codes section and select Edit.
- In the next window, select Generate new recovery codes.
It is best to download and save the codes, as they cannot be displayed a second time.
Change Password
To change your password:
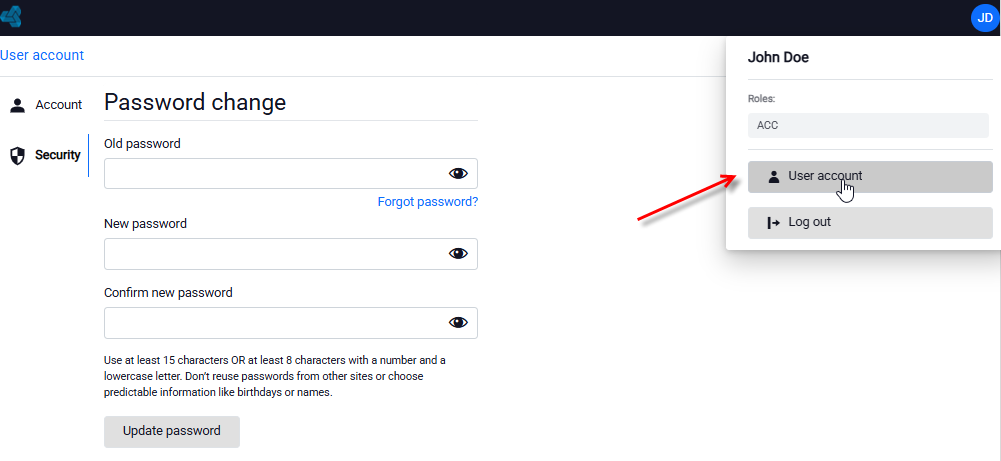
- In the upper-right corner, go to User account, then select the Security tab.
- In the Change Password section:
- enter your old password,
- enter a new password,
- confirm the new password.
- The password must meet security requirements (appropriate length and use of different character types).
- Click Update password to save the changes.
- If you do not remember your password, use the Forgot password? option.
Automatic migration of users and roles from the previous VIP system
If user accounts and assigned roles already existed in the previous VIP user and role management system, then after:
- downloading the current version of archITekt,
- upgrading (updating) the project,
the user and role data migration process is performed automatically.
After this migration, a federation marked as VIP will appear in the User federations module.
This confirms that user data has been imported from the previous system and is operating in federation mode.
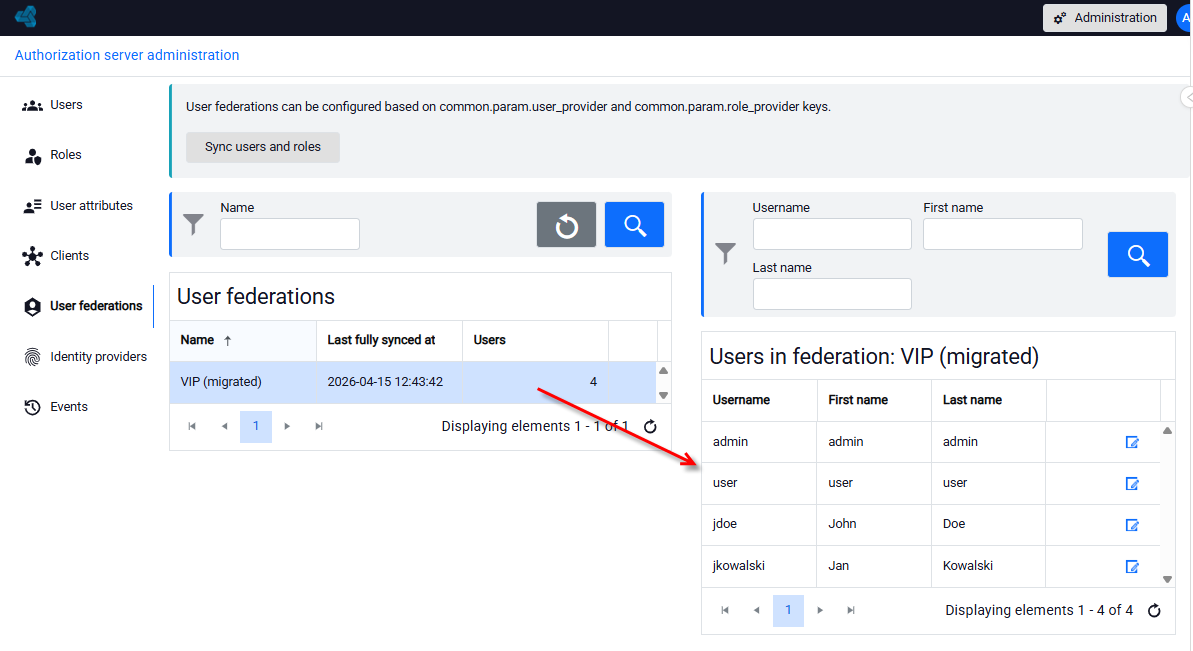
The list of user accounts is visible to the administrator after each user logs into the system.
This means that the account appears in the administration panel only when the user performs their first login.
Automatic password security upgrade (rehash to Argon2id)
At the moment of user login, the system automatically rehashes their password, converting it to a more secure algorithm: Argon2id. This is a modern, recommended password hashing algorithm that provides:
- a high level of resistance to dictionary and brute-force attacks,
- memory-hard protections,
- compliance with current security standards.
The rehashing process occurs:
- automatically,
- without user involvement,
- only at the first login after the system update,
- without requiring the user to change their password.
After completion, the password is stored in the database in Argon2id format. You can verify this in the USER_ACCOUNT table.
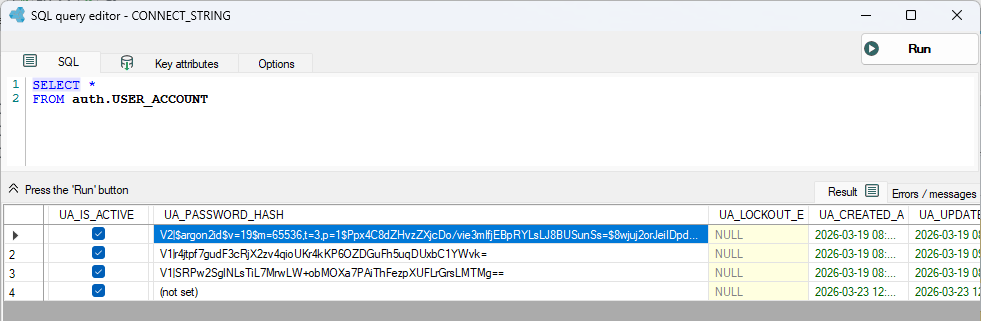
Configuring the connection to Azure AD for retrieving users
To properly configure user federation with Azure AD and enable retrieving users to the authorization server, two stages of actions must be performed: in VSoft archITekt Launcher and in the authorization server.
1. Configuration in VSoft archITekt Launcher
Before configuring user federation in the authorization server, it is necessary to add the appropriate configuration keys on the environment side.
- Go to VSoft archITekt Launcher and open the project reconfiguration page.
- In the Modify Config Keys section, select the Edit config keys option.
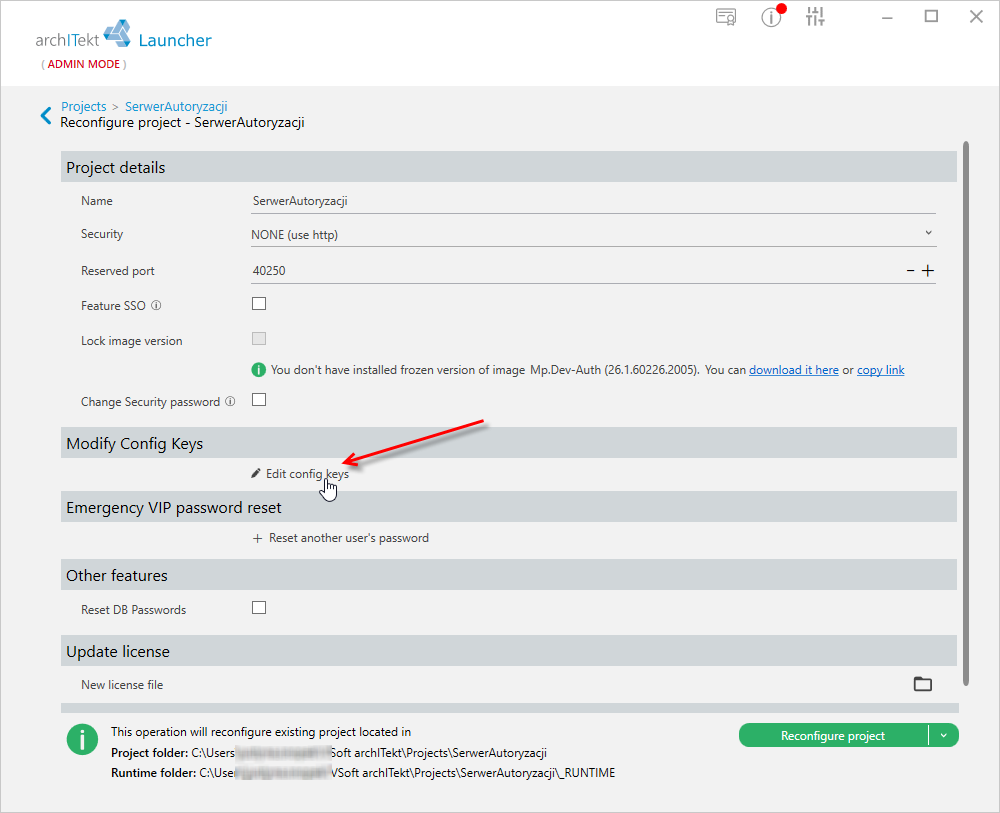
- From the Features list, select: Configure the connection to the AD server.
- Then fill in the required configuration keys to establish a proper connection to the Active Directory service.
- After entering the data, click OK, and then select Reconfigure project to save and apply the changes.
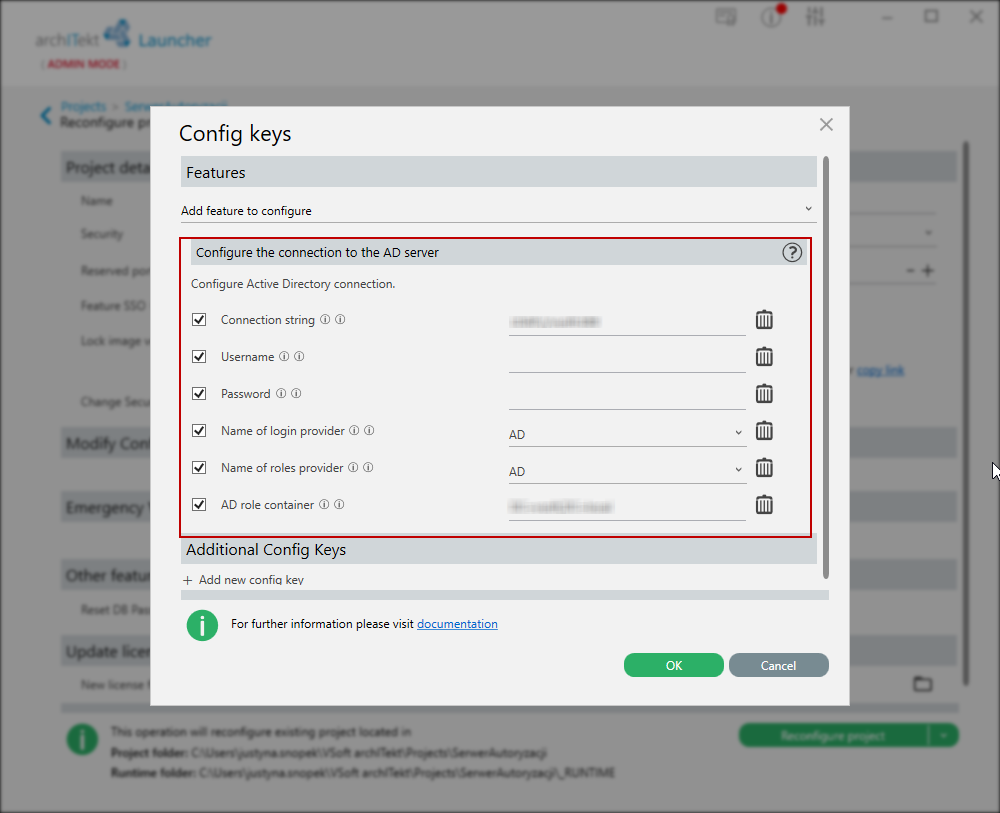
Without properly filling in the keys, user federation will not work, and synchronization will fail with an error.
2. Synchronization in the authorization server
After properly filling in the configuration keys, perform data synchronization.
- Log in as an administrator and go to the authorization server.
- Open the User Federations tab.
- Then click the Sync users and roles button.
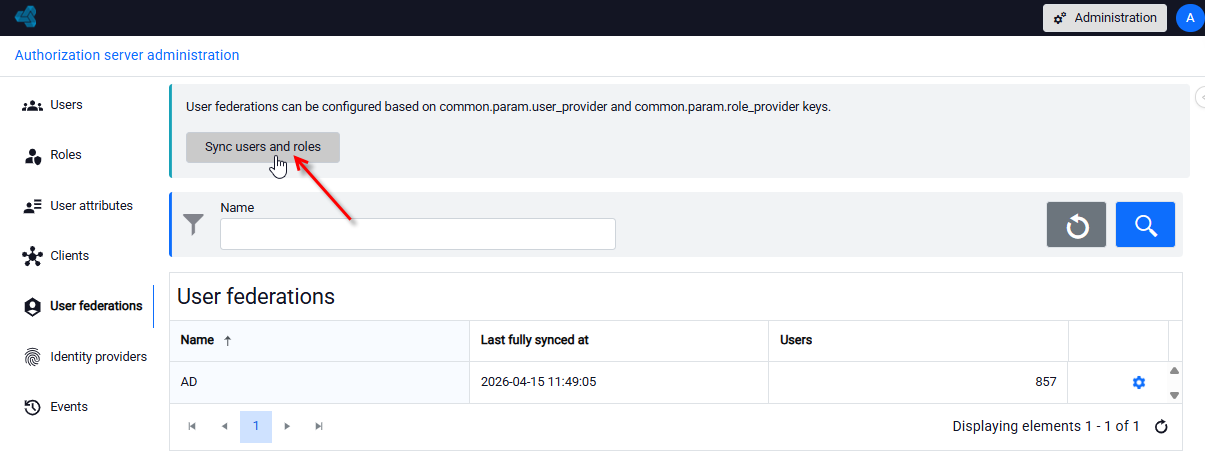
The button triggers the execution of the appropriate processing package, which is located in the System directory in the archITekt Studio application.
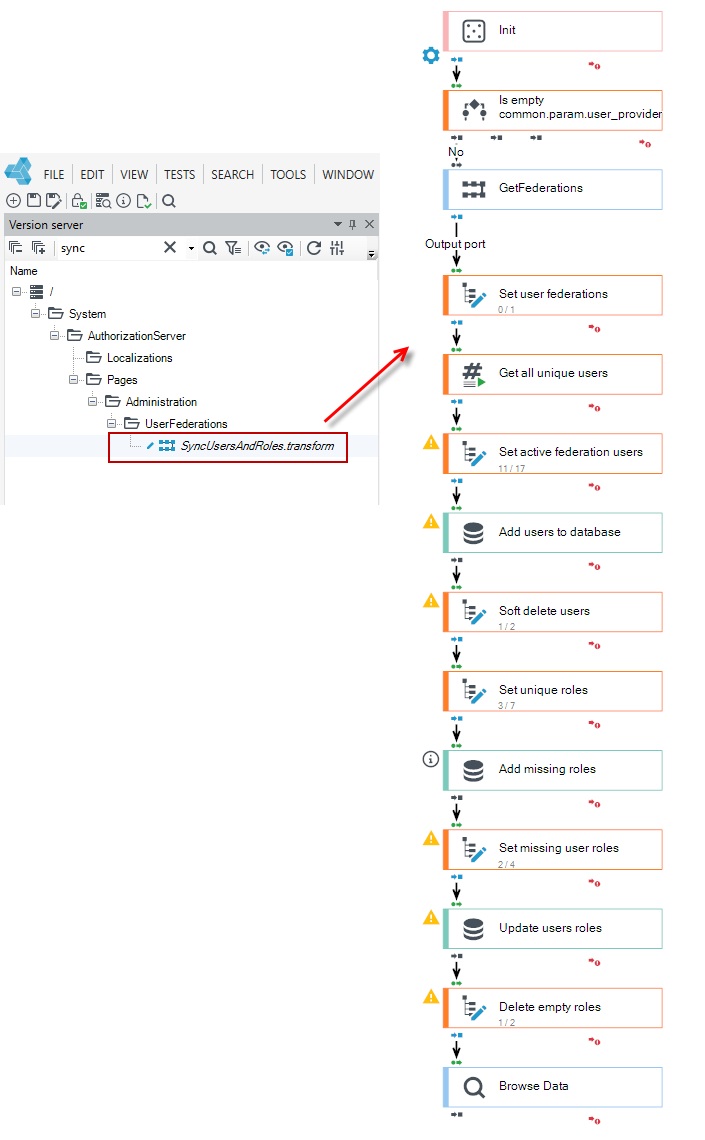
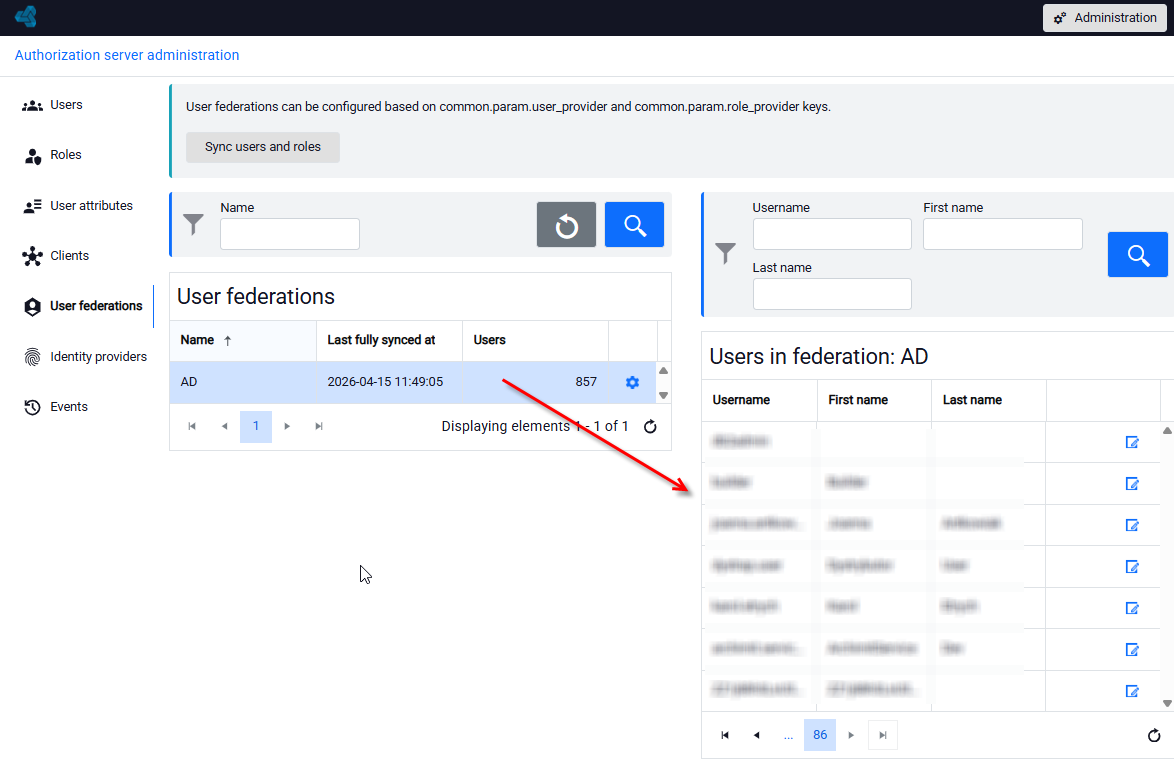
After synchronization:
-
users will be retrieved from Azure AD,
-
data will be saved in the authorization server,
-
the Last fully synced at column will be updated,
-
the Users in federation counter will show the current number of records.
-
Go to the User federations tab and select the AD entry on the federation sources list.
-
After selecting it, a list of all users retrieved from Active Directory will be displayed on the right side.
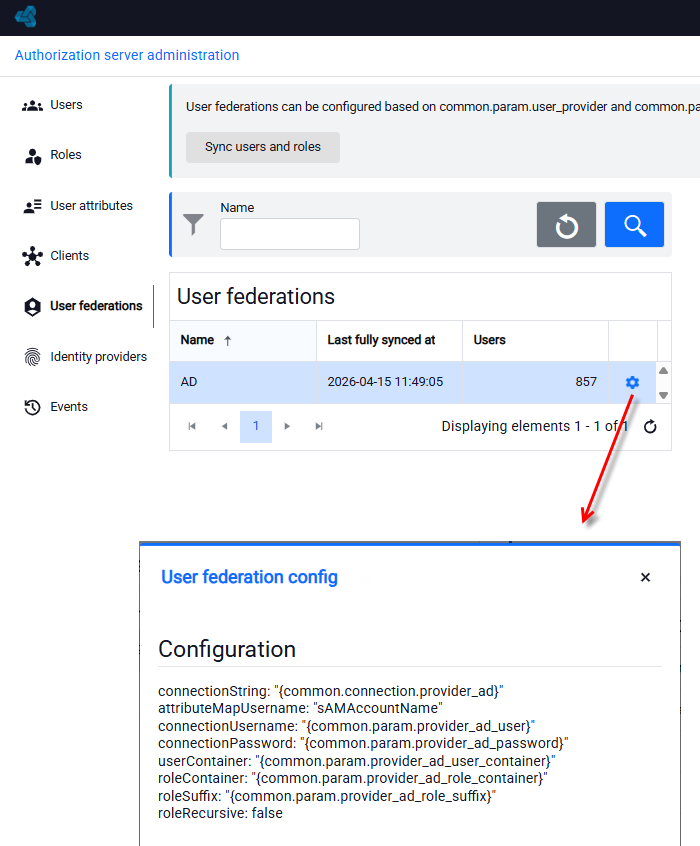
- To preview the configuration details of the selected user federation, there is a preview button in the last column of the row.
- Click this button — you will be taken to a screen where the configuration keys are displayed.
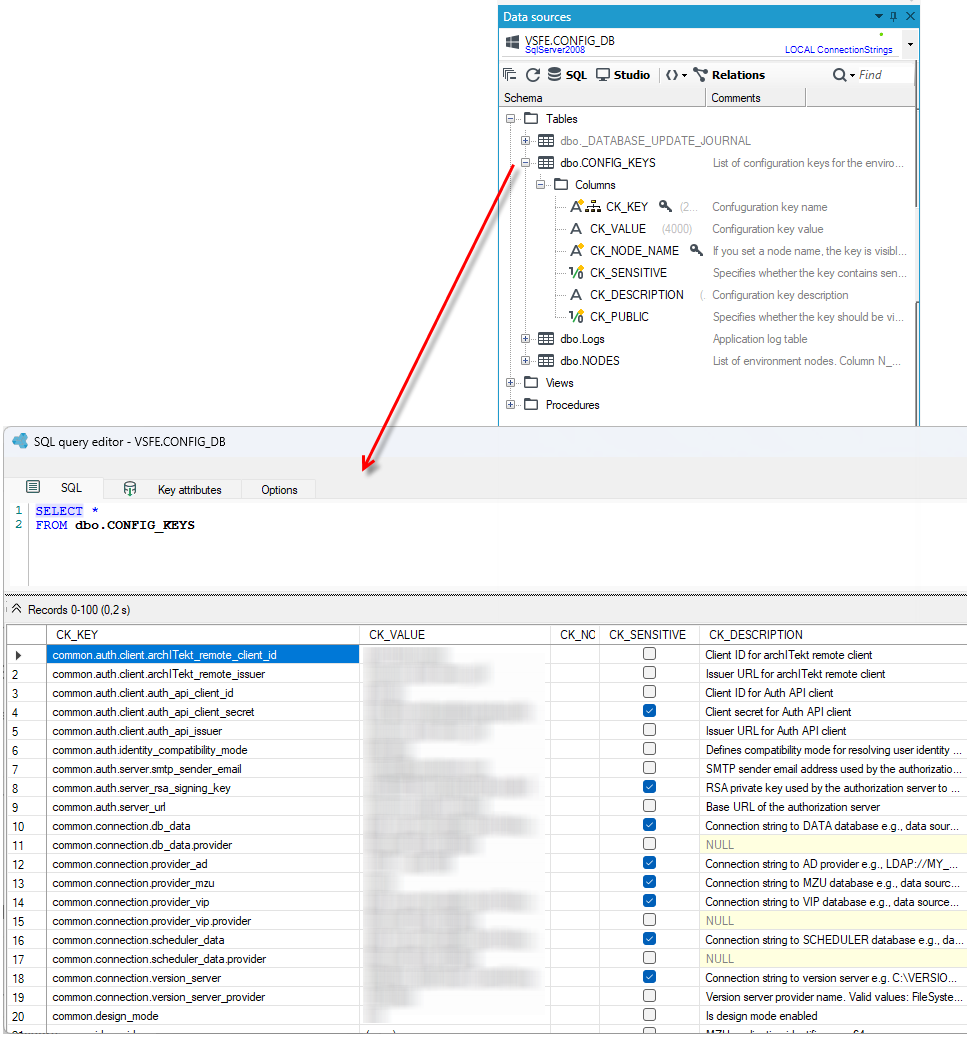
All configuration keys can be found in the CONFIG_DB database in the CONFIG_KEYS table.
Roles
Roles determine what a user has access to in the system. They can be assigned to users to control their permissions.
The system supports two types of roles:
1. Local roles
Local roles are created and managed entirely within the authorization server:
- you can create, edit, and delete them independently
- they are used to grant application-specific permissions
- they give full control over who has access to specific features
When to use?
When you want to manage access within applications (e.g., administrator, editor, user).
2. Federation roles
Federation roles originate from external directory systems (e.g., Active Directory) and are automatically synchronized.
- they are created and updated automatically through directory synchronization
- they cannot be edited or deleted in the local system
- they reflect security groups or roles from the source directory based on the
common.param.role_providerkey - they reflect the organizational structure (e.g., departments, groups)
When to use?
When you are using an existing company structure and want to map it in the system.
Important information
Federation roles are read-only in the local system — changes should be made in the source directory.
Synchronization automatically updates role memberships and can add or remove roles.
A user can have both local and federation roles simultaneously.
Role assignment is based on the principle: local roles are for application logic, and federation roles are for organizational structure.
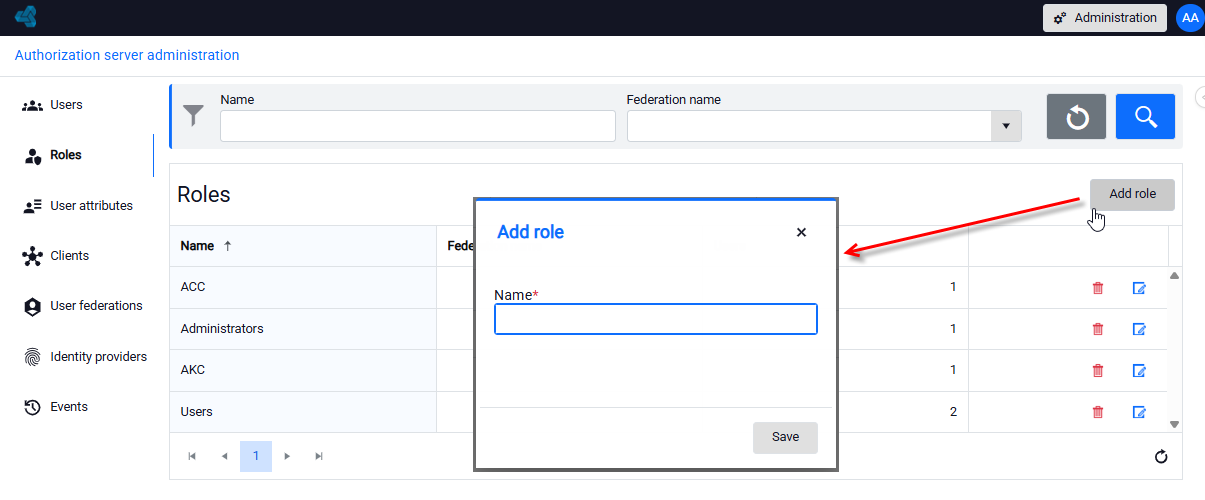
Adding a local role
To add a new local role in the authorization server:
- go to the Roles tab,
- click the Add role button,
- enter the role name and Save the data.
Assigning a local role to a user
Locally added roles can be assigned to both local accounts and federation accounts (e.g., those retrieved from Azure AD).
To assign a role to a user, follow the steps below:
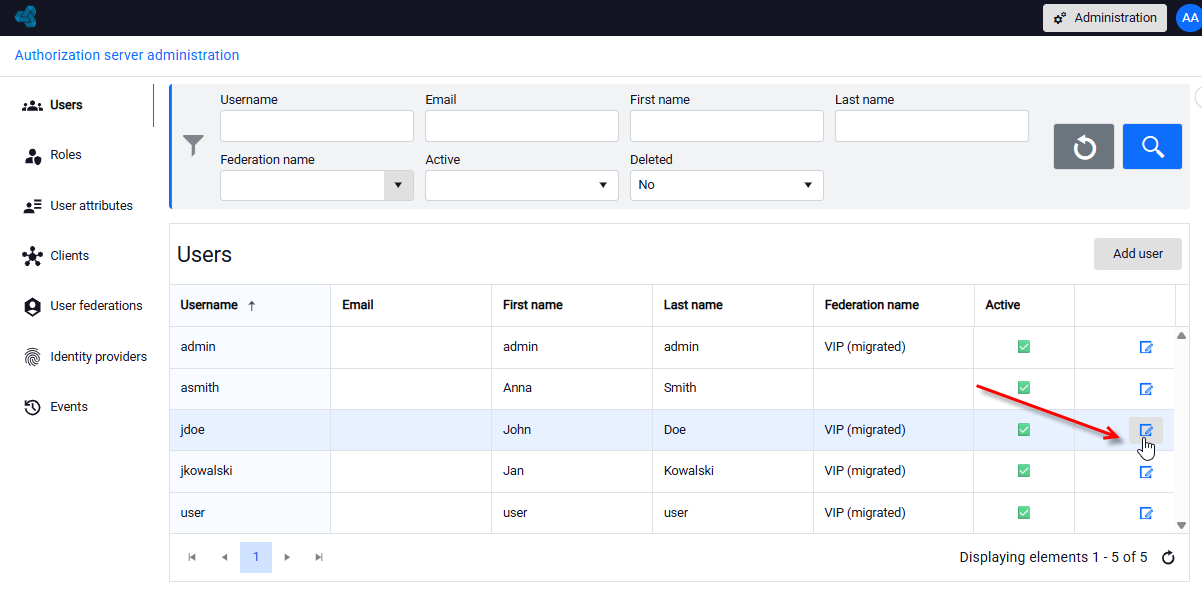
1. Go to the user list
- Log in to the authorization server as an administrator.
- Open the Users tab.
- There you will find the complete list of all accounts:
- local,
- federation (e.g., from Azure AD),
- from VIP migration.
2. Open user details
In the users table:
- Find the appropriate account.
- In the last column, click the details button.
- This will open the full user information.
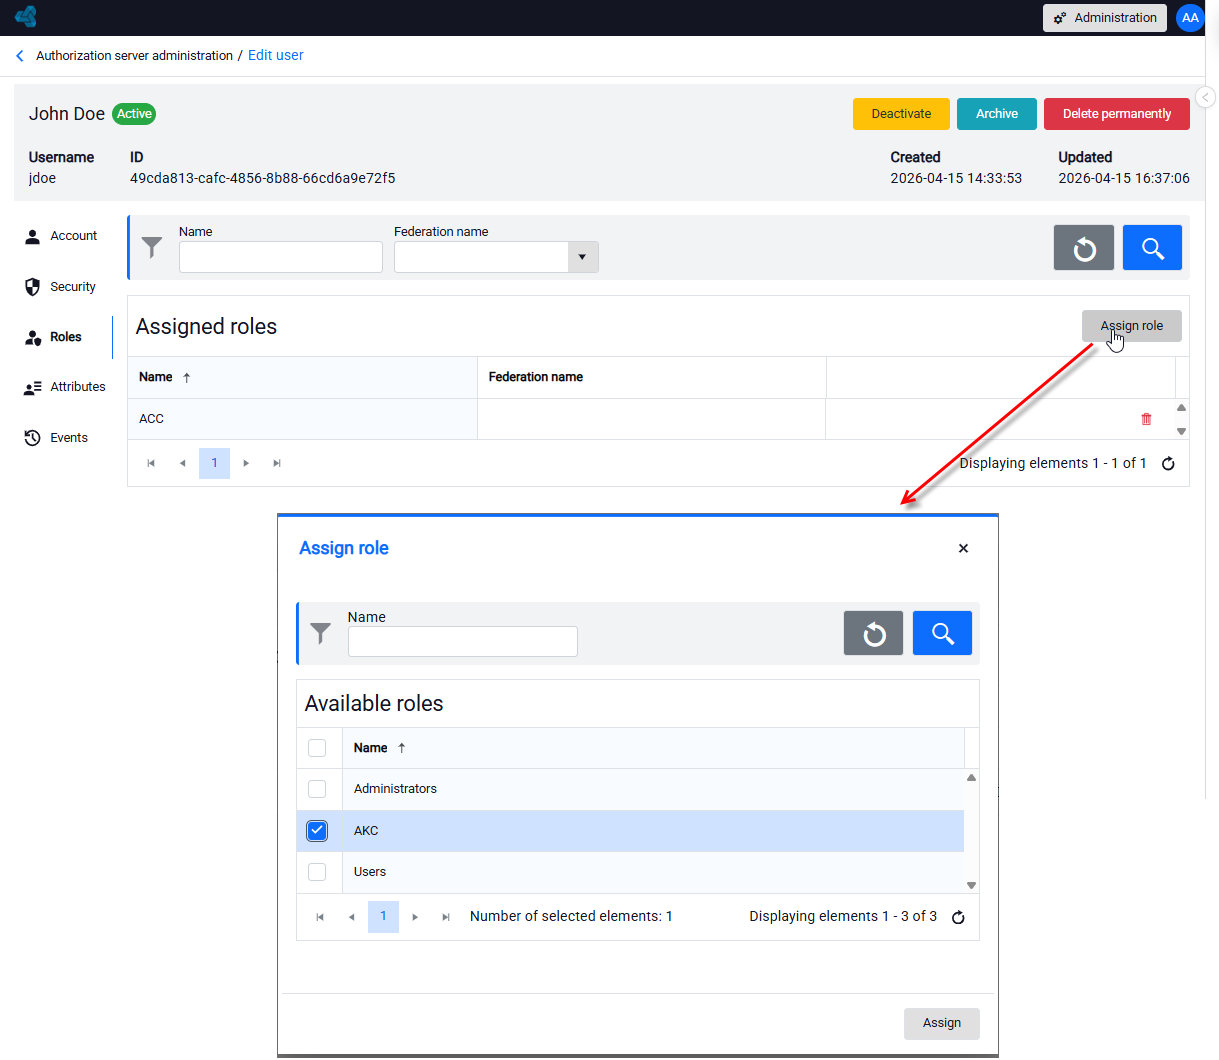
3. Go to the Roles tab and select roles to assign
In the user account details view:
- Open the Roles tab.
- Click the Assign role button.
- On the list of available roles, select the roles you want to assign to the user.
- Click Assign.
The role will be immediately added to the user and will be visible in their profile.
Local roles can be assigned to any account, regardless of its origin source.
Federation roles (if they exist) are assigned automatically based on federation and cannot be removed locally.
After assigning a role, the user immediately gains the appropriate permissions in the system.
Best practices for user and role management
Choosing the appropriate user type:-
- Use local users for system accounts, testing, or when no external directory exists.
- Use federation users when integrating with corporate directories and centralized password policies.
- Use IdP users for social login, external partners, or when leveraging existing identity providers.
Role management strategy:
- Use local roles for application-specific permissions that do not exist in external systems
- Use federation roles to leverage existing organizational structures and security groups
- Combine both types to create flexible access control: federation roles for organizational membership, local roles for application features.
Security considerations:
- Federation and IdP users inherit password policies from external systems
- For local users, enforce strong password policies at the authorization server level
- Regular synchronization ensures that federation users and roles are up to date with the source directory
- When choosing between local and IdP authentication methods, consider Multi-Factor Authentication (MFA) requirements
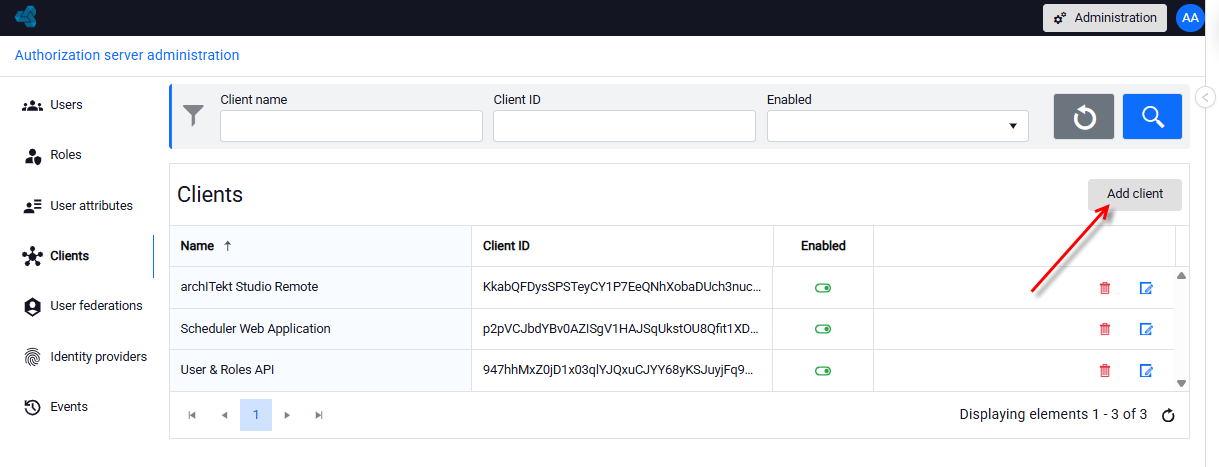
Clients
On this page you will find all applications (clients) that use login through the authorization server.
An active (enabled) client can be used for login. If you want to temporarily block access, disable the client instead of deleting it.
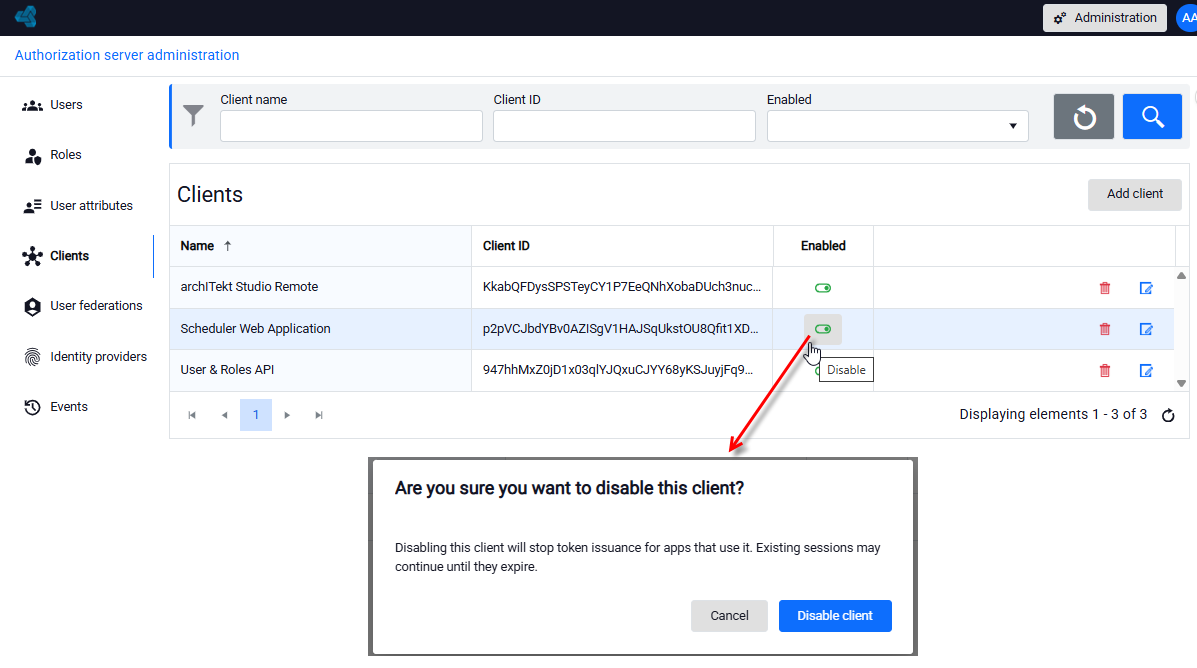
Application client configuration
- Click Add client to configure a new application.
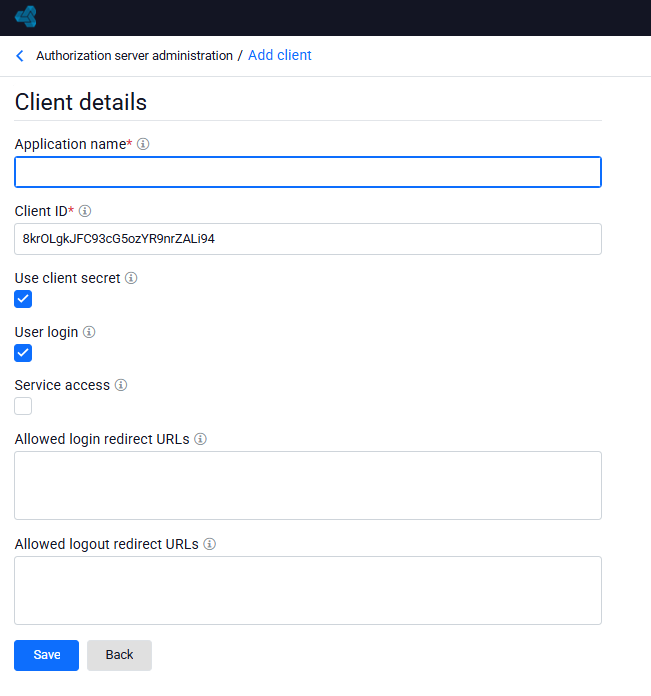
On this page, you add or edit an application (client) that will use login through the authorization server.
Basic information
- Application name – enter a clear and descriptive name for the application (e.g. “User Panel”, “System API”).
- Client ID – a unique identifier of the application (generated automatically or assigned manually).
Authorization Method
- Use client secret – when enabled, the client will be authenticated using a client secret. This option is most commonly used for server-side applications and is recommended for applications that require a higher level of security.
- User login – allows users to log in and grant the application access on their behalf.
- Service access – allows the application to access resources without a logged-in user.
Redirect addresses
- Allowed login redirect URLs - Enter the addresses to which the user will be redirected after login. They must exactly match the addresses in the application (for security reasons).
- Allowed logout redirect URLs - Add addresses to which the user will be directed after logout. E.g., the home page or logout confirmation screen.
- Addresses must be separated by commas.
The system supports multiple applications:
archITekt Remote Client
- Flow: Authorization Code + PKCE
- Keys:
common.auth.client.archITekt_remote_issuercommon.auth.client.archITekt_remote_client_id
Auth API Client
- Flow: Client Credentials (without user involvement)
- Keys:
common.auth.client.auth_api_issuercommon.auth.client.auth_api_client_idcommon.auth.client.auth_api_client_secret (sensitive)
Scheduler Client
- Flow: Authorization Code + PKCE
- Keys:
scheduler.auth.client.issuerscheduler.auth.client.client_idscheduler.auth.client.client_secret
User federations
User federation enables automatic synchronization of accounts and roles from external systems (e.g., line-of-business systems, LDAP, IdP, or databases) to the authorization server.
Thanks to federation, the administrator does not have to manually add users — they are imported and updated according to the source configuration.
User and role synchronization
At the top of the page, there is a Synchronize users and roles button. It enables manually triggering the synchronization process across all federations.
After clicking, the system:
- retrieves users from the external source,
- updates their data,
- refreshes assigned roles,
- saves the synchronization result.
Synchronization may take from a few seconds to several minutes — depending on the number of users and the performance of the data source.
Based on the screen, you can:
- check whether synchronization is working,
- determine when it last ran successfully,
- verify the number of imported users,
- detect issues (e.g., lack of synchronization or change in user count).
After migrating data from the previous user and role management system, the VIP migration federation will be visible on the list. If you configure user retrieval from AD, the AD federation will be visible.
After migrating data from the previous VIP user and role management system, the following federation will appear in the User Federations section:
- VIP (migration) - This means that user accounts and their roles have been correctly transferred from the previous system and are operating in migration federation mode - see: Automatic migration of users and roles from the previous VIP system.
- AD - If you configure user retrieval from Azure AD in the system. It indicates that the system has a federation based on Azure Active Directory, and users are retrieved from it automatically according to the configuration - see: Configuring the connection to Azure AD for retrieving users.
Both federations can coexist simultaneously in the system.
The administrator can at any time access the federation details to verify the number of users and the date of the last synchronization.
Identity Providers
Identity Providers (IdP) are systems or services that authenticate users and provide information about their identity to other applications or services.
What do identity providers do?
- They verify whether the user provided correct login data (login/password, token, certificate, etc.).
- They pass user information to applications (e.g., name, role, permissions).
- They enable Single Sign-On (SSO) across multiple applications.
Examples of identity providers:
- Google – login via Google account
- Microsoft / Azure AD – login via Microsoft or organizational account
- Facebook, GitHub – social login
- Keycloak, Okta, Auth0 – corporate and enterprise tools
Why are they important?
- They simplify user management
- They increase security (MFA, password policies)
- They facilitate application integration within a company or service ecosystem
Identity provider configuration enables users to log into the system using an external OAuth/OIDC server (e.g., Azure AD, Entra ID, Keycloak, Auth0, etc.).
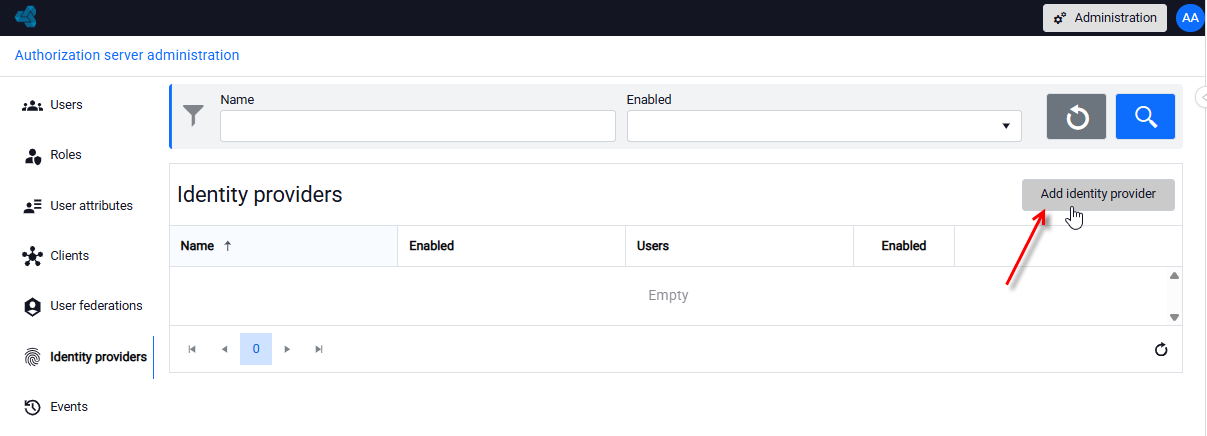
- Go to the Identity providers menu and select Add identity provider.
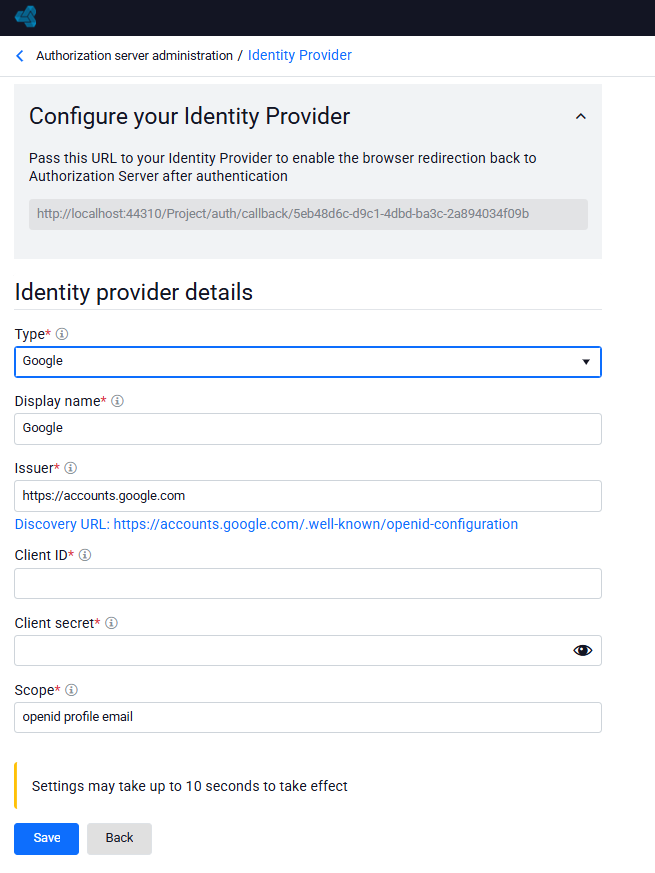
- Pass the callback URL to the identity provider. At the top of the screen, the address is displayed that must be copied to the configuration in the external IdP: http://localhost:44310/Project/auth/callback/5eb48d6c-d9c1-4dbd-ba3c-2a894034f09b
- In the Identity provider details section, fill in the following fields:
- Type – select the identity provider through which users will be able to log in. You can also choose OpenID Connect to configure your own provider.
- Display name – the name visible to users when selecting a login method. It should be short and easy to recognize.
- Issuer – the URL of the identity provider. The server uses it to verify the provider and validate user sign-ins.
- Client ID – a unique identifier assigned to your application by the identity provider. It identifies the application during user authentication.
- Client secret – a secret key issued by the identity provider. It works together with the Client ID to confirm that the application is trusted. Never share it publicly.
- Scope – defines which user information the application will retrieve from the provider, such as a name or email address
After saving:
- Log out of the application.
- Try logging in again by selecting the configured identity provider.
- If an error occurs — the most common causes are:
- The issuer does not match the OIDC configuration.
- The redirect URL has not been added in the identity provider (IdP).
- Incorrect secret or client ID.
Database structure
The authorization server stores all data in an SQL database. The database is organized into logical groups of tables, each serving a specific function.
The database contains tables divided into the following categories:
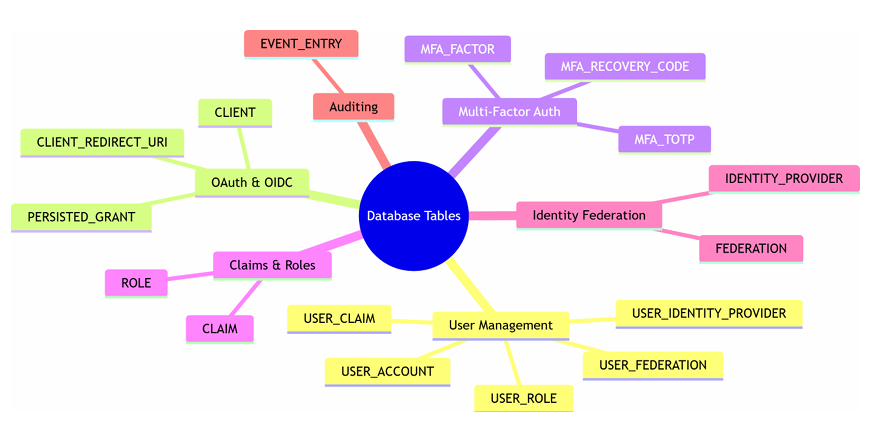
User management tables
USER_ACCOUNT- Stores basic user account information such as username, email, and hashed password. Tracks account status (active, temporarily locked, deleted) and the security stamp for session invalidation.USER_CLAIM- Associates custom attributes with user accounts. Enables storing flexible user data beyond standard profile fields, such as department, room number, or custom business attributes.USER_ROLE- Links users to roles for role-based access control. A single user can have multiple roles, and the table tracks these associations.USER_FEDERATION- Links user accounts to external directory systems (e.g., Active Directory). Stores the user identifier in the external system and synchronization metadata, maintaining a one-to-one relationship between the local user and the directory entry.USER_IDENTITY_PROVIDER- Links user accounts to external identity providers (e.g., Google, Microsoft). Enables social login scenarios.
OAuth 2.0 and OpenID Connect tables
CLIENT- Defines applications that can authenticate users through the authorization server (e.g., Scheduler). Stores client credentials, allowed authorization flows, and application configuration.CLIENT_REDIRECT_URI- A whitelist of allowed addresses to which the user can be redirected after authentication. Prevents open redirect attacks.
The system supports two types of redirect addresses:
Authentication Redirect URI (Callback)
- Used after successful login
- The application receives the authorization code at this address
- Multiple addresses can be configured for different environments (dev, staging, production)
Example: https://company.com/auth/callback
Logout Redirect URI
- Used after user logout
- Redirect after session termination
- Enables displaying a confirmation or redirecting to the home page
Example: https://company.com/logged-out
Each application should have at least one Authentication Redirect URI. Logout URIs are optional but recommended.
PERSISTED_GRANT - Stores security data issued during authentication, such as authorization codes or password recovery tokens. Tracks creation time, expiration, and possible revocation.
Multi-Factor Authentication (MFA) tables
MFA_FACTOR- Represents MFA methods assigned to a user. Supports multiple MFA devices for a single user.MFA_TOTP- Stores Time-based One-Time Password (TOTP) configuration for applications such as Google Authenticator or Microsoft Authenticator. Contains the secret key and algorithm settings.MFA_RECOVERY_CODE- Backup codes enabling account access in case of loss of the primary MFA device. Each code can be used only once.
Claims and roles tables
CLAIM- Defines available attribute types (String, Int, Decimal, DateTime, Boolean) that can be assigned to users. Claims represent user data, permissions, or other information included in tokens (e.g., department, access level).ROLE- Stores role definitions used in access control. Roles can be assigned to multiple users and optionally originate from external systems (e.g., Active Directory).
Identity federation tables
FEDERATION- Configuration of external user directories (primarily Active Directory).IDENTITY_PROVIDER- Configuration of external OpenID Connect identity providers. Stores issuer addresses and client data, among other information.
Audit tables
EVENT_ENTRY- Security event log covering successful and failed logins, client authorizations, and errors. Contains information about time, user, IP address, browser, and event details.
Authorization server configuration
The authorization server uses configuration keys to control its operation. These settings allow customizing the system's behavior without modifying the code.
Basic system configuration
Authorization server URL
- Key:
common.auth.server_url - Purpose: Sets the base URL of the authorization server. This is the address users navigate to during login.
- Default: the public web interface address is used.
- Impact: all authorization-related redirects and token issuance use this address.
Server operation mode
- Key:
www.auth.server.mode - Purpose: Determines whether a given instance operates as an authorization server or as a client connecting to another server.
- Default: (not specified)
- Values:
- server – the instance operates as an authorization server
- client – the instance uses an external authorization server
Token signing key
- Key:
common.auth.server_rsa_signing_key - Purpose: A cryptographic private key used to sign JWT tokens, ensuring their integrity.
- The public key is exposed through the JWKS endpoint (
.well-known/jwks), enabling clients to verify signatures. - Default: not set (must be configured).
- Security: this is a sensitive setting and must be protected.
Application client configuration
The system supports multiple registered client applications, each with its own configuration.
archITekt Remote Client
- Purpose: archITekt remote application configuration
- Authorization mode: Authorization Code + PKCE (public client)
- Keys:
common.auth.client.archITekt_remote_issuer– issuer URL (default:{common.auth.server_url})common.auth.client.archITekt_remote_client_id– application identifier (default:archITekt-remote)
Auth API Client
- Purpose: system-to-system authentication
- Authorization mode: Client Credentials
- Keys:
common.auth.client.auth_api_issuer– issuer URL (default:{common.auth.server_url})common.auth.client.auth_api_client_id– application identifier (default:auth-api)common.auth.client.auth_api_client_secret– client secret (sensitive)
Scheduler Client
- Purpose: scheduler client configuration
- Authorization mode: Authorization Code + PKCE
- Keys:
scheduler.auth.client.issuer– issuer URL (default:{common.auth.server_url})scheduler.auth.client.client_id– application identifier (default: scheduler-web)scheduler.auth.client.client_secret– secret (sensitive)
Identity and directory integration (AD, LDAP)
Identity compatibility mode
- Key:
common.auth.identity_compatibility_mode - Purpose: controls the format of user identifiers returned by functions such as
GetCurrentUserId() - Default: default
- Values:
- default – the local ID from the authorization server database is returned (recommended for new installations)
- federation – the external ID is returned (e.g., LDAP object identifier for Active Directory users in SID format)
Compatibility notes: New system deployments use the default mode. Existing applications integrating with federation directories may use the federation mode to ensure backward compatibility with legacy integrations.
AD user container
- Key:
common.param.provider_ad_user_container - Purpose: Specifies the path to the organizational unit in Active Directory where user accounts are located.
- Default: The field remains empty, which means that all users are retrieved.
- Example:
OU=Users,OU=Company,DC=example,DC=com
AD role container
- Key:
common.param.provider_ad_role_container(previously key:common.param.provider_ad_container) - Purpose: Specifies the path to the organizational unit in Active Directory where security groups/roles are located.
- Default: The field remains empty, which means that all users are retrieved.
- Example:
OU=Groups,OU=Company,DC=example,DC=com
Session management
Session timeout (sliding)
- Key:
www.param.session_timeout - Purpose: Determines how long a user can remain logged in without activity before being automatically logged out.
- Default: 30 minutes
- Behavior: The timeout "resets" each time the user performs an action (clicking buttons, submitting forms, navigating pages). As long as the user is actively using the system, they remain logged in. If they stop using it for the specified time, they are automatically logged out for security reasons.
- Example: With a 30-minute timeout, a user who logs in at 9:00 AM and actively uses the system remains logged in. If they take a 30-minute break without clicking anything, they will be logged out. However, if they click something at 9:29 AM, the timer resets and they have another 30 minutes.
Maximum session time
- Key:
www.param.max_session_timeout - Purpose: The maximum time a user can be logged in regardless of activity.
- Default: 720 minutes (12 hours)
- Behavior: Unlike the sliding timeout above, this is a hard limit. Once reached, users must log out and log in again, regardless of whether they are actively using the system.
- Example: Even with continuous work — after 12 hours, the system requires re-login.
- Security purpose: Enforces periodic re-authentication to increase security in sensitive systems.
Configuration example:
With session_timeout=30 and max_session_timeout=720:
- User logs in at 9:00 AM
- Works actively → stays logged in (timeout is reset)
- Takes a 35-minute coffee break → is automatically logged out
- Maximum active session duration is 12 hours, after which re-authentication is required.
Email configuration
SMTP sender address
- Key:
common.auth.server.smtp_sender_email - Purpose: The "From" email address used by the authorization server for sending emails (password resets, notifications).
- Default:
noreply@yourdomain.com - Effect: This address appears as the sender in all system-generated emails.
Available endpoints
The authorization server exposes various endpoints (URLs) that applications and users communicate with.
Basic authentication flow
Standard login process:
User request → /auth/login → /auth/verify → Authenticated
This two-step process handles most authentication scenarios:
Step 1: /auth/login
- Purpose: initiating authentication and verifying login credentials
- What happens: the user enters their login and password, the system verifies them
- Next step: if the credentials are correct → proceed to
/auth/verify- the verification stage
Step 2: /auth/verify
- Purpose: verification and session creation
- What happens: the system creates a session and issues authentication tokens
- Result: the user is logged in and can use protected resources
Example flow
- User tries to access the application
- Application redirects to
/auth/login - User enters credentials
- System redirects to
/auth/verify - Session and tokens are created
- User returns to the application as logged in
Endpoint mapping
Custom path configuration
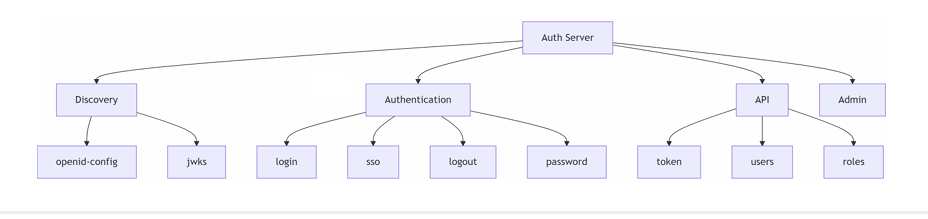
The default endpoints shown above can be changed in the routes.config file.
Why it is worth it:
- customization to match the organization's branding and naming conventions
- maintaining consistency with existing application URLs
- simplifying authentication paths for end users
How it works:
The WWW/Configuration/Environment/routes.config file allows assigning custom paths to standard authentication endpoints. The functionality of all endpoints remains unchanged — only the URL paths change. This provides flexibility without the need to modify code.
Discovery and configuration endpoints
These provide information about the authorization server's capabilities and configuration.
OpenID Connect Configuration
- Endpoint:
.well-known/openid-configuration - Purpose: Contains a complete description of the authorization server's capabilities.
- Who uses it: Client applications that want to learn how to integrate with the server.
- What it returns: A list of supported endpoints, authentication methods, token types, and security algorithms.
- Example use case: A new application automatically configuring itself to work with the authorization server.
JSON Web Key Set (JWKS)
- Endpoint:
.well-known/jwks - Purpose: Publishes public keys used for verifying token signatures.
- Who uses it: Applications that need to verify token authenticity.
- What it returns: Public keys in JSON format.
- Example use case: An API verifying whether an access token was actually issued by this authorization server.
Authentication and authorization endpoints
These handle the core authentication and authorization processes.
Authorization Endpoint
- Endpoint:
auth/authorize - Purpose: Initiates the authentication process for applications (login).
- Who uses it: Client applications when users need to log in.
- What it does: Redirects users to the login page and returns an authorization code after successful authentication.
- User experience: User clicks "Log in" in the application → is redirected here → logs in → is redirected back to the application with an authorization code.
Login page
- Endpoint:
auth/login - Purpose: Displays the login form where users enter their credentials.
- Who uses it: End users during authentication.
- What it contains: Username and password fields, password reset links.
- User experience: A standard login page where users enter their username and password.
Single Sign-On Login
- Endpoint:
auth/login/sso - Purpose: Handles authentication using Windows authentication.
- Who uses it: Users in corporate networks with Windows domain authentication.
- How it works: Initiates Windows authentication using the Kerberos or NTLM protocol, automatically authenticating users already logged into their domain.
- User experience: User accesses the application → is automatically authenticated using Windows domain credentials → no login form required if the user is already authenticated in the domain.
Logout
- Endpoint:
auth/logout - Purpose: Terminates the user session and clears authentication tokens.
- Who uses it: Users and applications during logout.
- How it works: Destroys the session, clears cookies.
- User experience: User clicks Log out → session cleared → redirected to logout confirmation page or home page.
Verify Token
- Endpoint:
auth/verify - Purpose: Verifies the user after login and handles additional verification steps such as multi-factor authentication.
- Who uses it: The authorization server during the login process.
- How it works: Confirms the validity of user credentials, then prompts for multi-factor authentication if enabled.
- User experience: After entering username/password, the user may be prompted to enter a TOTP code from the authenticator application or use a recovery code to complete login.
Password management endpoints
These handle password recovery and reset processes.
Forgot Password
- Endpoint:
auth/forgot-password - Purpose: Initiates the password recovery process.
- Who uses it: Users who have forgotten their password.
- How it works: Sends an email with a password reset link.
- User experience: User enters email address → receives an email with a reset link.
Reset Password
- Endpoint:
auth/reset-password - Purpose: Allows users to set a new password
- Who uses it: Users clicking the reset link from the forgotten password email.
- How it works: Validates the reset token and allows the user to enter a new password.
- User experience: User clicks the link in the email → enters a new password → password updated.
User account management
Account Management
- Endpoint:
account - Purpose: User self-service portal for managing account settings.
- Who uses it: Authenticated users managing their profile.
- What it offers: Profile information, password change, multi-factor authentication enrollment.
- User experience: Users view and update their personal data, enable two-factor authentication.
Token Exchange Endpoints (API)
Token Endpoint
- Endpoint:
api/auth/token - Purpose: Exchanges authorization codes and credentials for access tokens.
- Who uses it: Client applications and systems authenticating against the authorization server.
- Supported grant types:
- Authorization code: Exchanges an authorization code for an access token (user-initiated login processes).
- Client credentials: Exchanges client ID and secret for an access token (system-to-system authentication).
- What it returns: access token and expiration time.
- Example use case: a web application exchanges an authorization code for a token; a background service uses client credentials to call protected APIs.
User Management API endpoints
User Management API
- Endpoint:
api/auth/users - Purpose: Retrieving user account information and detailed data.
- Who uses it: External services and applications (e.g., scheduler, workflows).
- Required authentication: JWT Bearer token.
- Example operations:
- Retrieving detailed user data by identifier
- Searching for users
Role Management API
- Endpoint:
api/auth/roles - Purpose: Retrieving role information and user role assignments.
- Who uses it: External services and applications (e.g., scheduler, workflows).
- Required authentication: JWT Bearer token.
- Example operations:
- Listing available roles
Administration Endpoints
Admin Dashboard
- Endpoint:
admin/auth-server - Purpose: Web-based administrative interface for managing the authorization server.
- Who uses it: system administrators.
- What it offers:
- User account management
- Client application configuration
- Reviewing audit logs and authentication events
- Configuration management
- User experience: an administration portal with system management tools.
Endpoint Security
All endpoints implement appropriate security measures.
Public endpoints (no authentication required):
- Configuration discovery endpoints (
.well-known/*) - Login and password reset pages.
- These are intentionally public to allow users and applications to access authentication services.
Protected endpoints (authentication required):
- Account management
- Logout (requires an active session)
- API endpoints (require valid JWT Bearer tokens)
- Admin dashboard (requires administrative permissions)
Rate Limiting
Endpoints implement rate limiting to prevent abuse, specifically:
- Login endpoints - Lockout for 5 minutes after 5 failed login attempts. The mechanism works identically for existing and non-existing accounts (protection against user enumeration).
- MFA verification - Lockout for 5 minutes after 5 invalid codes.
Low-code functions
The authorization server provides a set of functions that can be used in formulas (expressions), processes, and configurations.
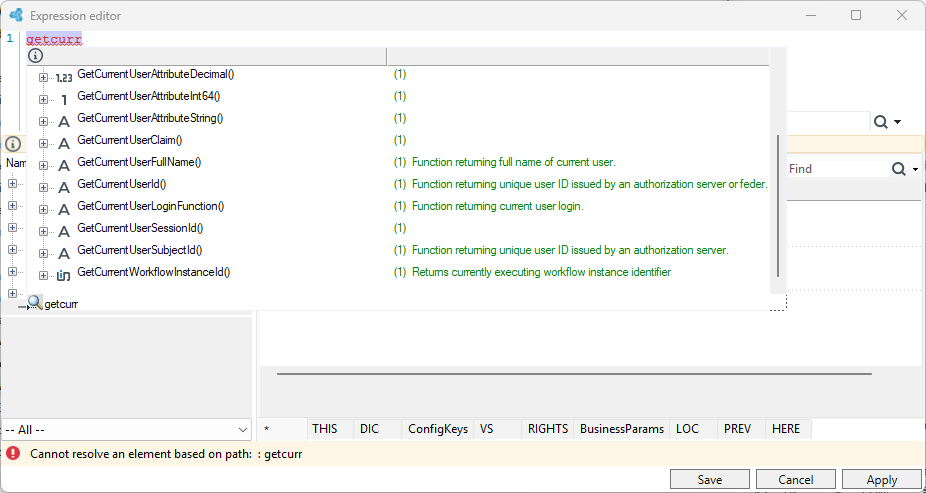
The authorization server provides a set of functions that can be used in formulas (expressions), processes, and configurations. These functions enable creating custom authentication logic for processes and integrations without the need to write traditional code.
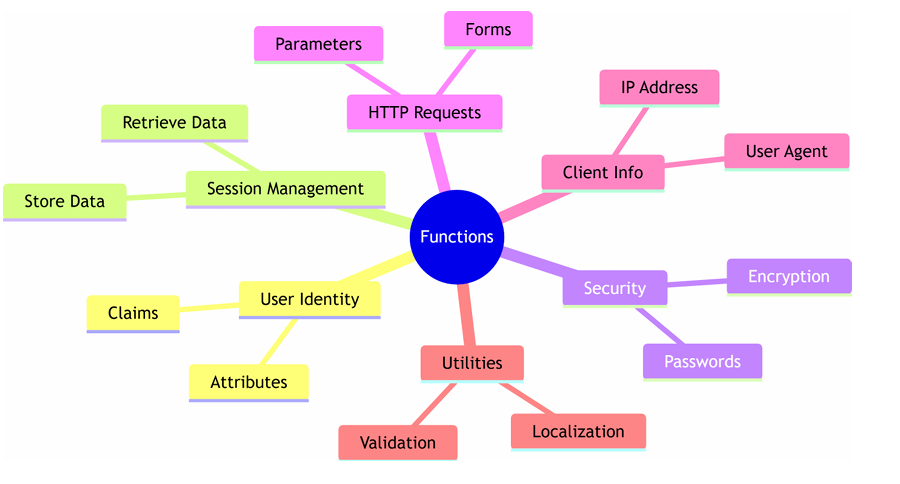
User and attributes
The functions below enable retrieving information about the currently logged-in user.
Retrieving user identity.
| Function | What it does | When to use |
|---|---|---|
GetCurrentUserSubjectId() | Returns the unique, persistent identifier of the currently logged-in user. | When you need to track user activity or store data related to their account. |
GetCurrentUserSessionId() | Returns the unique identifier of the current login session. | When tracking user sessions or detecting multiple simultaneous logins. |
GetCurrentUserClaim(claimName) | Retrieves specific information from the user's token (e.g., email, phone number). | When standard user data such as email or username is needed. |
Accessing custom user attributes
Users can have custom attributes in the system (e.g., department, room number, supervisor name).
There are different functions depending on the data type:
| Function | Data type | Example usage |
|---|---|---|
GetCurrentUserAttributeString(attributeName) | Text | Retrieving department name, job title, or office location. |
GetCurrentUserAttributeInt64(attributeName) | Integer | Retrieving employee number, cost center number, approval limit. |
GetCurrentUserAttributeDateTime(attributeName) | Date and time | Retrieving contract end date, last training date, hire date. |
GetCurrentUserAttributeBool(attributeName) | True/False value | Checking whether the user is a manager, has special access, works remotely. |
GetCurrentUserAttributeDecimal(attributeName) | Decimal number | Retrieving salary, discount rate, approval thresholds. |
Example scenarios
1. Personalized greeting
Displaying a welcome message with the department name:
"Welcome! You are logged into the [Department] portal."
2. Conditional process flow
Checking if the user has a manager role:
If attribute "IsManager" = true → show approval buttons.
Session management
Session functions allow storing temporary data during the user's session. This data exists only until logout.
| Function | What it does | Best used for |
|---|---|---|
SetValueInUserSession(key, value) | Saves information in the user session. | Storing wizard progress, temporary selections, data between pages. |
GetValueFromUserSession(key) | Retrieves previously saved session data. | Reading data saved in previous steps. |
GetValueFromUserSession(key, removeAfterRead) | Retrieves session data and optionally removes it. | One-time messages, flags, read-once data. |
Example scenarios
Multi-step form:
- Page 1: enter personal data → save to session
- Page 2: professional data → save to session
- Page 3: summary → retrieve all data → save to database
Temporary messages:
- After performing an operation, save a message in the session
- After navigating to the next page, display the message and remove it
Cart / item selection:
- User selects items across multiple screens
- They are saved in the session and retrieved at finalization
Security operations
These functions are used for data protection and secure password management.
Password management
| Function | What it does | When to use |
|---|---|---|
HashPassword(password) | Converts a password to a secure, irreversible hash. | When saving new passwords (never store passwords in plain text!). |
VerifyPasswordHash(password, hash) | Checks whether a password matches the stored value. | When verifying a password entered by the user. |
GeneratePassword(length, minimumNumberOfNonAlphanumericCharacters) | Creates a strong, random password. | When creating new accounts or resets. |
Generating unique identifiers
| Function | What it does | When to use |
|---|---|---|
GenerateHexId(length) | Creates a random unique identifier | Creating reference numbers, tracking codes. |
GenerateHashedHexKey(value) | Creates a fixed hash from a value | When identical data should always generate the same identifier. |
Data encryption
| Function | What it does | When to use |
|---|---|---|
EncryptValue(value) | Encrypts data | Protecting API keys, personal data, sensitive values. |
DecryptValue(value) | Decrypts data | Reading sensitive data when required. |
Examples:
New user registration
- User provides a password
- System uses
HashPassword() - Only the hash is saved in the database
Protecting sensitive data
- Encrypt API keys before saving them in the database
Generating identification numbers:
- Create unique reference numbers for support tickets, orders, or documents.
HTTP request handling
These functions help read data from HTTP requests, forms, and URLs.
Reading data
| Function | What it does | Example |
|---|---|---|
GetQueryStringParameterFromRequest(name) | Retrieves a parameter from the URL | ?userId=123 → returns 123 |
GetFormParameterFromRequest(name) | Retrieves a value from a submitted form | Retrieving the "email" field. |
GetPathAndQueryFromRequest() | Retrieves the full path and query parameters of the request | /login?returnUrl=/home |
Checking request type
| Function | Returns True if… | Typical use case |
|---|---|---|
RequestIsGet() | The request is for displaying/reading data. | Displaying page content. |
RequestIsPost() | The request is for submitting/creating data. | Processing form data. |
RequestIsPut() | The request updates existing data. | Handling update operations. |
RequestIsPatch() | The request partially updates data | Processing partial changes. |
RequestIsDelete() | The request deletes data | Handling delete operations. |
Response handling
| Function | What it does | Use case |
|---|---|---|
IsLocalUrl(url) | Checks whether the URL is internal | Preventing phishing, verifying redirects. |
ReplaceResponseContentWithJson(json, statusCode) | Returns a JSON response | Building custom APIs or webhooks. |
Example scenarios
Redirect after login:
-
Retrieve the return URL from the query string: GetQueryStringParameterFromRequest("returnUrl")
-
Check if it is safe: IsLocalUrl(returnUrl)
-
If safe, redirect; if not, go to the default page
Form processing:
-
Check if the form was submitted: RequestIsPost()
-
If yes, retrieve form values: GetFormParameterFromRequest("email")
-
Process the data
Creating an API endpoint:
Return a JSON response with the appropriate status code for API consumers.
Client informatione
Functions for collecting information about the user's device and connection.
| Function | Returns | Usage |
|---|---|---|
GetClientIpAddress() | Client IP address | Security logs, access control. |
GetClientUserAgent() | Device and browser information. | Mobile device detection, security analysis. |
Example scenarios:
Security audit log:
- Record login attempts along with IP address and device information for security audits.
Detecting suspicious activity:
- Send a notification if a user logs in from an IP address significantly different from the one usually used.
Device-specific features:
- Display a mobile-optimized interface if the user agent indicates a mobile device.
Access restrictions:
- Block or allow access based on IP address ranges (e.g., allow access only from the corporate network).
Localization (languages, time zones)
Localization (languages, time zones)
Functions enabling work with multiple languages and time zones.
Language support
| Function | Returns | Usage |
|---|---|---|
GetSupportedLanguages() | List of available languages | Building a language selection menu. |
GetCurrentLanguageName() | Current language code | Displaying content in the appropriate language. |
GetCurrentUserAttributeDateTime(attributeName) | Date and time | Retrieving contract end date, last training date, hire date. |
GetCurrentUserAttributeBool(attributeName) | True/False value | Checking whether the user is a manager, has special access, works remotely. |
GetCurrentUserAttributeDecimal(attributeName) | Decimal number | Retrieving salary, discount rate, approval thresholds. |
Time conversion
| Function | What it does | When to use |
|---|---|---|
ToLocalTimeApp(dateTime) | Converts UTC time to local time | Retrieving department name, job title, or office location. |
ToUniversalTimeApp(dateTime) | Converts local time to UTC | Database entries. |
Example scenarios:
Language selection:
-
Retrieve available languages:
GetSupportedLanguages() -
Display as a dropdown menu
-
User selects their preferred language
Correct display of event times:
Event saved in UTC format → Convert to local time → Display to user
Validation
Walidacja
Functions for checking whether data conforms to expected formats and quality standards.
| Function | Checks | Return | Usage |
|---|---|---|---|
IsEmailValid(input) | Whether the text has email format | True/False | Form validation, data import. |
Example scenarios:
Form validation:
User enters an email address → Validate with IsEmailValid() → Display an error message if the address is invalid
Import data quality control:
Check imported email addresses → Flag invalid addresses → Request correction
User registration:
Check email format before creating an account → Prevent entering invalid email addresses
Best practices for using functions
1. Use appropriate data types
Match the function to the data type:
- Numbers → Use
GetCurrentUserAttributeInt64()orGetCurrentUserAttributeDecimal() - Text → Use
GetCurrentUserAttributeString() - Dates → Use
GetCurrentUserAttributeDateTime() - Yes/No → Use
GetCurrentUserAttributeBool()
2. Security first
- Always use
IsLocalUrl()before redirecting users - Never store passwords in plain text — always use H
ashPassword() - Encrypt sensitive data using
EncryptValue() - Do not log sensitive information in audit trails
3. Session data guidelines
- Use sessions only for storing small, temporary data
- Do not store large amounts of data in sessions
- Remember that session data is lost when the user logs out
Remove session data when it is no longer needed (use the removeAfterRead parameter)