On-premises environment
In an on-premises environment, the application runs on a single server or on a cluster. It requires an application and database server for production operation.
The exact server requirements are described here: Preparation of infrastructure on the On-premises environment .
Management of such environments is done by the administrator by running PowerShell scripts, however, in VSoft archITekt Launcher you can:
- configure the parameters of the On-premises environment and install or upgrade it,
- manage it and verify the running status of environment components, check the history of activities on the environment and retrieve logs,
- configure environments in all supported configurations: from a single server to a cluster of servers, from installation on a local computer through installation on a remote computer even outside the domain.
The Launcher itself will take care of the required PowerShell scripts being prepared for running as a result of the administrator's actions. In addition, it will still give the administrator a final glance at the commands prepared and ready to run before running each script itself.
Adding an environment
- Go to VSoft archITekt Launcher to the management page of the particular project for which you want to create an On-premises environment.
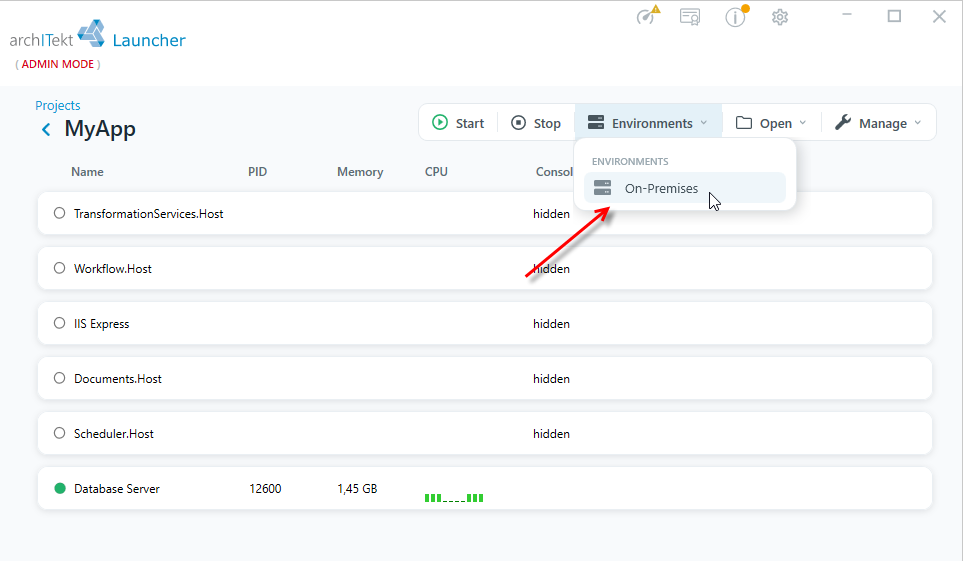
- Select the Environments button in the top toolbar, then choose the On-Premises option from the list.
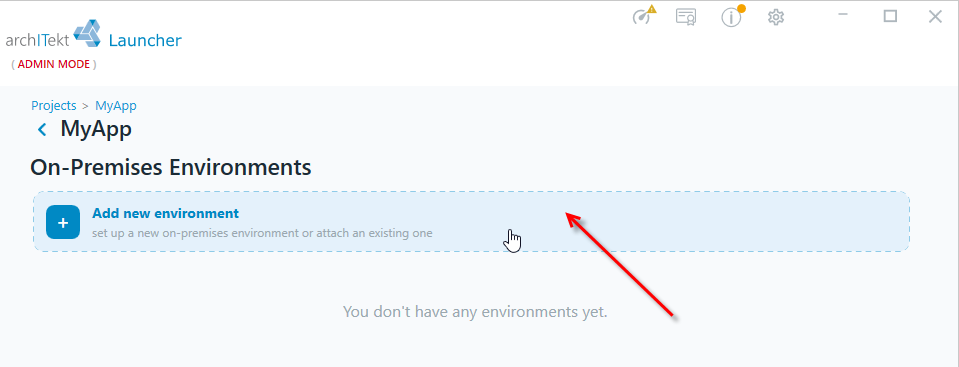
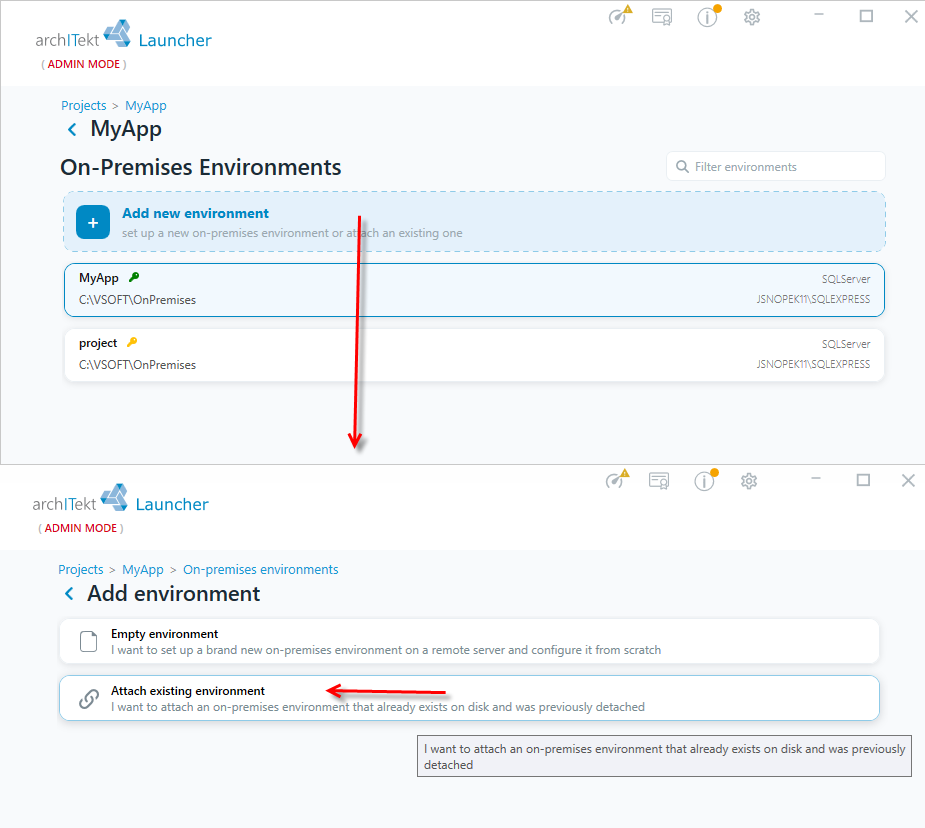
- On the On-Premises Environments page, select the Add new environment tile.
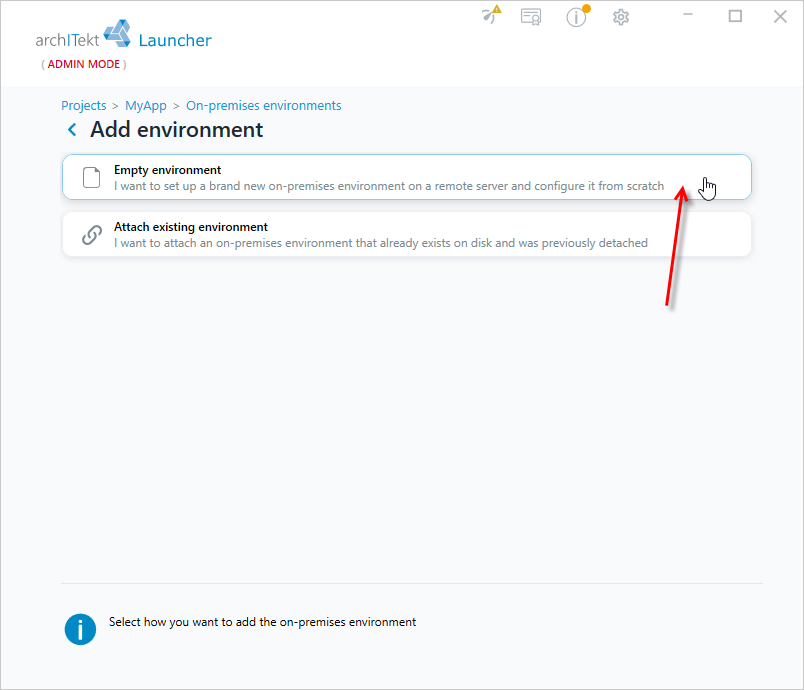
- Select Empty environment if you want to set up a brand new environment on a remote server, or Attach existing environment if you want to attach an environment that already exists on disk and was previously detached.
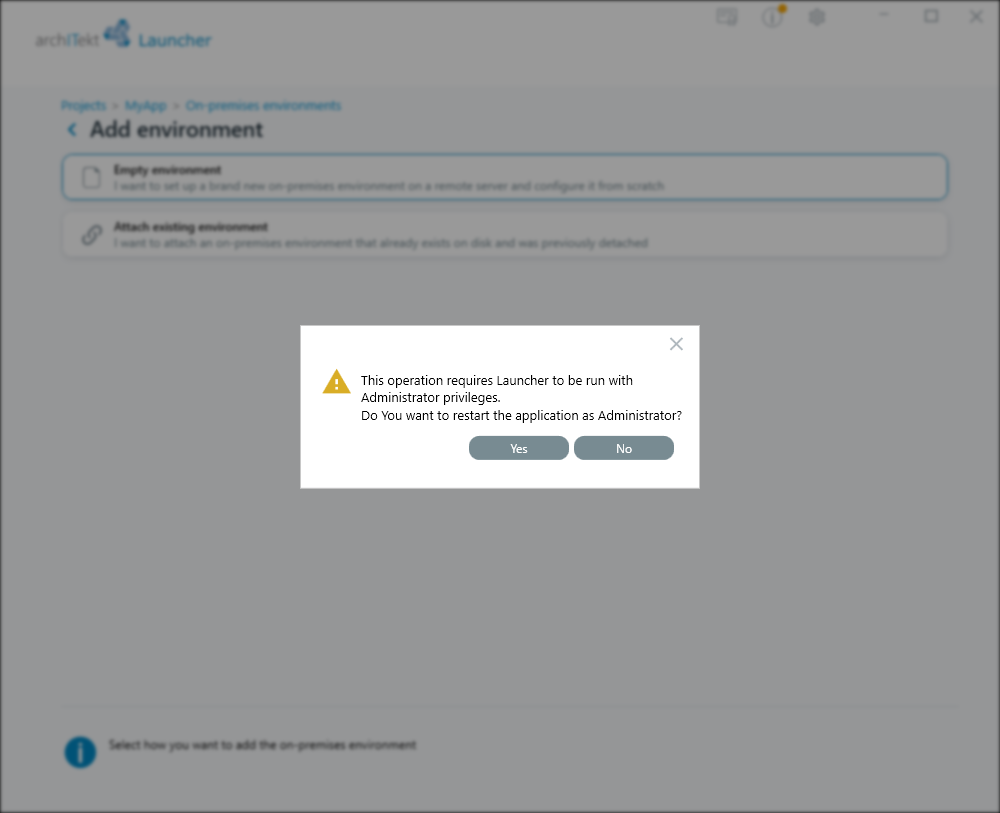
- Since configuring an On-premises environment requires administrator privileges, the message This operation requires Launcher to be run with Administrator privileges. Do You want to restart the application as Administrator? may appear. Select Yes to restart the Launcher with administrator privileges. If you select No, the On-premises environment will not be created.
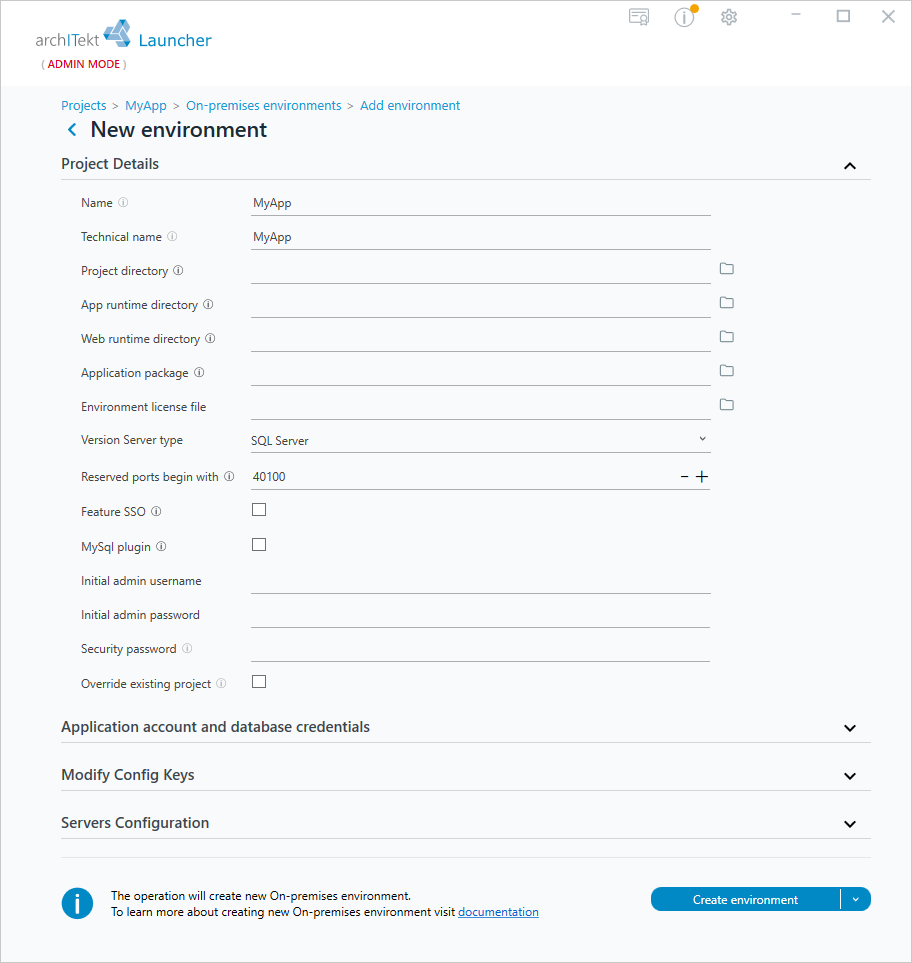
- Successively complete the data in each section.
Project Details
- Name - The name of the environment presented on the application login page.
- Technical name - The technical name of the environment. It is used as a database name prefix, as the name of the web application, and as the name of the project and environment component directories.
- Project directory - The directory where the project will be installed.
- App runtime directory - The runtime directory where the application environment components will be installed. If the directory is not specified, the application components will be installed in the default location
C:\Vsoft[Technical name] - Web runtime directory - The runtime directory where the web environment components will be installed. If no directory is specified, the application components will be installed in the default location
C:\Vsoft[Technical name] - Application package - Path to the package that is initially installed on the environment.
- Environment license file - The path to the license file.
- Version Server type- If you select File system, a project with a file version server will be created, if SQL Server, then the version server will be database, for more see: File and Database Version Server
- Reserved ports begin with - Define the beginning of a reserved block of ports internally used by the application. The first of the range of ports used for the internal application needs. The application uses 2 ports for communication between components. Traffis between servers on these ports must be open.Then the application uses consecutive ports to run LibreOffice in the server mode (communictaion with these ports takes place only within the server). The number of ports used is equal to the number of running LibreOffice converters.
- Feature SSO - Parameter specifies whether to enable SSO (Single Sign On) login functionality in the application, which allows logging in using Windows authentication. Requires the addition of Config Keys.
The administrator with the given login will be added to the internal user management provider. If you use an external provider (e.g. Active Directory), you must take care of creating a user with administrator rights in the application yourself.
- MySql plugin - check the option if you want to enable connection to the MySql base.
- Initial admin username - the initial password of the user who will be the administrator on the created environment.
- Initial admin password - Define the password for the administrator account.
- Security password - Ability to define a password to encrypt the project. VSoft archITekt allows you to secure the configuration of the project so that part of the configuration is stored in encrypted form. This includes part of the configuration keys provided by the system by default, as well as configuration elements selected by the administrator, which he himself provides by extending the system (e.g. configuration of connections to external databases). Encryption of the project on the on-premises environment is done in the same way as for a regular project created in VSoft archITekt Launcher - see Encrypting the configuration.
- Override existing project - select this option if you want to replace an existing project when there are SQL tables or project files with the same name.
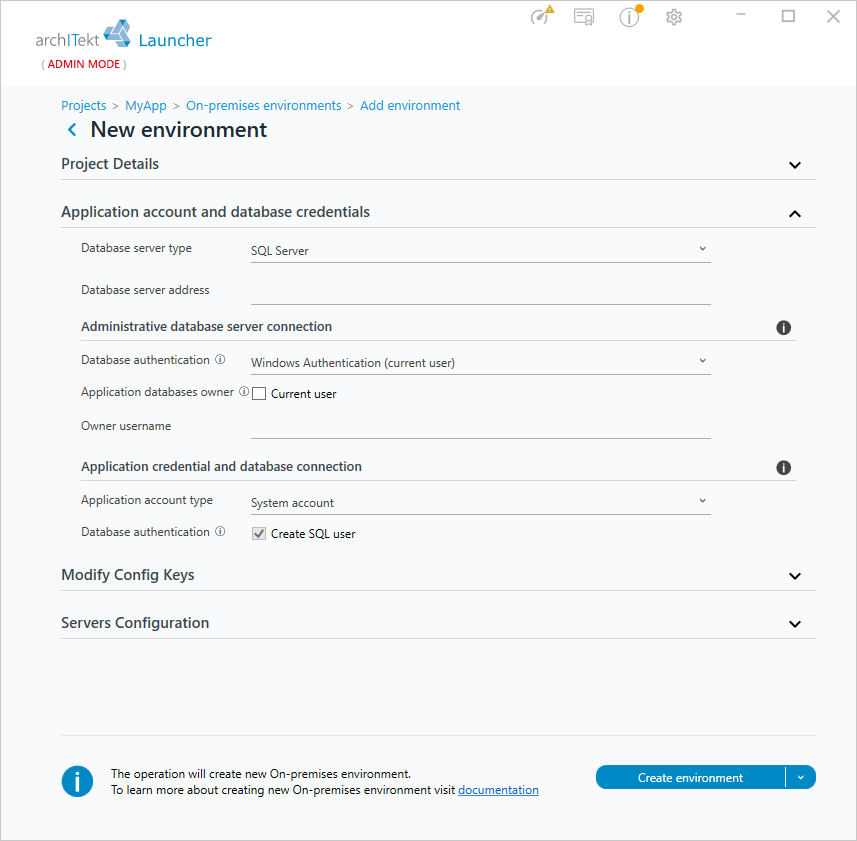
Application account and database credentials
- Database server type
- Database server address - database server address
Administrative database server connection - in this section, specify how the system and user database will be created:
- Database authentication -Select one of the database connection type options. The database administrator should have appropriate enough permissions to create the application database and application users. If you choose Windows Authentication (current user) - connection to the database using Windows domain login, then specify:
- Application database owner - check this option if the current user is the owner of the database
- Owner username - fill the field if the owner of the databases is another user
- If you specified the type of server connection to the database through the SQL Server Authentication option, then enter the login and password of the database server.
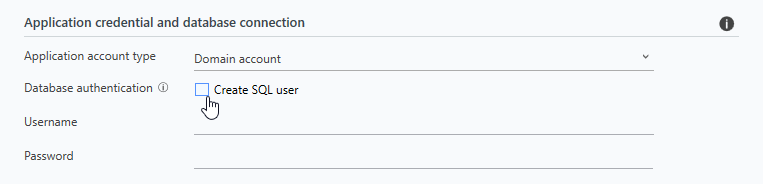
Application credential and database connection - specify how the application connects to the database.
- Application account type - specify the type of application account.
- Database authentication - If you have selected the application account type as Domain account, then you can create a new user for database authentication or use the credentials of an existing user. Create SQL user option. In the following fields, specify:
- Username - enter the user account on which the application components will run
- Password - enter the user's password
Modify Config Keys
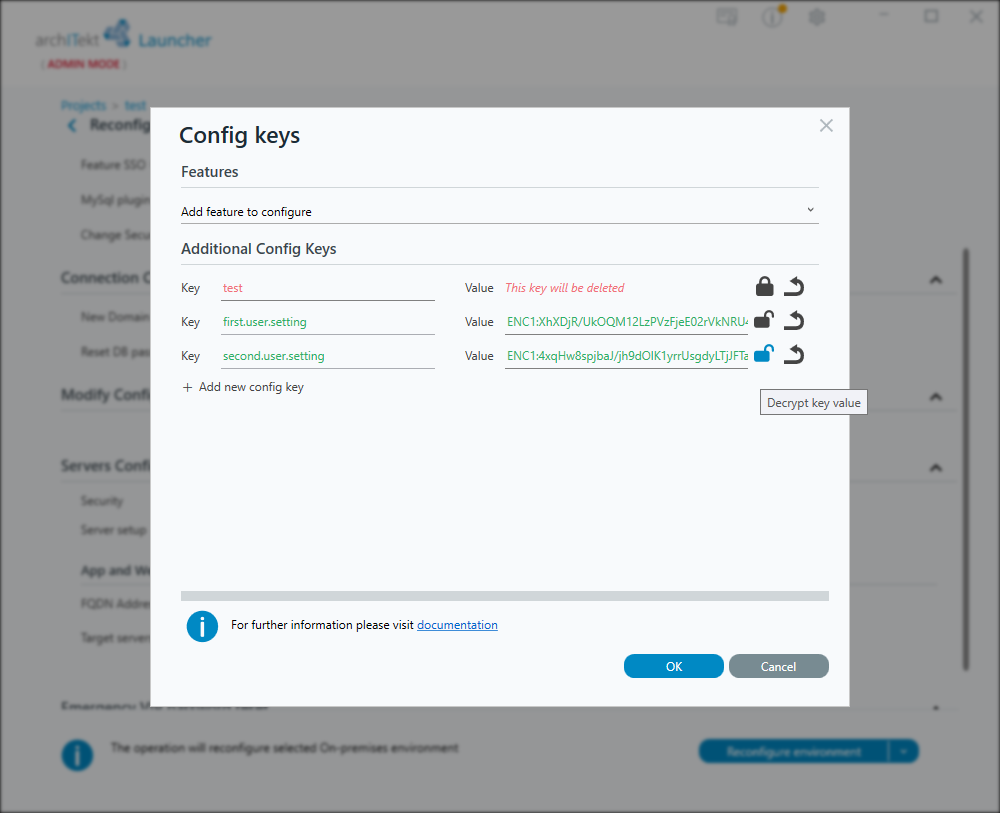
- If you want to add, configure keys select +Edit config keys button.
- In the next window, select +Add new config key and enter the key parameters and value.
- VSoft archITekt allows you to secure the project configuration so that part of the configuration is saved in encrypted form. This includes part of the configuration keys. The key encryption option is available if a password has been set in the project's Security password field - for more see Encrypting the project and about the configuration encryption mechanism itself see Configuration encryption mechanism. Encrypting the keys themselves, however, is only possible during a project reconfiguration - see: Project reconfiguration.
Servers Configuration
- Security - select the option without HTTP protocol security or the option with SSL encryption resulting in HTTPS, where you must also provide a certificate thumbprint.
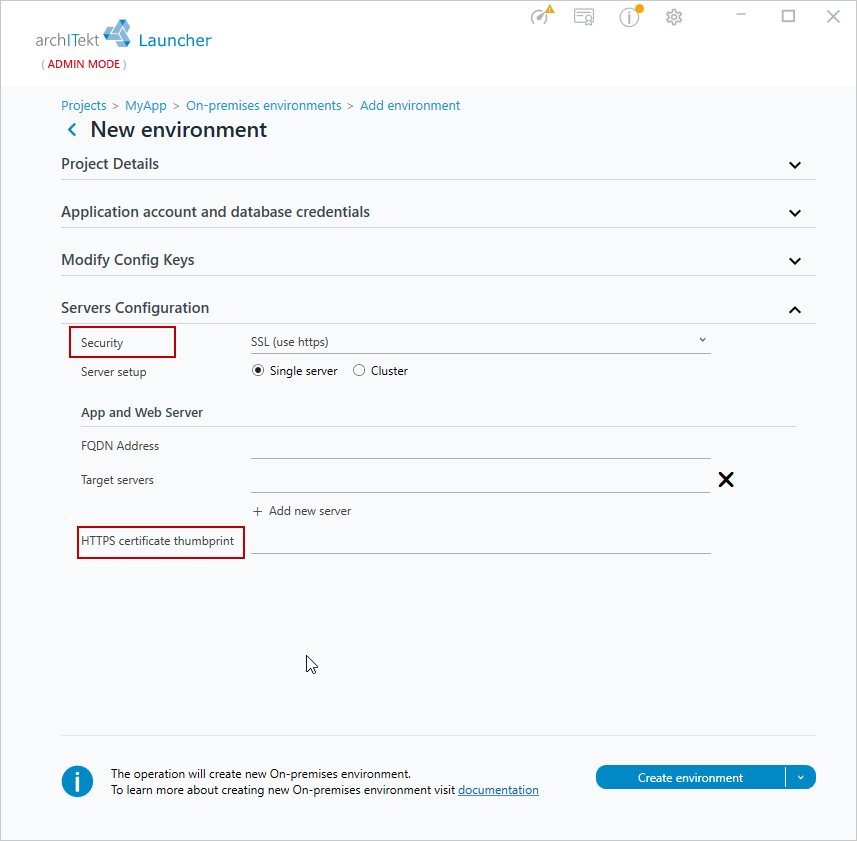
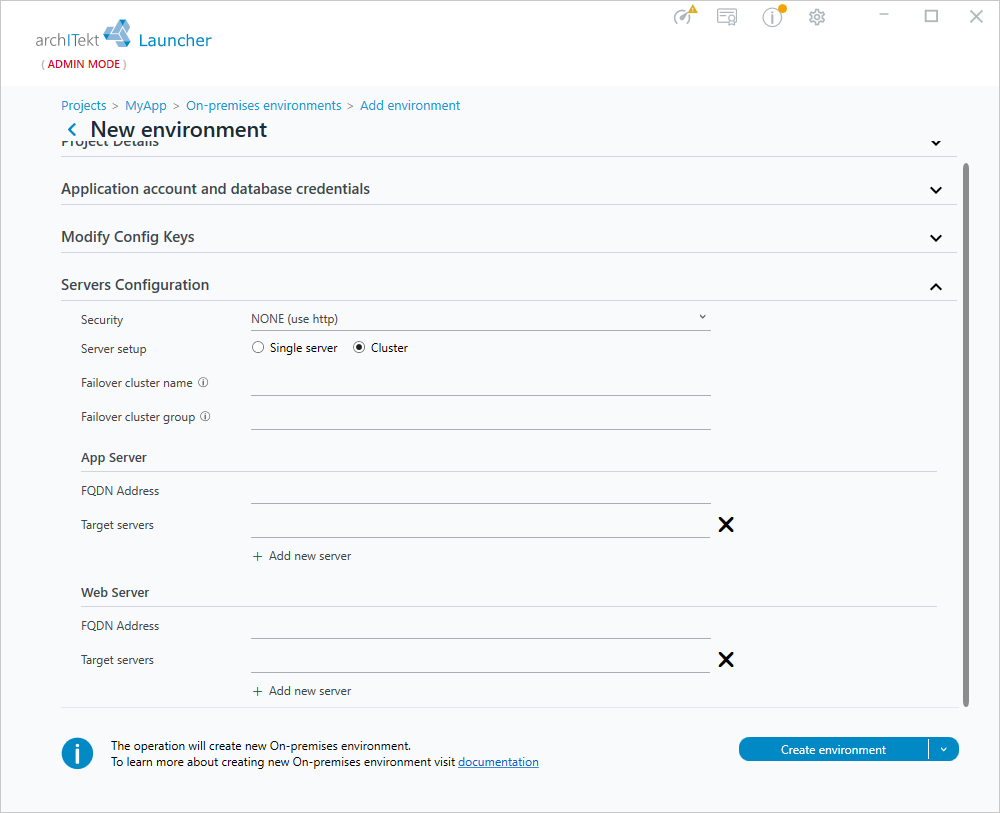
- Server setup - Fill in the data for the application server and web server. If you choose the cluster server option, then the data is split into 2 sections, separately for the application server and the web server. In addition, you need to enter:
- Failover cluster name - the name of the cluster on which archITekt services are to be installed.
- Failover cluster group - the name of the group to which the services will be automatically added.
- FQDN Address - Fully qualified domain name, the name under which the environment's application servers will be available.
- Target servers - The name under which the environment's web servers will be available on the network. To add more servers, select Add new server.
Verify input parameters and create environment
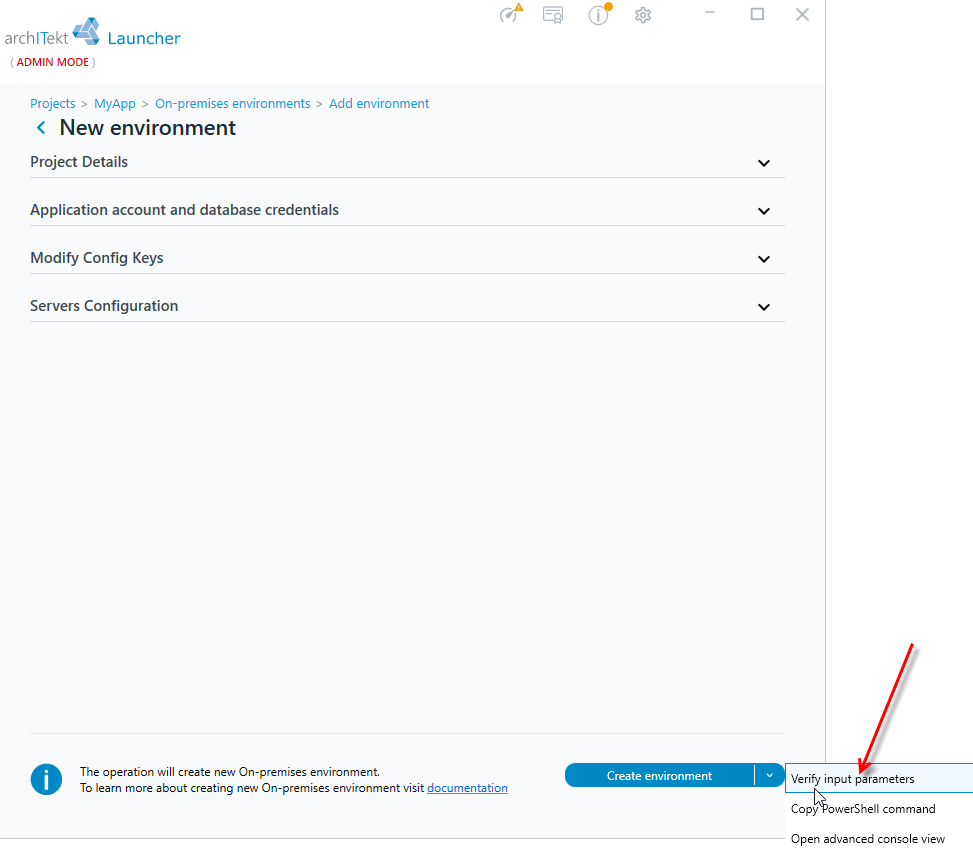
- After entering the data, you can select Verify input parameters, which does not create a new environment yet, but only checks the correctness of the entered parameters, the ability to connect to the database, the correctness of the entered passwords, etc.
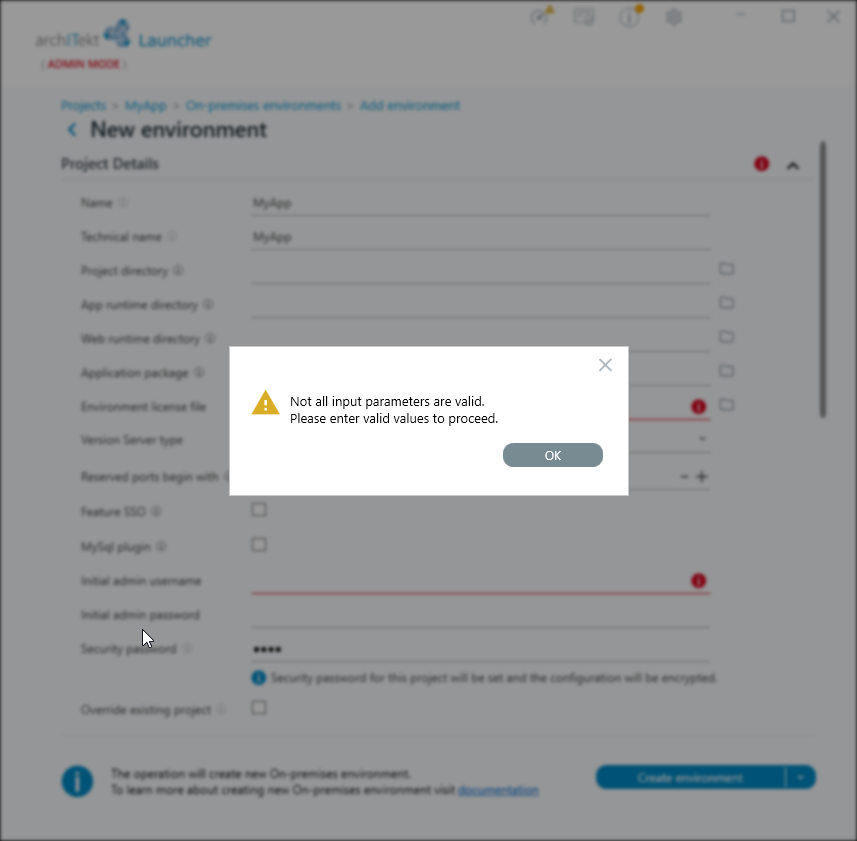
- If the mandatory data is not completed, a message will be displayed and the fields highlighted to be completed.
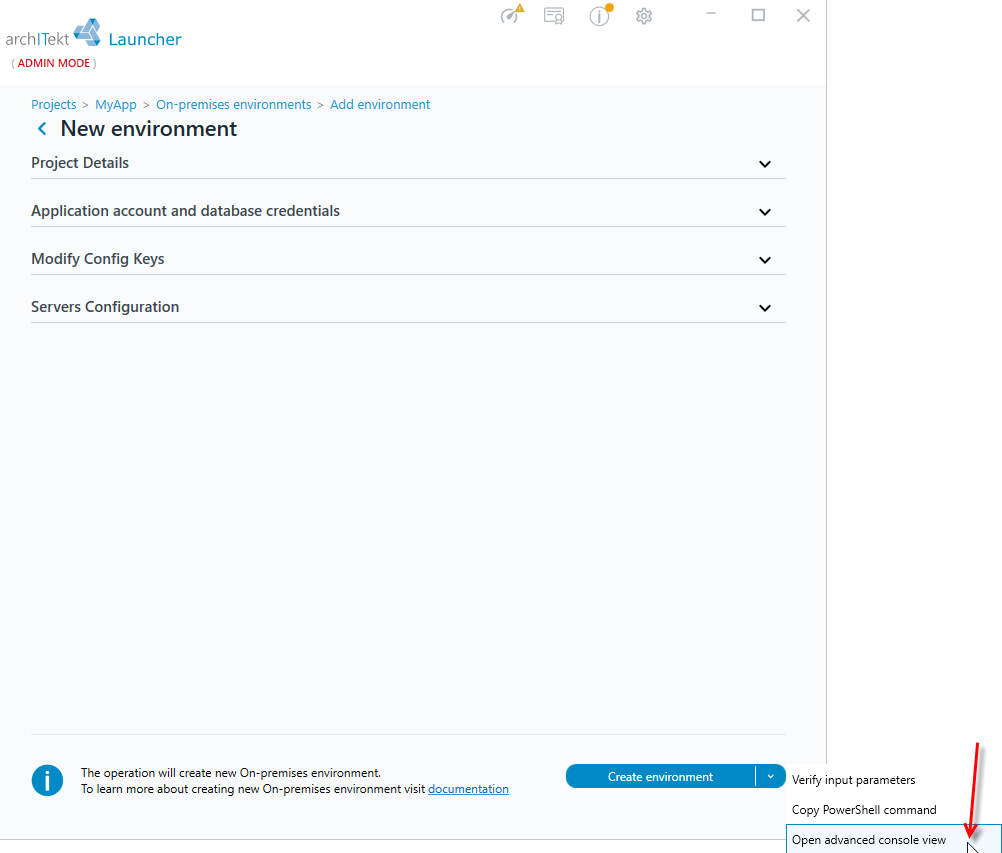
- After entering all the data choose Create environment.
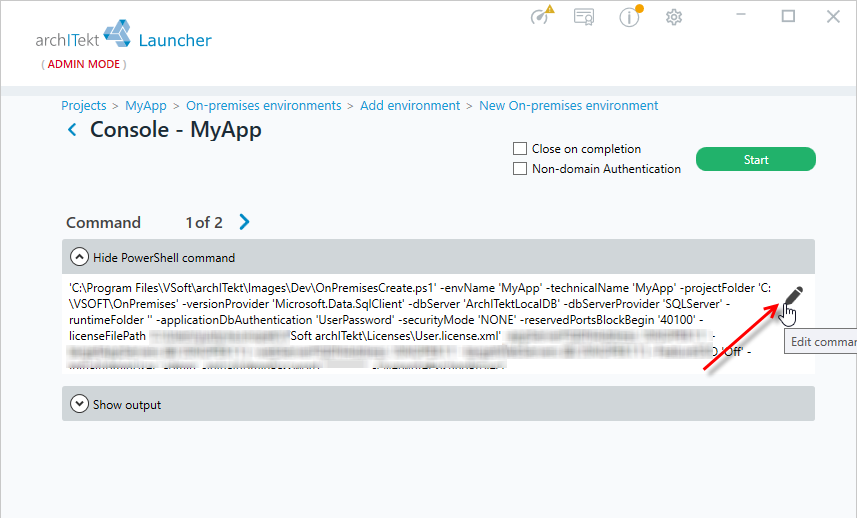
- The option to preview and edit the commands before running them is only available after you expand the Create environment button and select the Open advanced console view option - for more see: Advanced view of the console.
- Check the Non-domain Authentication option and enter data in the Username and Password fields. Non-domain authentication allows you to run PowerShell scripts on a server that is not part of your current domain and requires additional authentication.
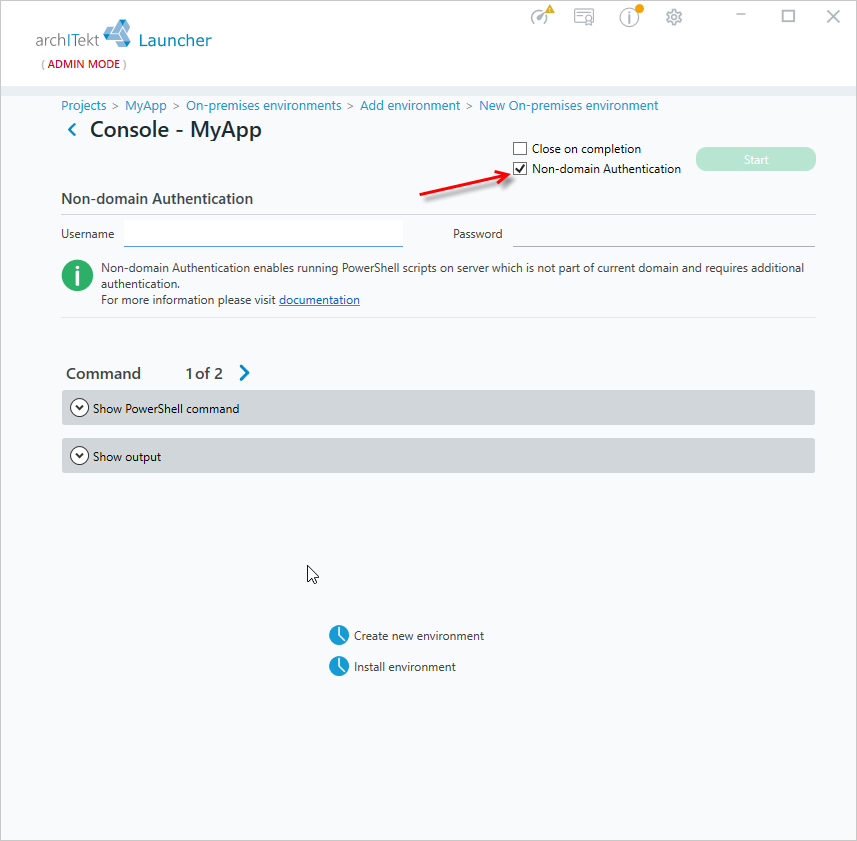
- Select Start to start the environment creation process. In the console window, you can view the scripts being executed. If you are using the advanced console view, you can also edit the generated commands before they are executed.
Installing, updating and reinstalling the environment
The environment is installed automatically while it is being created - see: Verify input parameters and create environment. The operation described below only needs to be run manually if the environment creation process was interrupted (e.g. due to a lost connection to the server or an error) and the components were not fully installed, or if you want to update or reinstall an already existing environment.
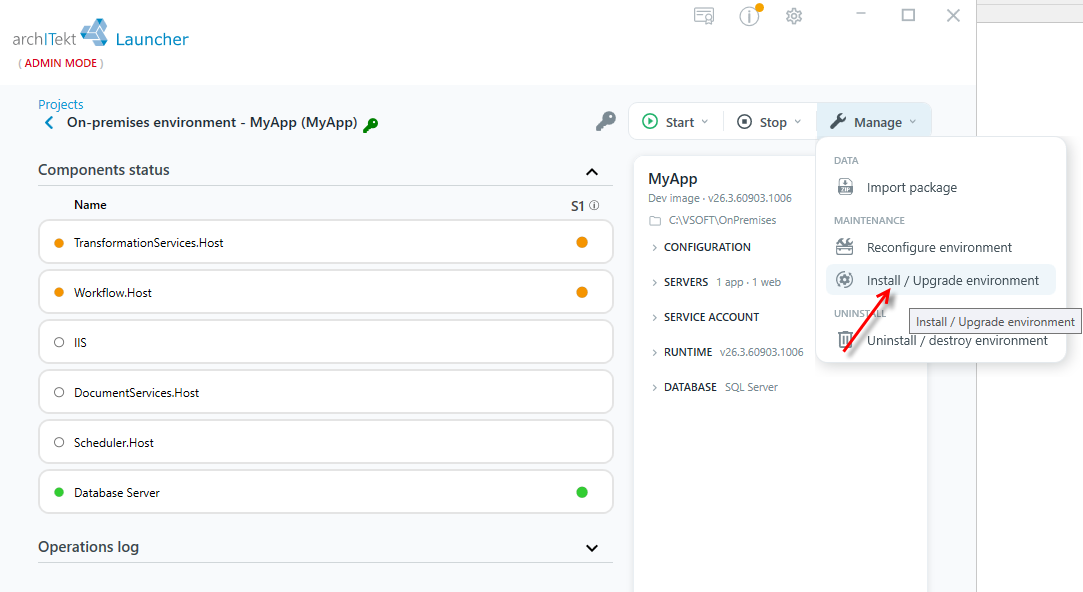
- Go to the management window of the given environment (see: Environment management), expand the Manage button and select Install / Upgrade environment.
- In the Update / reinstall On-premises environment window, select one of the options:
- Update environment - this operation executes the command to install or update the application components on all the servers included in the environment, depending on the status found on each server. Use this option also if the environment creation process was interrupted and you want to complete the installation.
- Reinstall environment - this operation uninstalls and then reinstalls components on each node.
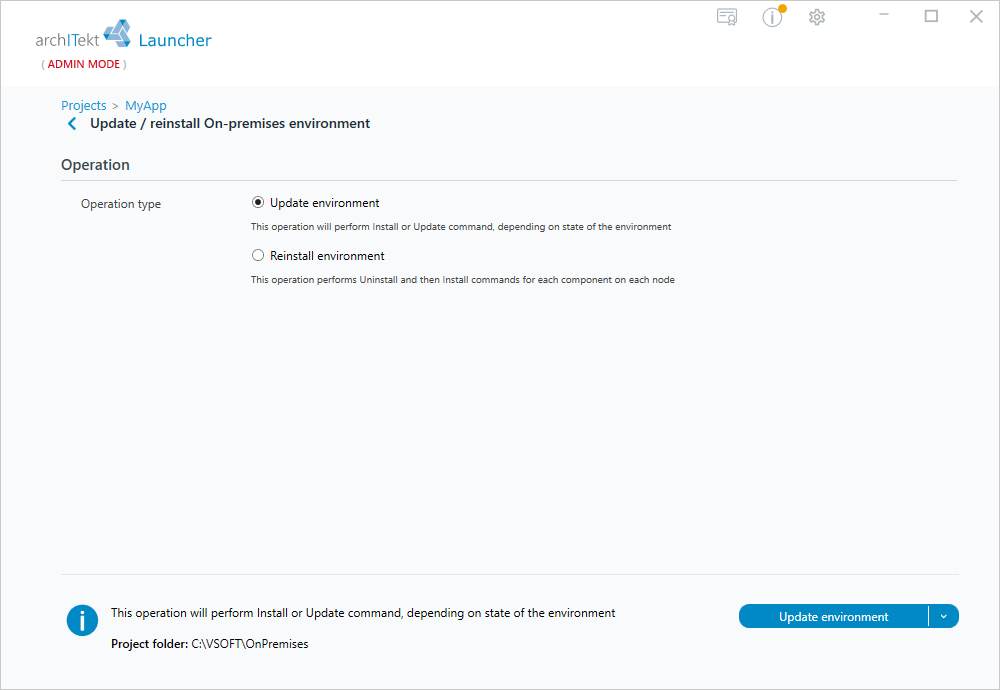
- Select the Update environment button to run the operation. As in other places in the Launcher, expanding the button may give access to the Open advanced console view option, allowing you to preview and edit the commands before running them - for more see: Advanced view of the console.
Environment management
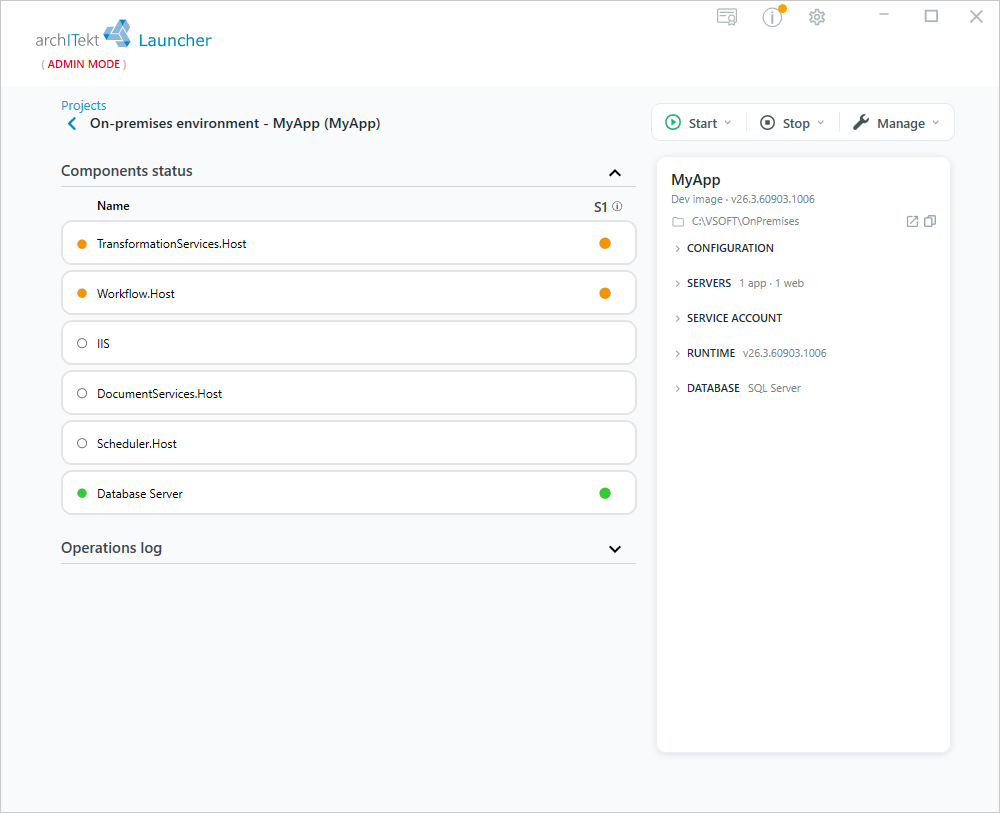
- To go to the management of a given environment, hover over a given project and select the button that takes you to the details window of the given environment.
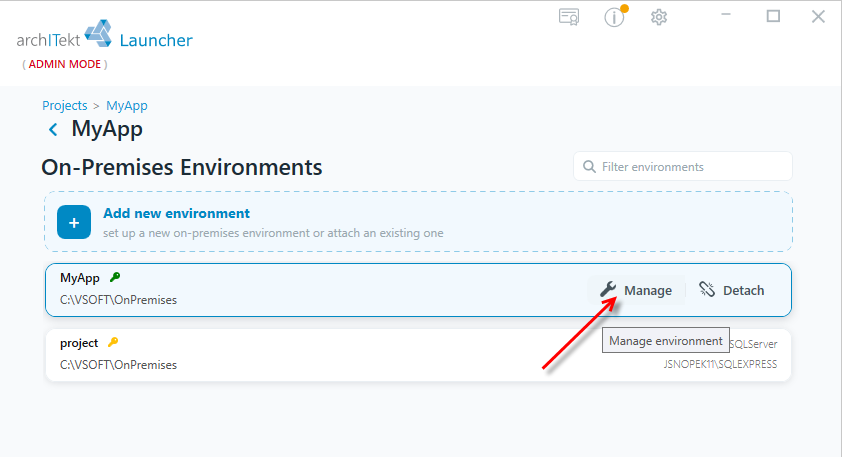
In the environment details window, you can choose one of the options:
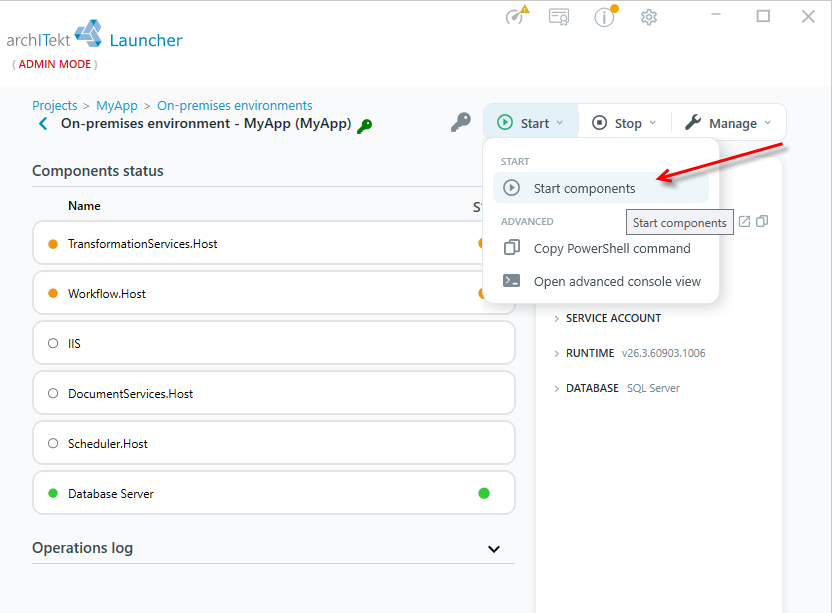
- expand the Start button and select Start components to run all services (services and WWW actions). The Advanced section additionally provides the Copy PowerShell command option (copies the PowerShell command to the clipboard) and Open advanced console view (lets you preview and edit the command before running it).
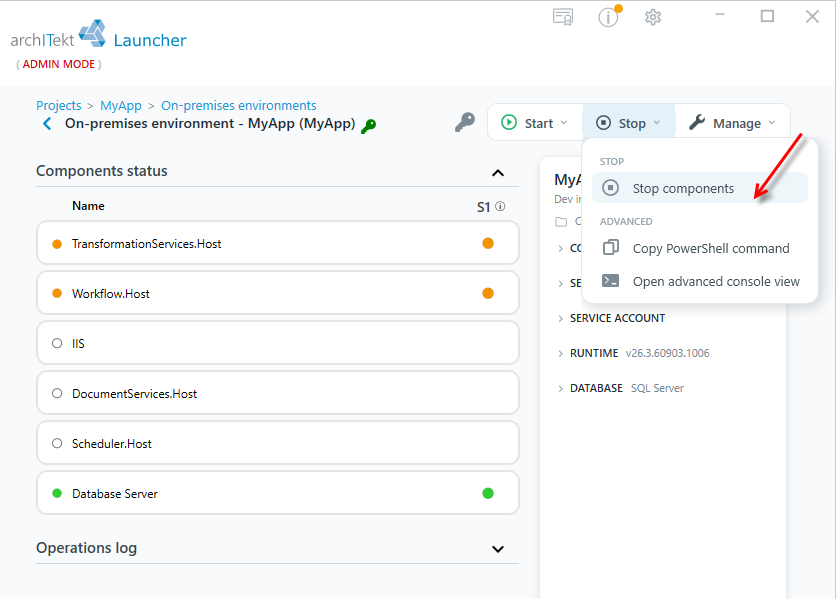
- expand the Stop button and select Stop components to stop the services. As with the Start button, the Advanced section provides the Copy PowerShell command and Open advanced console view options.
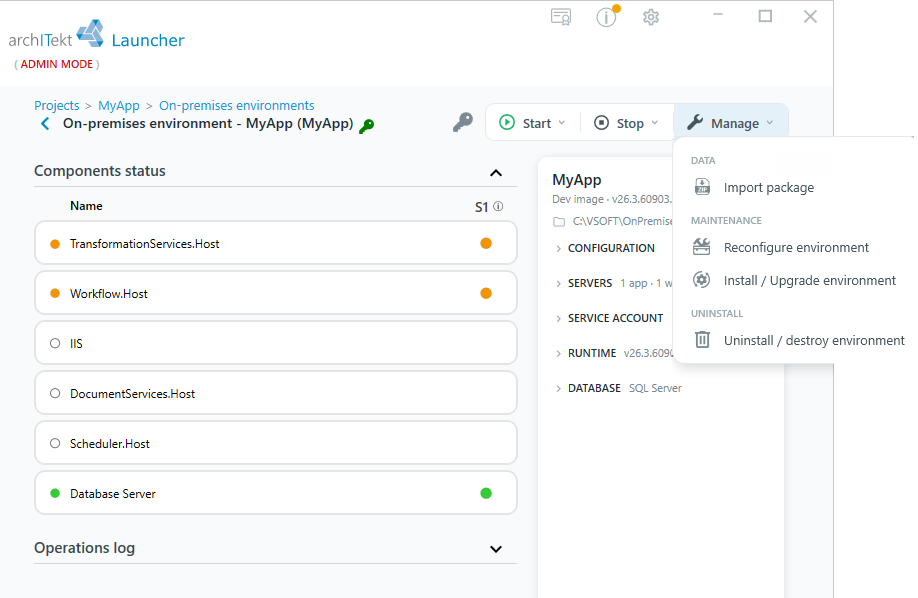
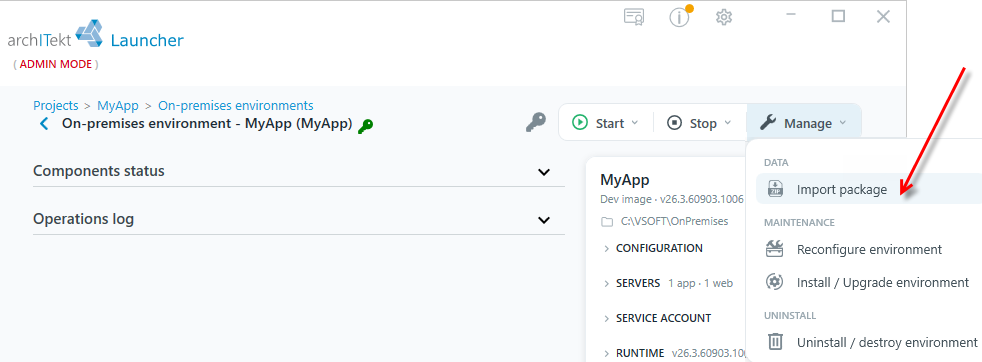
- expand the Manage button to access the remaining environment operations:
- DATA - Import package - the option to import project files, see Import files
- MAINTENANCE - Reconfigure environment - the option to reconfigure the environment (a window is then displayed with parameters to be modified, as when creating a new environment), and Install / Upgrade environment - the option to perform an installation, update or reinstallation of the environment, see Installing, updating and reinstalling the environment
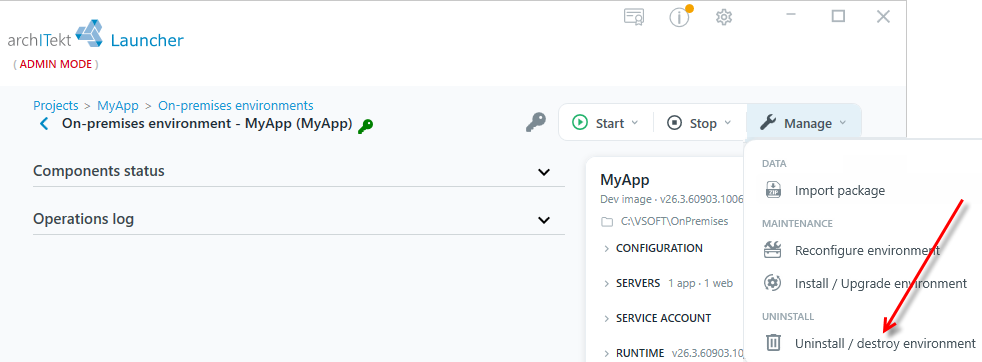
- UNINSTALL - Uninstall / destroy environment - the option to uninstall the environment, see Uninstall environment
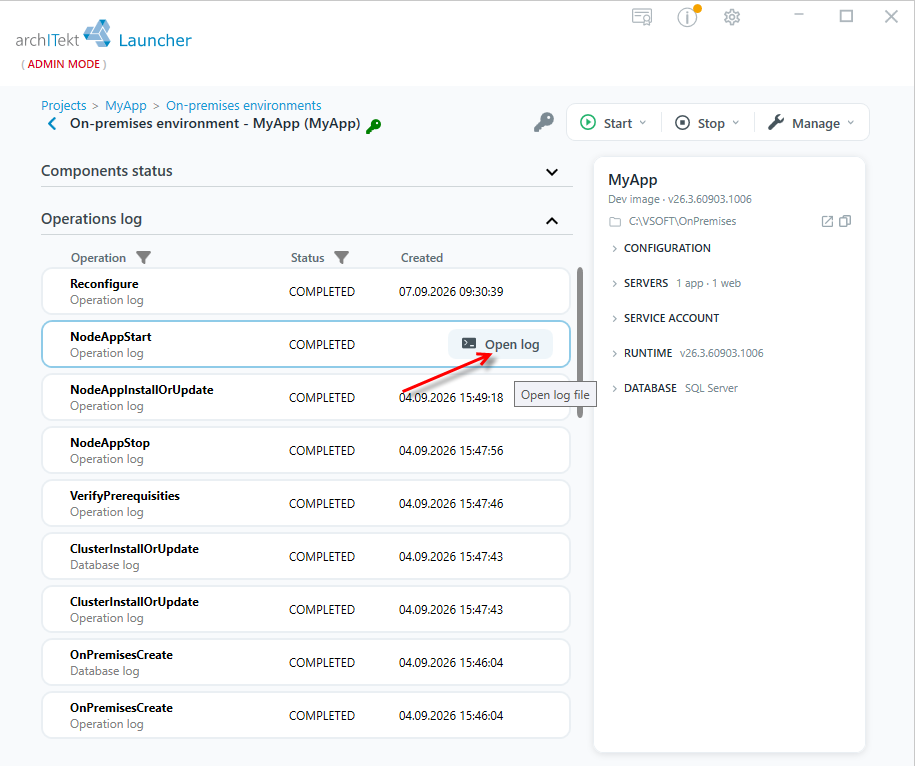
When you expand the Operations log section, the list displays all logs related to administrative operations for the environment.
- You can filter the list of logs - hover over the filter icon next to the Operation column and select one of the options: Show all logs, Show database logs or Show operations logs.
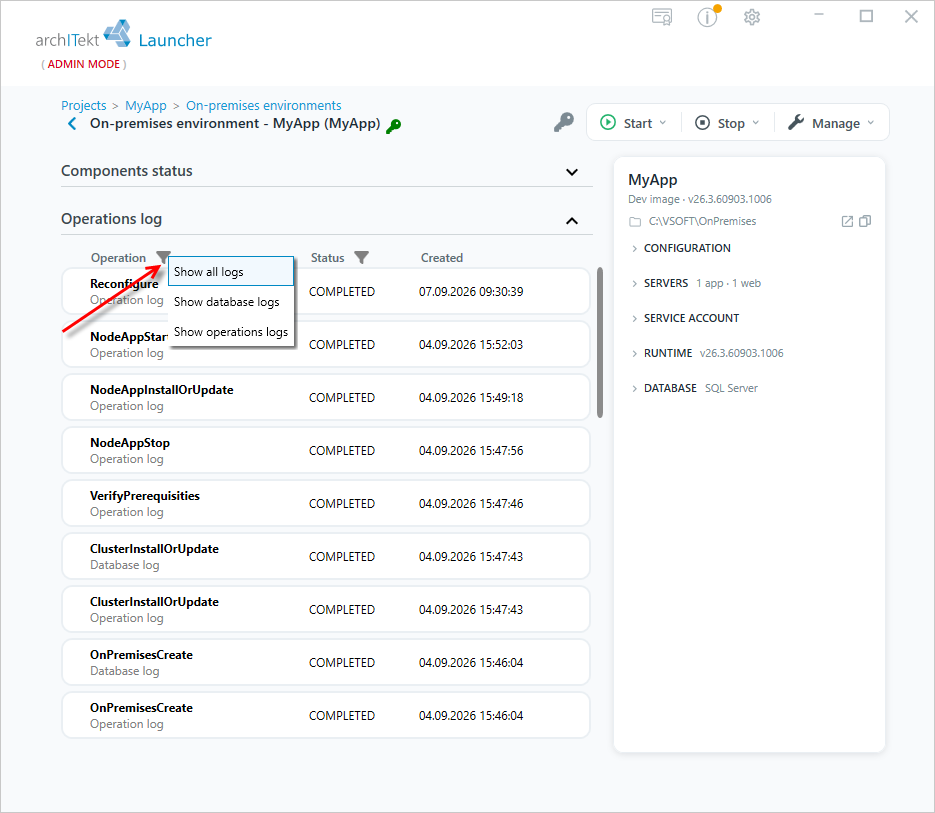
- Hover over a given log in the list and select the Open log button to open a file containing the history of the given operation.
Importing project files
In the management window, you can import a new version of the application into the environment by performing file import from the indicated location in the form of *.arch.zip file.
- Expand the Manage button and, in the DATA section, select Import package.
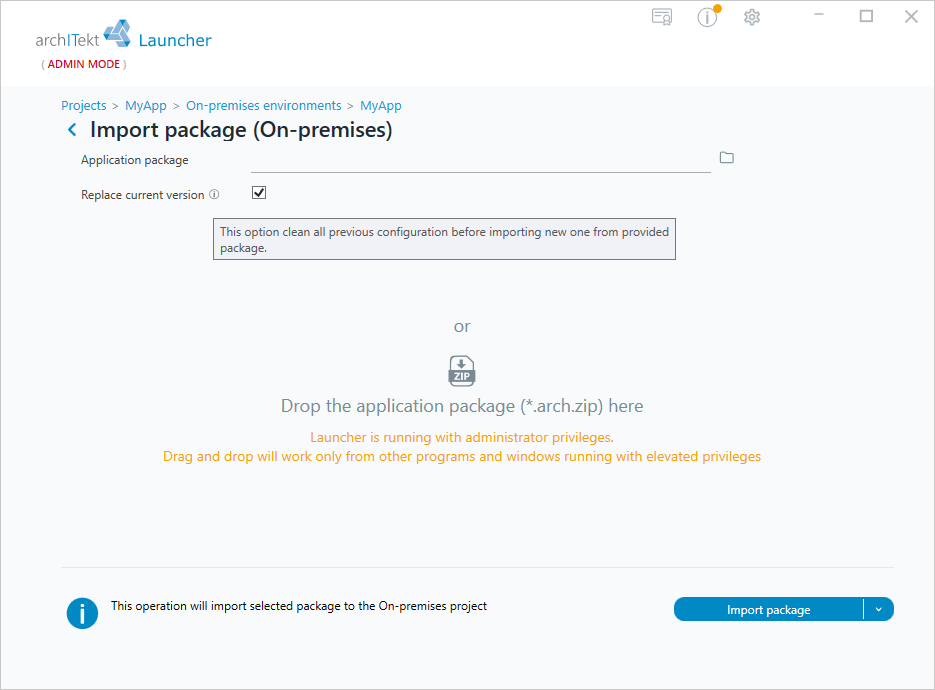
- In the Import package (On-premises) window, point to the
*.arch.zipfile in the Application package field or drag it into the indicated area. Drag and drop only works from programs and windows running with administrator privileges, since the Launcher itself runs with elevated privileges. - Option Replace current version clean all previous configuration before importing new one from provided package.
- Select Import package.
Exporting a package
The package export option available in archITekt Studio works only on development environments. This is because archITekt Studio requires direct access to the project directory in order to automatically read all the parameters necessary to prepare the PowerShell command template.
If you need to export a package on an On-Premises environment, this operation can only be performed from PowerShell, by building the appropriate command yourself.
Below is a command template:
"C:\Program Files\VSoft\archITekt\Images\21\PackageExport.ps1" `
-PathProjectFolder "[project directory]" `
-PackagePath "[any directory]\[PackageName].[yyMMdd.HHmm].arch.zip" `
-UserVersionNumber "[yyMMdd.HHmm]" `
-OptExcludeSystemFolder `
-OptOptimizeUserSQLAutoScripts
Where:
- [Project directory] – path to the project directory,
- [PackageName] – name of the generated package,
- [yyMMdd.HHmm] – current date and time in the format yyMMdd.HHmm.
The version number must always be greater than the previous one. Using the date and time as the version number makes it easy to maintain the required order.
Example:
"C:\Program Files\VSoft\archITekt\Images\21\PackageExport.ps1" `
-PathProjectFolder "C:\VSoft\Projects\MyTest1" `
-PackagePath "C:\MyTest1.260602.1457.arch.zip" `
-UserVersionNumber "260602.1457" `
-OptExcludeSystemFolder `
-OptOptimizeUserSQLAutoScripts
The command prepared this way will create an export package for the MyTest1 project in the C:\ location, assigning it the version number 260602.1457.
Uninstall environment
- Expand the Manage button and, in the UNINSTALL section, select Uninstall / destroy environment.
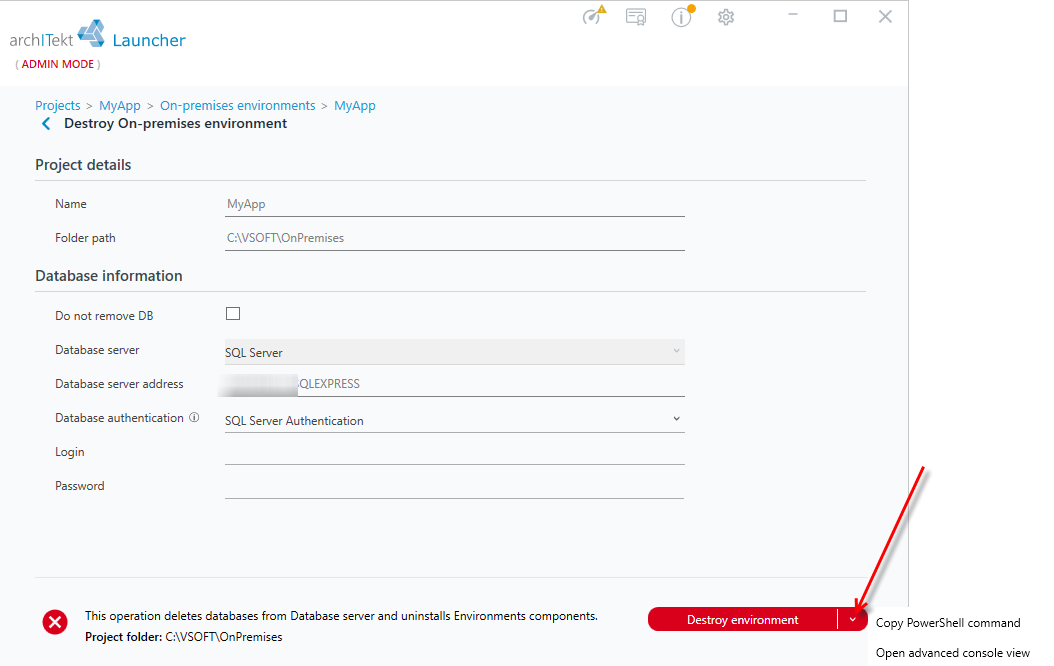
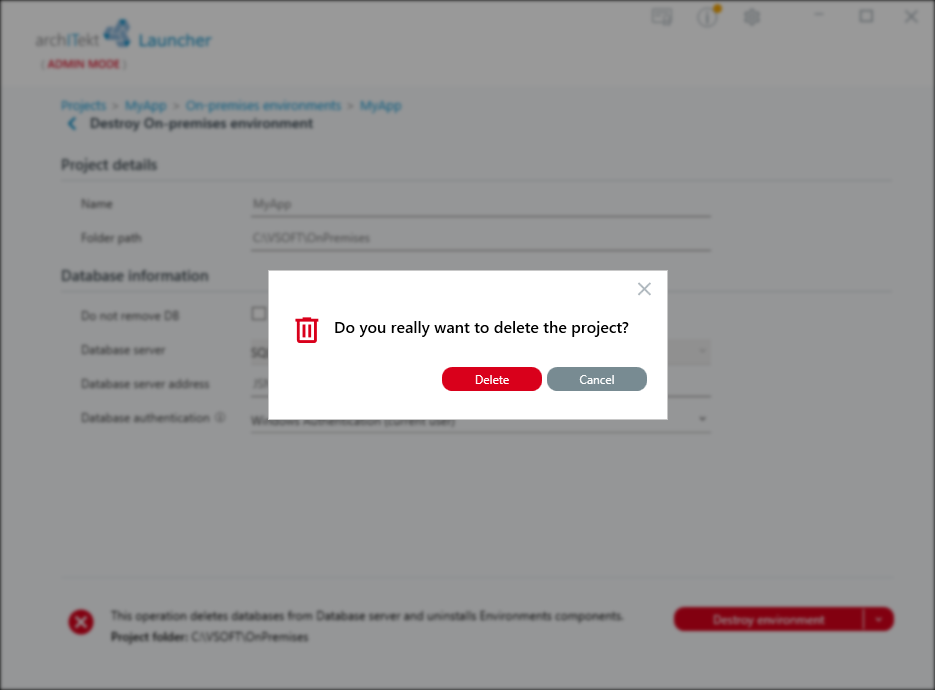
- In the Destroy On-premises environment window, verify the project details (Name, Folder path) and fill in the database information: if you don't want to remove the database, check Do not remove DB, otherwise provide Database server, Database server address, Database authentication and, depending on the selected authentication method, Login and Password. This operation deletes the databases from the database server and uninstalls the environment components.
- Select the Destroy environment button to run the operation. As in other places in the Launcher, expanding the button gives access to the Copy PowerShell command and Open advanced console view options.
- Confirm the action by selecting Delete in the Do you really want to delete the project? window, or select Cancel to abort.
Attaching and detaching an environment
- To attach an existing environment, go to the On-premises environments list page for the given project, select the Add new environment tile, then the Attach existing environment option, and point to the location from which you want to add an already existing environment associated with the project to the list.
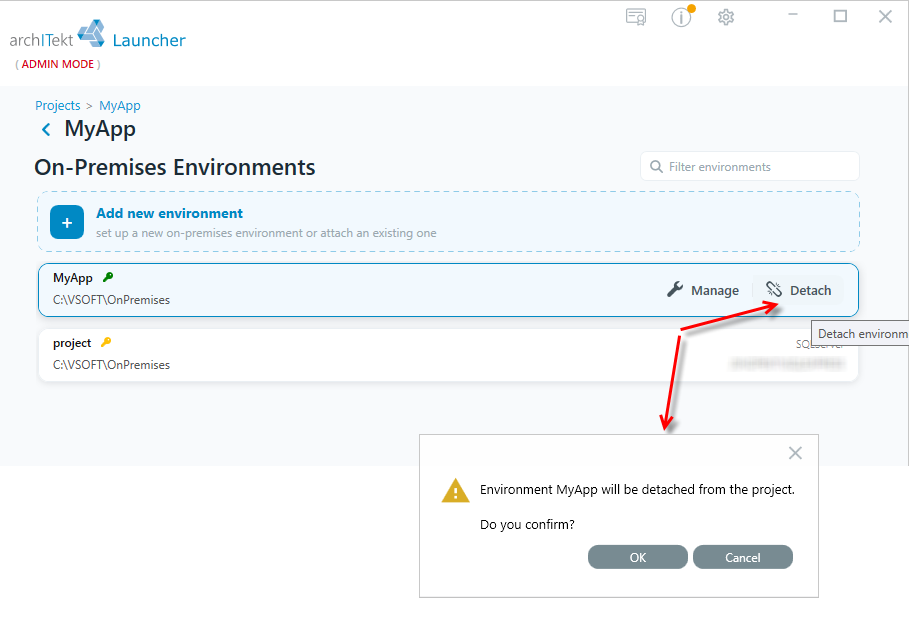
- To detach (forget) the environment, hover your mouse over the environment in the list and select Detach.
- Confirm the operation by selecting OK in the window with the message "Environment [name] will be detached from the project. Do you confirm?", or select Cancel to abort. The environment will only be detached from the project, not deleted.