General tools
The chapter contains a detailed description of blocks which are the general tools.
The blocks are located in the right hand side of the window in the menu Toolbox.
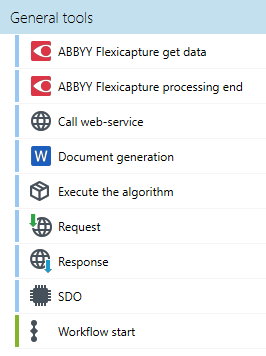
The general tools includes blocks:
Execute the algorithm

Block Execute the algorithm executes an algorithm element on a data structure. Places results in the same structure.
- In the parameters of the block, specify the path to the algorithm/table (VMD element version - properties) to be called, and in the Details tab, indicate the root of the call Select root and map the input parameters of the algorithm/table. The algorithm structure is suggested in the form of a grayed-out record and data fields.
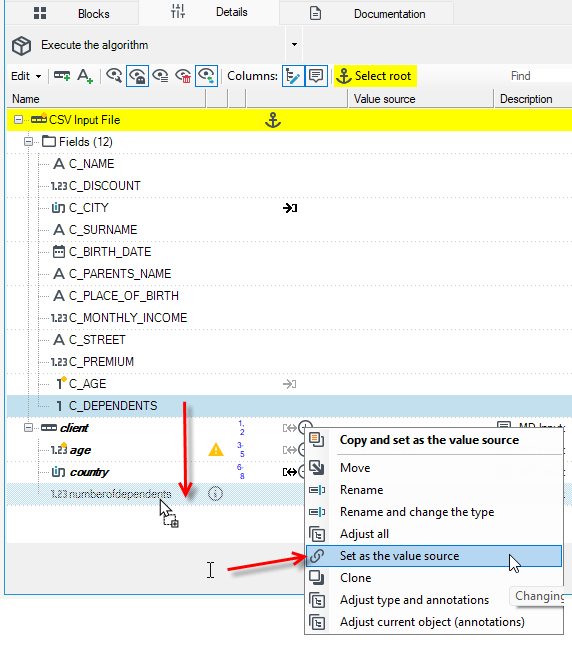
- You can add fields to the schema and assign them a value, or drag fields from the data schema onto the grayed-out fields of the algorithm's data structure. From the context menu, select Set as the value source.
- The indicated element will be called as many times as many physical records are in the call point at the time of processing, and the results of the call will be inserted under the call point and will be available in the next block.
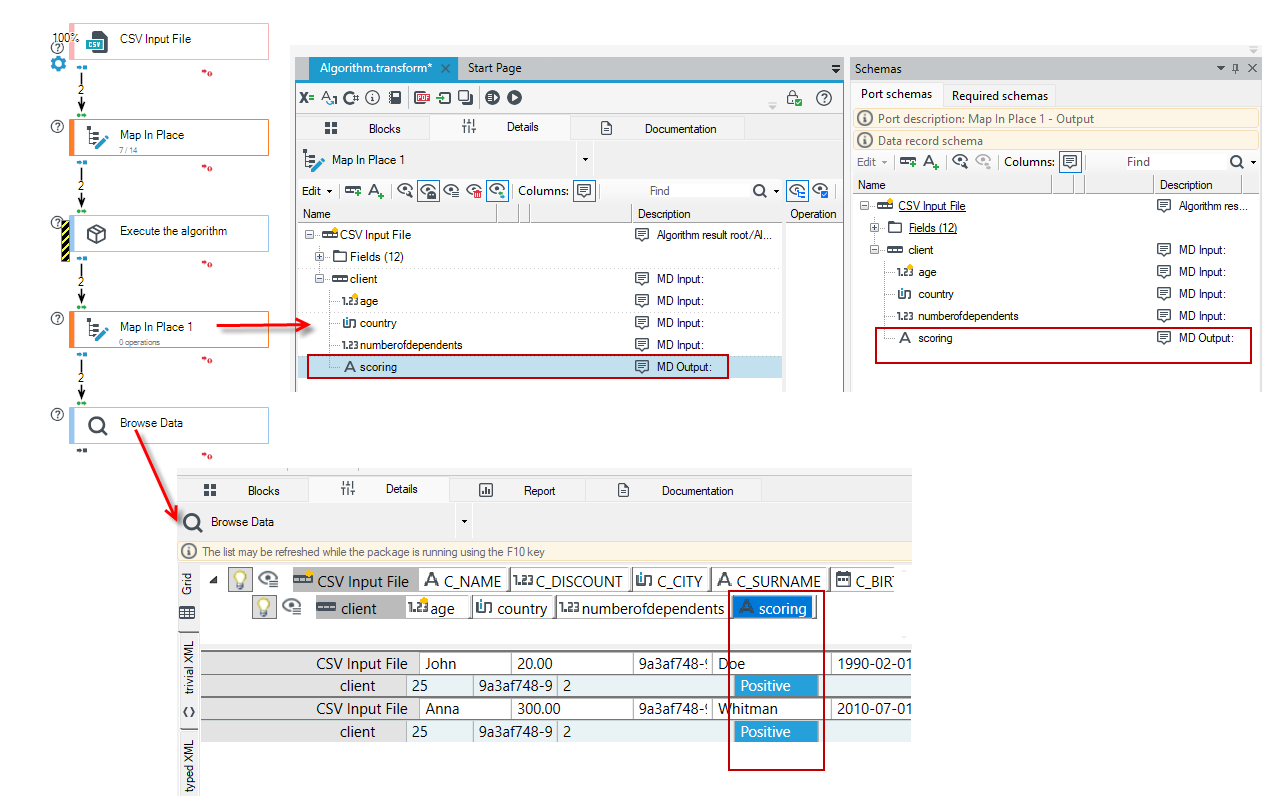
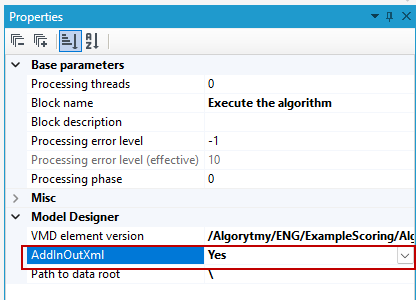
- In the block parameters, you can also enable the addition of technical text fields intended for the input and output XML passed to/from the algorithm.
- This allows for quick diagnostics of erroneous runs or copying data from test processing to unit tests of algorithms.
Document generation

The Document generation block allows you to generate documents in DOCX and PDF formats based on a template prepared in Word with archITekt's Generation document installed - for more see: Documents generation.
The block requires you to configure:
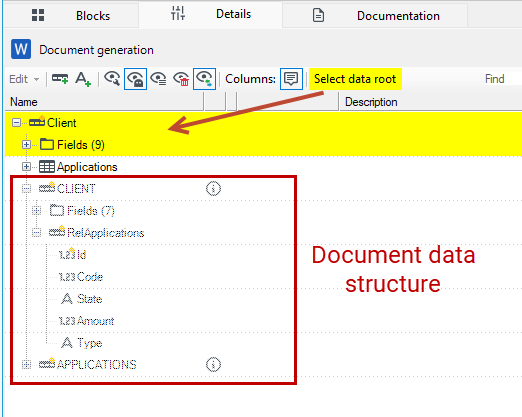
- the input data root, i.e. the record in the data structure that will contain the source data for the document (after going into the details of the block and selecting the record, select the Select data root button highlighted in yellow),
- version server element (.docx document template or .vds data schema) - selected in the properties of the block.
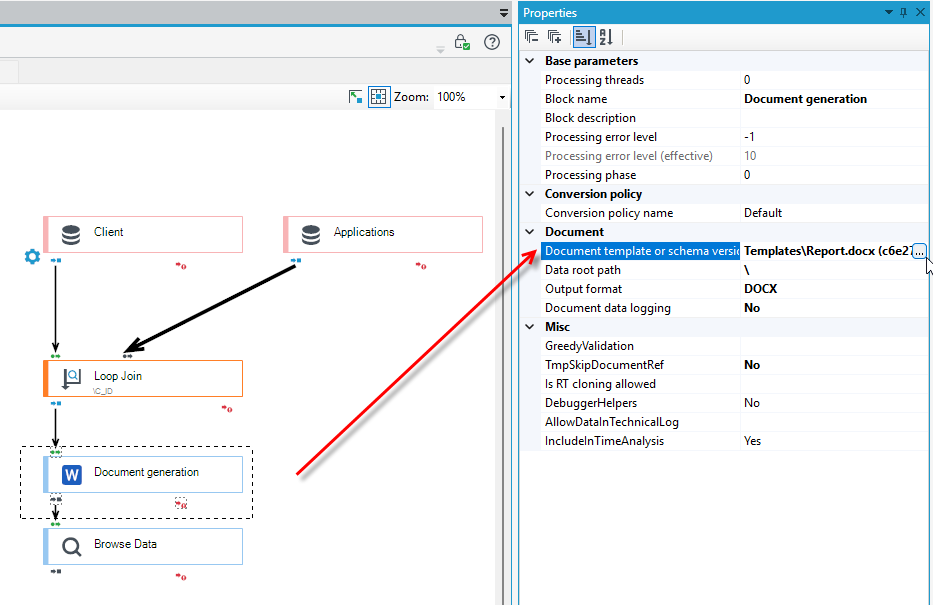
- If a
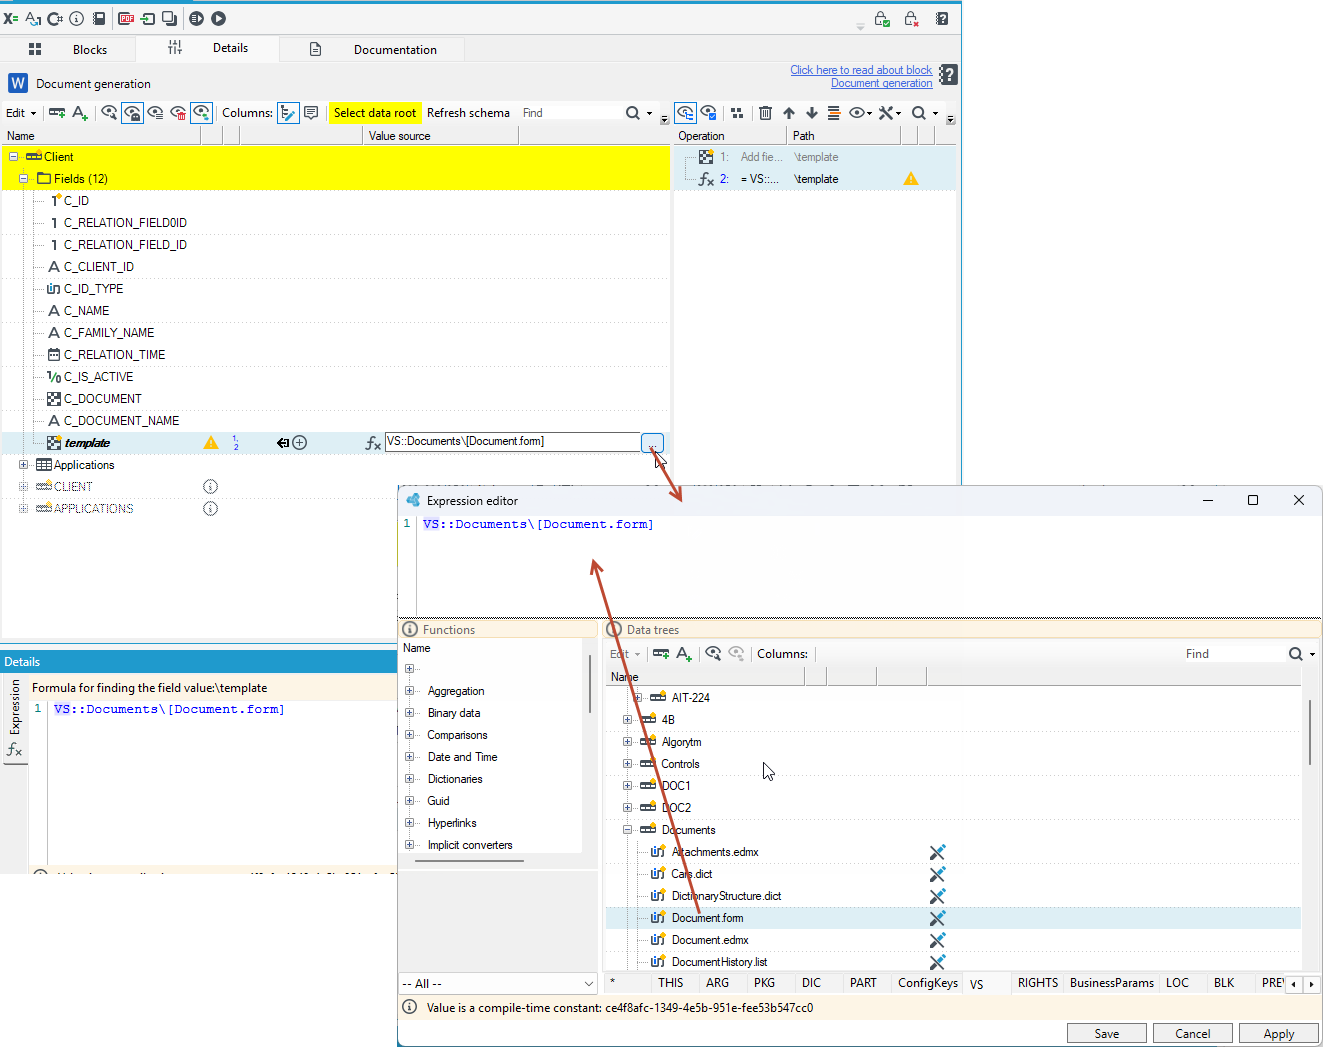
.vdsdata schema file is selected, it is also required to indicate the document template in binary form (the 'template' field in the root record).
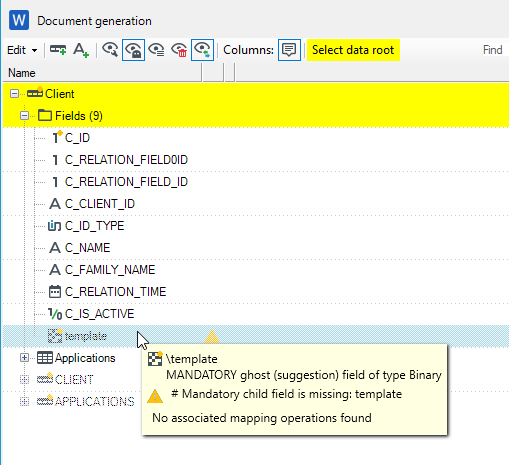
The template in binary form can be loaded using:
- block Read Files from disk,
- ReadFile expression function (possible to load a file from disk or from a version server using a path, e.g.
vs:///template.docx), - binary field from the database.
In addition, in the properties of the block you can change:
- format of the resulting document: PDF or DOCX,
- diagnostic logging of data transferred from the processing package to the document generation.
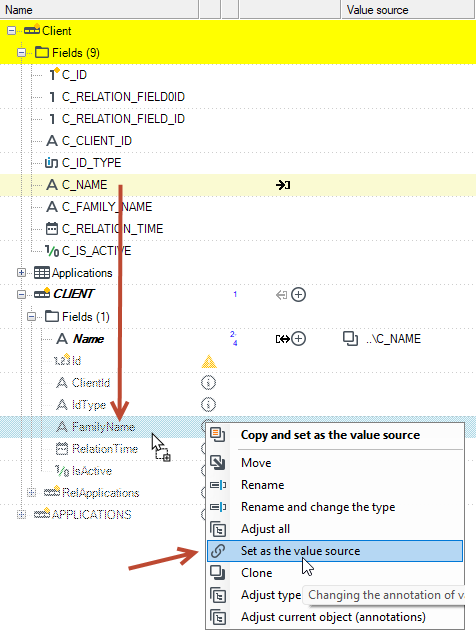
After configuring the above elements, the document input data schema will be prompted in the root record. The required fields must be mapped for the package to run.
- Drag fields from the data schema to fields from the document data structure and select Set as the value source from the context menu.
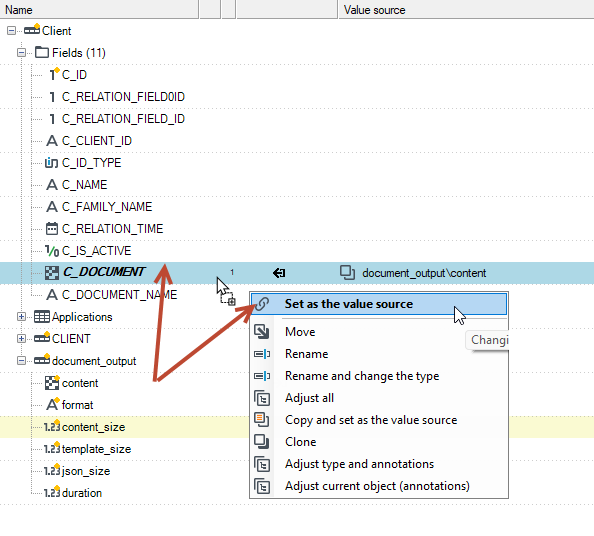
The generated output document will be stored in binary form in the root record in the document_output/content field

The field in this form can be saved at a later stage:
- to disk using the WriteFile expression function, example function is:
WriteFile("C:\Raport."+document_output\format,document_output\content)
- into the database to a binary field. Drag the content field to the binary field in the data structure and select Set as the value source from the context menu.
Workflow start

Block Workflow start allows you to start the indicated workflow.
- On the Properties panel, select the workflow to be launched.
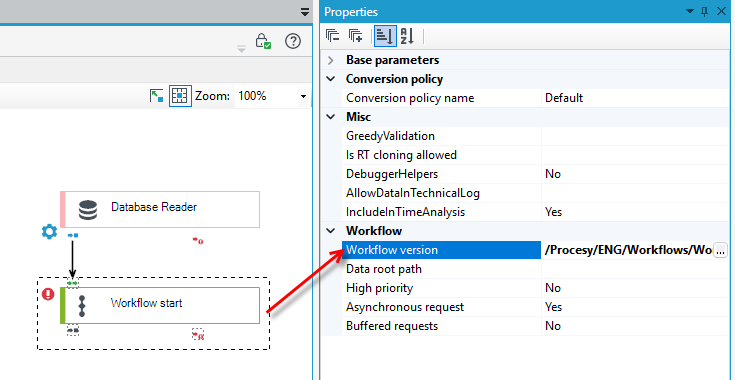
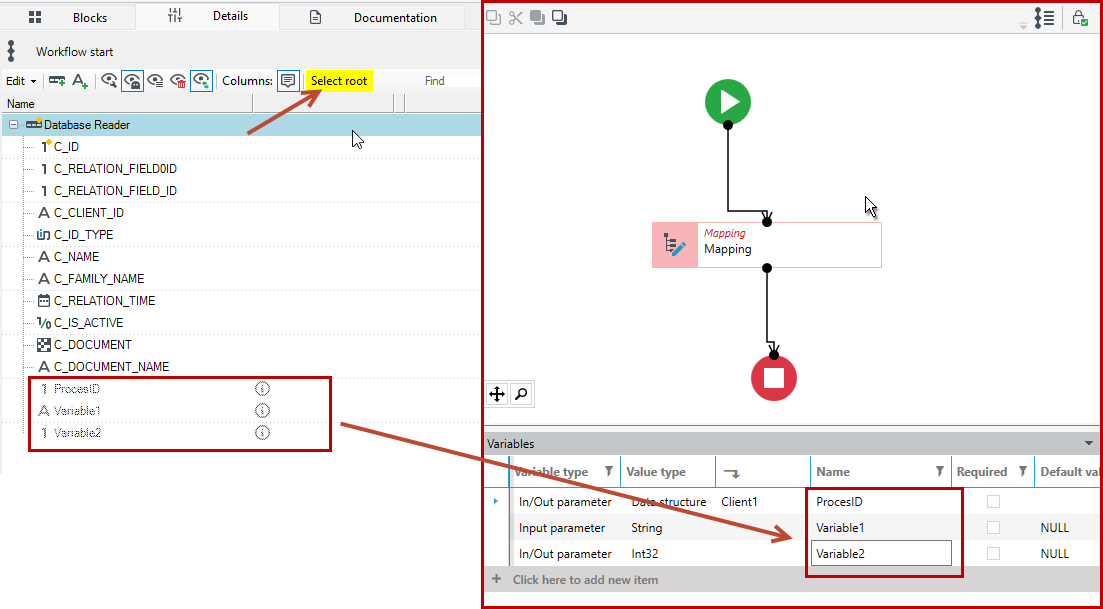
- Go to the block Details tab and select the input data root, i.e. the record in the data schema for which the workflow is to be started. Select the record and choose Select root.
- After selecting the root, the workflow variables you defined in the workflow on the Variables tab will be displayed.
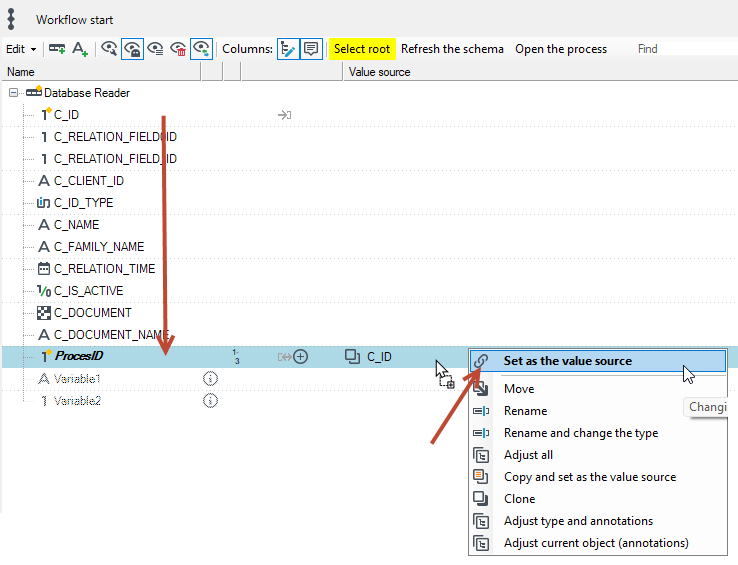
- Make mappings of the workflow data structure id, (and other data if processing requires it) with the data from the data schema. Drag the selected fields and select Set as the value source from the context menu.
In processing packages, you can also invoke a workflow on mapping operations using the Start workflow annotation.
- On a record or on a field in the data schema, right-click and select Start workflow from the context menu.
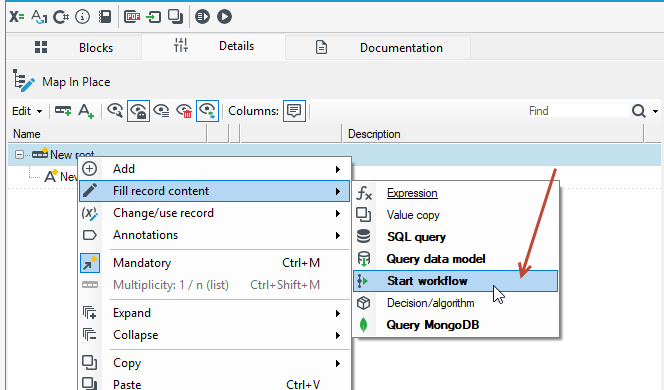
- After selecting the operation on the Operations tab, on the Properties panel you can indicate which workflow you want to run, or select a workflow on the data shema.
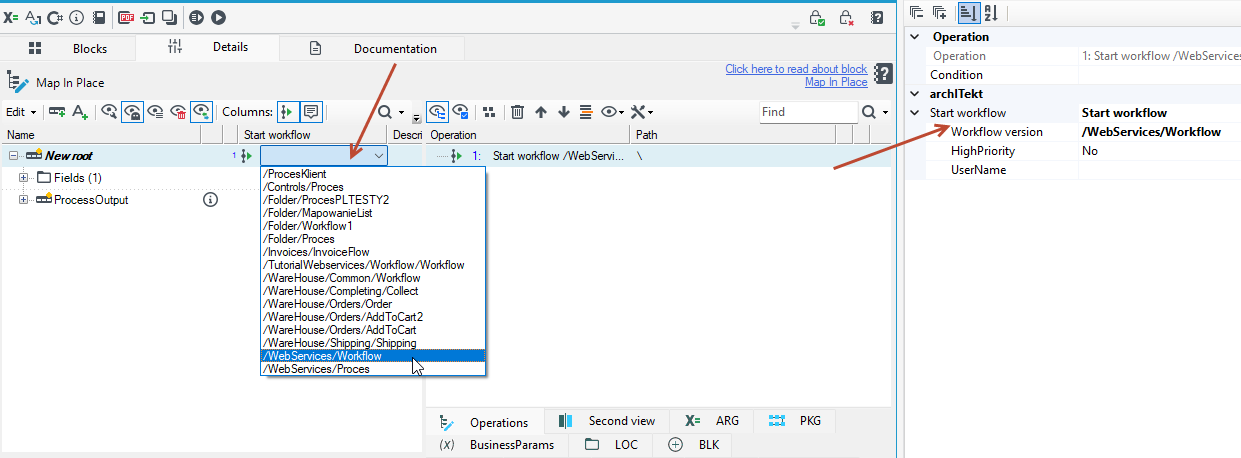
- You can also fill in the
_Processghost field and thus indicate the workflow definition. The value indicated in the data record is more important than the static configuration, if any. This allows you to statically indicate a workflow-template used only for parameter prompting, and actually, in instances call different workflows. - When you point to a workflow, the workflow variables you defined on the Variables tab will be displayed.
- These variables will be passed to the workflow.
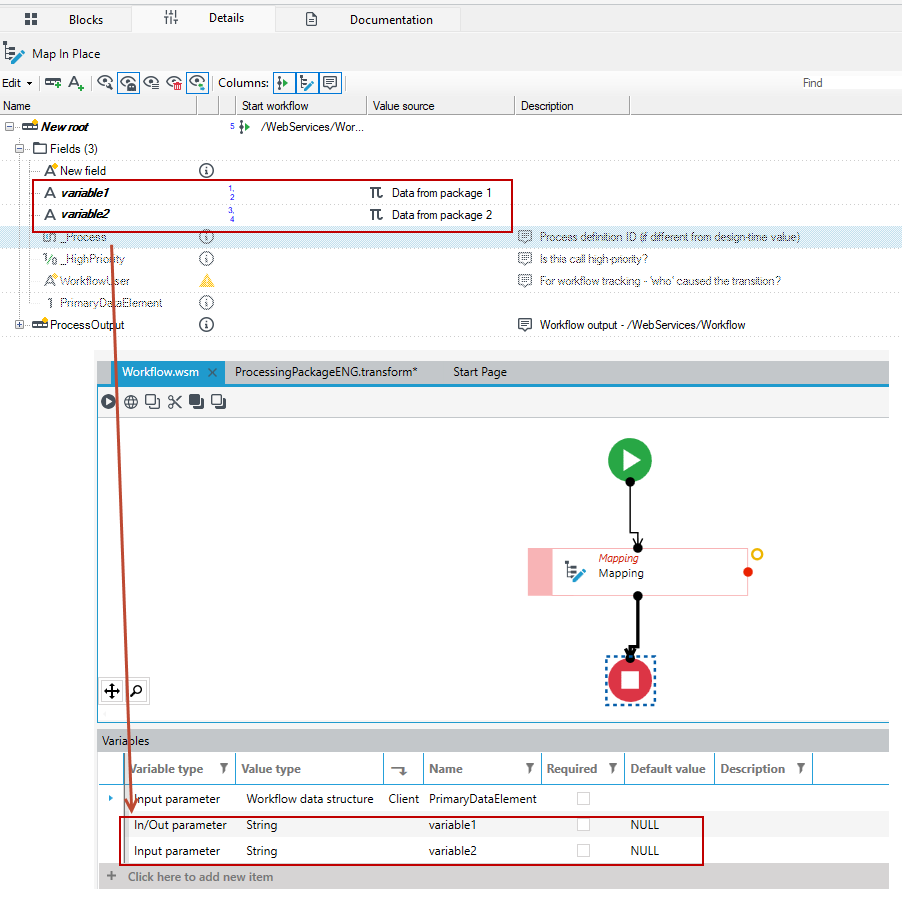
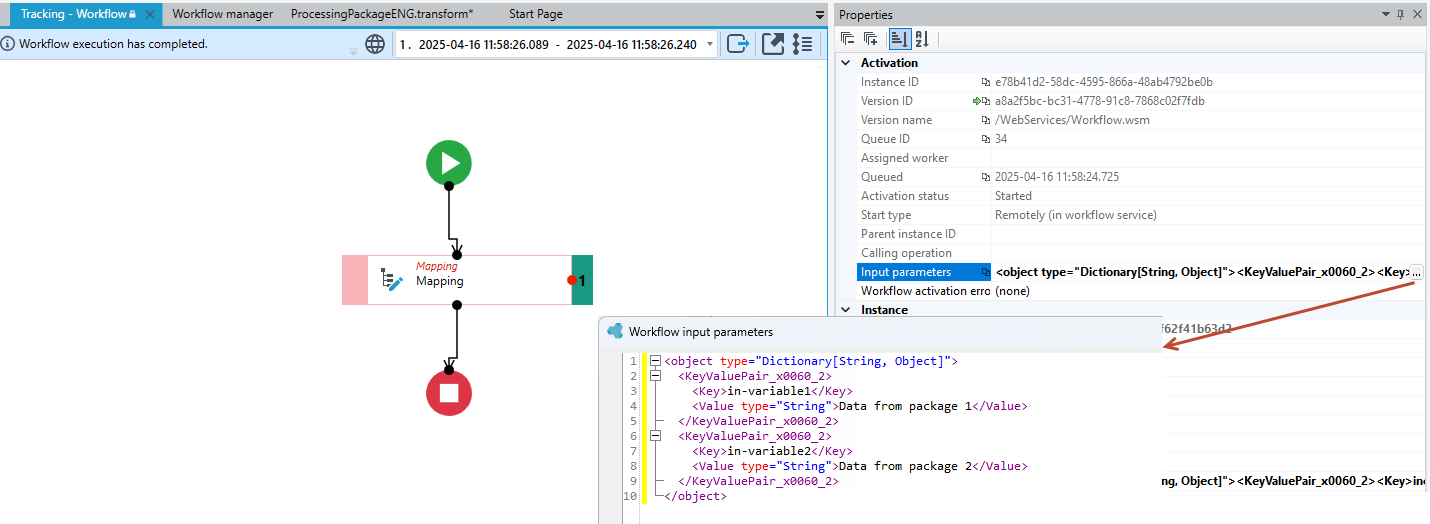
After running the processing package, you can preview whether the data from the package has been passed to the workflow.
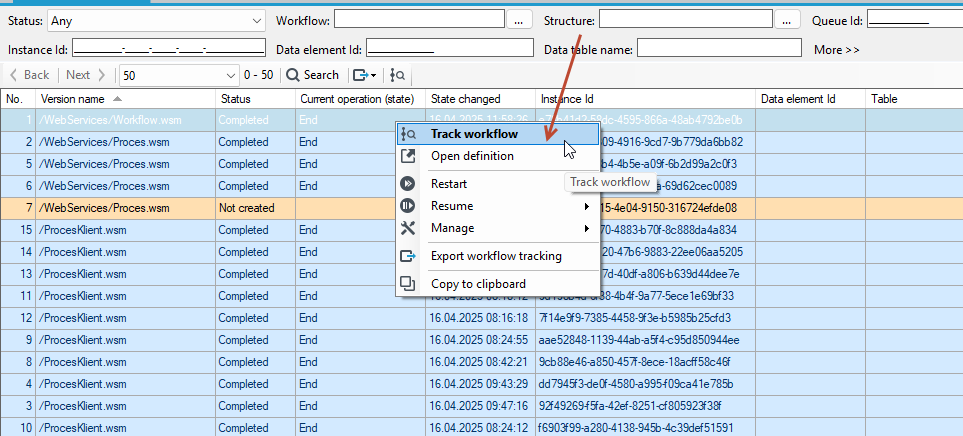
- Select Workflow manager from the Tools main menu.
- Double-click on the workflow to access the details of the workflow, or select Track workflow from the context menu.
- After clicking on the Input parameters option, the XML with the data passed to the workflow is available.
Call web-service

Block Call web-service sends request to specified service through WCF and processes it's response.
To call the service, you must define a data source. See: Data Sources
There are several types of services:
- SOAP (version 1.1 and 1.2)
- POX - Plain Old XML
- REST
- In the case of SOAP service, the identification of the input point is based on the SOAP mechanism of the so-called Action and the content of the request / response is encoded using SOAP (as Body excluding the fields marked "Header" annotation of the "Message header" type).
- In the case of POX service, identification is done by the name of the XML request main element, and the content is encoded directly to/from XML.
- For REST, identification is based on address matching and http operations (
GET,POST,PUT, etc...) and the request/response content can be encoded as XML/JSON/UrlEncode. - In the PathTemplate parameter of the block, we specify an address template
/Resource/{id}/{subId}, where{id}and{subId}will be completed in the physical address of the request based on data from the request body, as long as they are marked there with a "Header" annotation of the type "PathAndQuery". - The rest of the request fields annotated in this way that do not appear in the address template will be completed to the http request, e.g. ?q=abc&id=123 will be completed from the q and id fields. The remaining request fields (not so annotated) will be interpreted as request content elements (XML / UrlEncode).
In order to configure the block, calling the WCF service of the external system, you need to perform the following operations:
1. Specify the service schema
- In the case of SOAP, it is best to import the Action fields and the request and response templates from the WSDL document. In other cases, you can use the editors on the Request and Response tabs directly.
- In the case of SOAP, for this purpose, in the details of the block, on the Operation tab, you need to load the service definition. This can be done by:
- pointing to the service data file,
- inferring the service schema from the provided XML messages,
- indicating the network address to the WSDL file, from which designer will automatically download the definition.
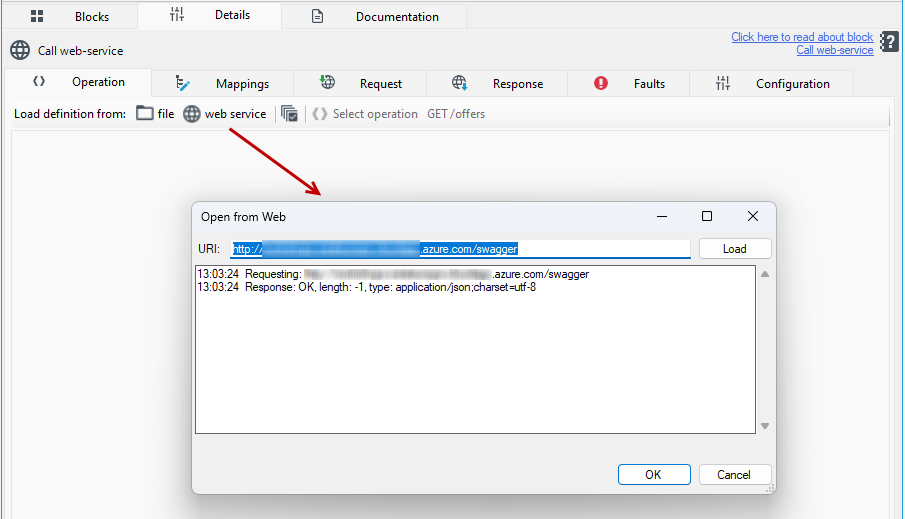
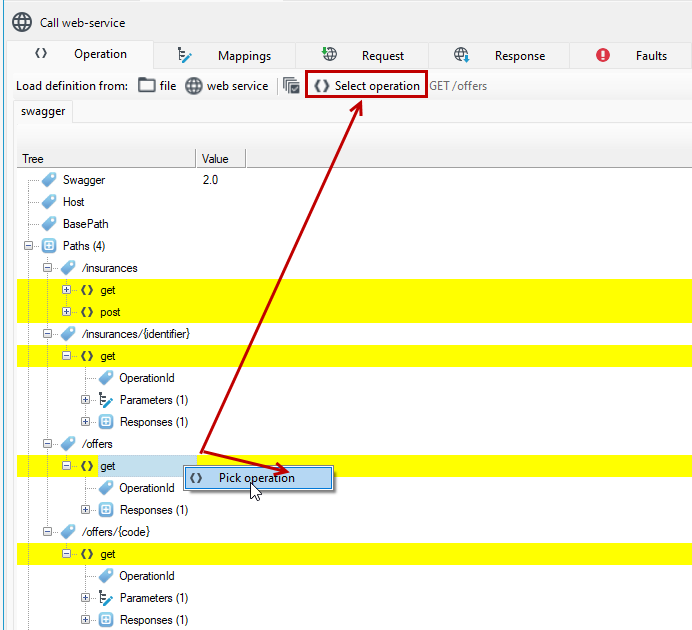
After loading the definition, select the operation of interest by selecting it on the tree and pressing the Select operation button or by selecting the option from the context menu.
2. Mapping of input parameters
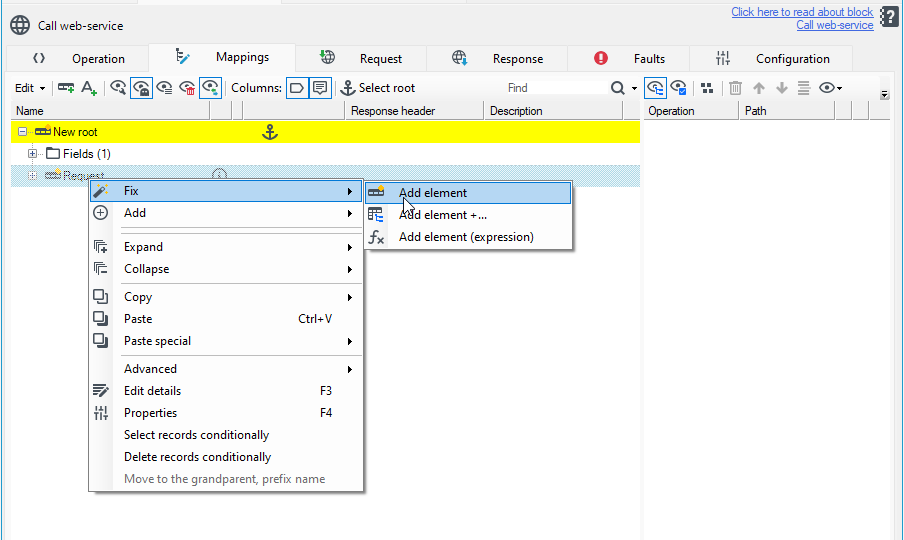
On the Mappings tab, select where to attach the service to the processed data tree (using the Select root operation), and as a result, the input fields of the service will appear in the structure, which must be filled with data.
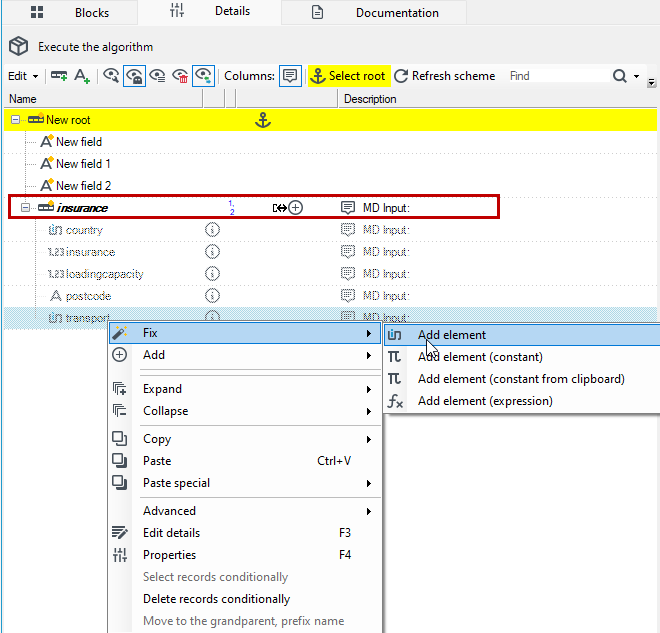
To add a record that is grayed out, right click and select Fix>Add element from the context menu.
3. Complete the environment configuration with the newly configured invoked service.
- The Configuration tab contains a fragment of the configuration (endpoint) for the invoked service, which should be added to the configuration files of the runtime environment according to the instructions presented on the tab.
- Due to the fact that on different environments there may be different configuration of services (differing, for example, in the security of the transmission channel), therefore, the WCF configuration for the called services is implemented using the standard configuration mechanisms of the Microsoft.NET platform.
- At the stage of initial design and testing of services in the project environment, it is possible to use several simple, ready-made WCF bindings (bindings) of the BasicHttpBinding (SOAP 1.1), WsHttpBinding (SOAP 1.2) and WebHttpBinding (POX, REST) types.
- In addition to the binding type, we specify the test URL of the service we want to invoke (http / https).
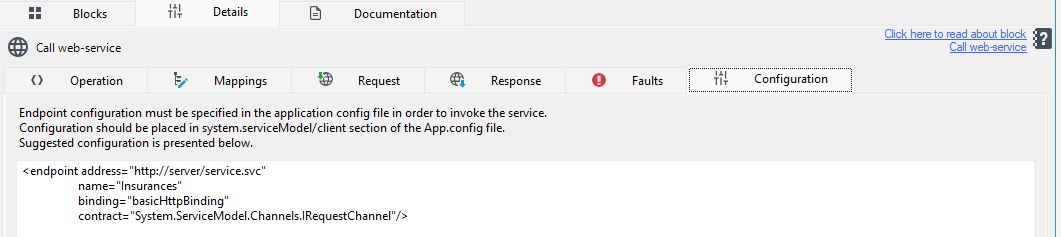
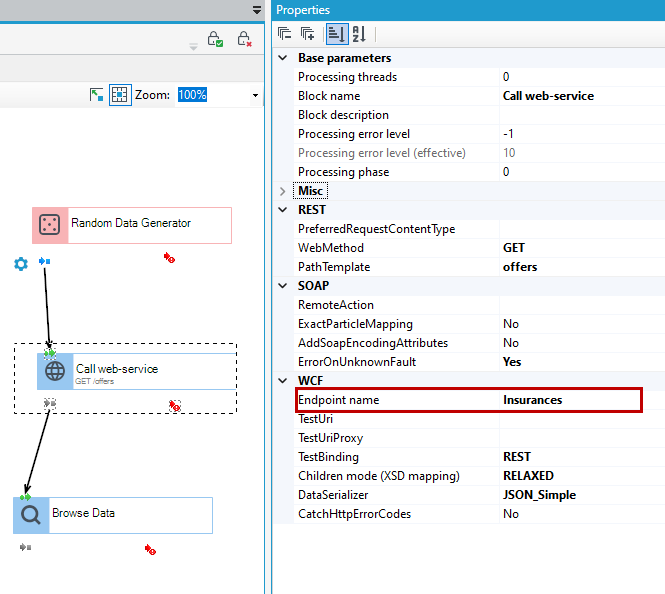
- The "[name]" fragment of the configuration should be filled in with a name of our choice, which we will also specify in the properties of the block in the variable Endpoint name.
- As part of the configuration of the block, we can specify a limit on the asynchronicity of the mechanism. Values greater than zero will cause the block within a single thread to be able to send and wait for more than one request at a time. This will usually result in speeding up the operation of all processing at the cost of increased use of resources on the other side of communication (usually CPU, databases, etc.).
- In addition, you can specify whether the blocker should release responses in the order they arrive, or rather respect the order of requests.
- It should be noted here that the systems we communicate with do not necessarily execute requests serially, and those sent earlier may return later than those sent a moment ago. Depending on the configuration of the block, this can lead to rearranging the order of the input data. You can read more about asynchronicity in the chapter Managing threads and task queues.
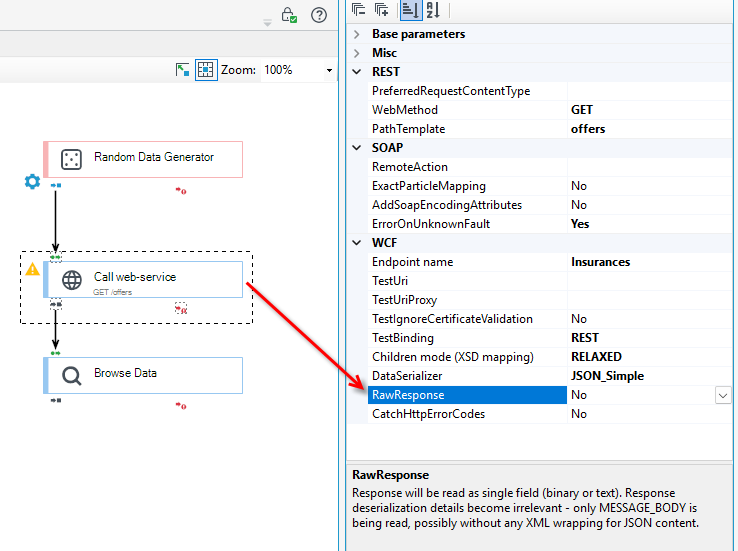
- The RawResponse option by passes all response parsers. The response will be read as a single field (binary or text). Details about response deserialization become irrelevant—only
MESSAGE_BODYis read, probably without any XML wrapping for JSON content.
- Mapping to XML follows the rules described in chapter: Mapping to/from XML and XSD.
In addition to creating the request body, the block also allows you to prepare custom SOAP headers. This is done using the Header/URI annotation (in request) at the level just below the request root. On the element and below it, we will usually need to specify XSD namespaces and other parameters in a precise way to process the header on the recipient side.
Example of integration with a REST Service
In the following example, we will retrieve data about available insurance offer types from a test service called Insurances.
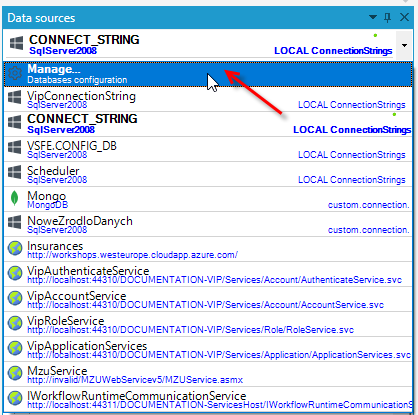
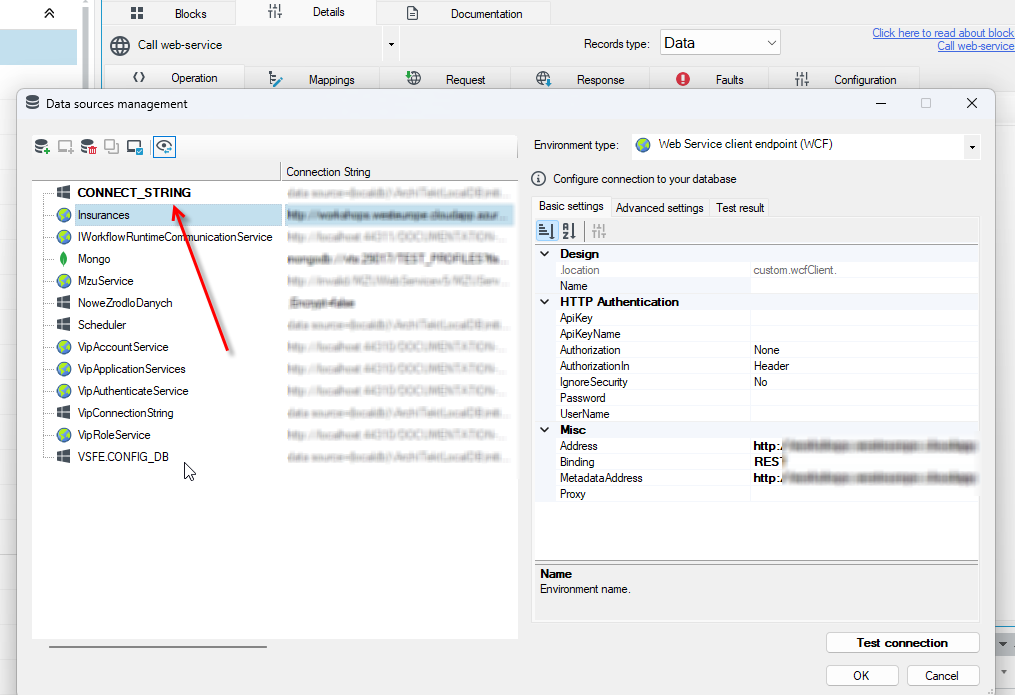
- Start by adding a new data source. Go to the Data sources panel and select Manage.
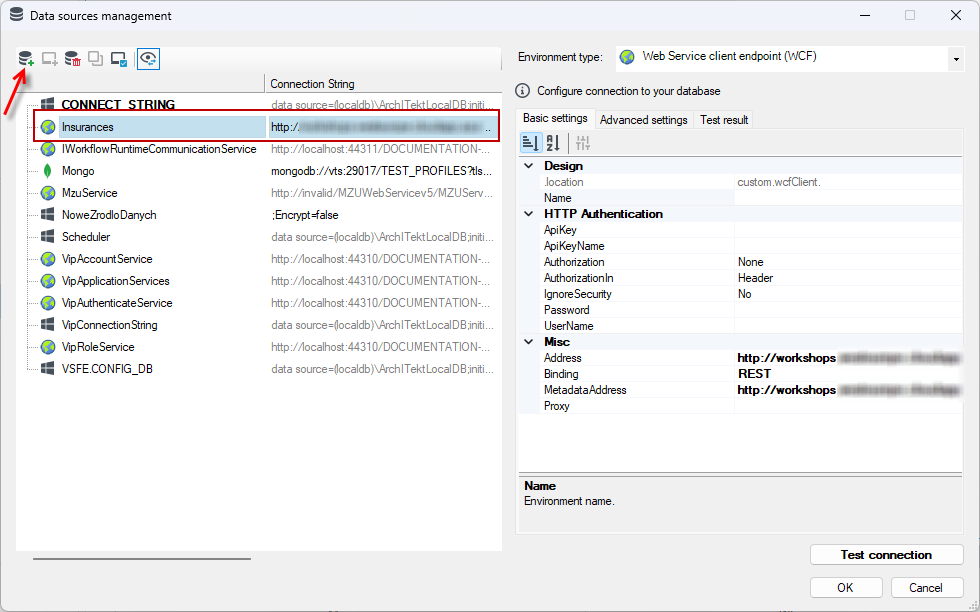
- Add a new environment and select Web Service client endpoint (WCF) as the environment type.
- Fill in the service address and metadata.
- Create a new processing package and select the data source.
- Add the following blocks: Random Data Generator, Call web - service, and Browse Data.
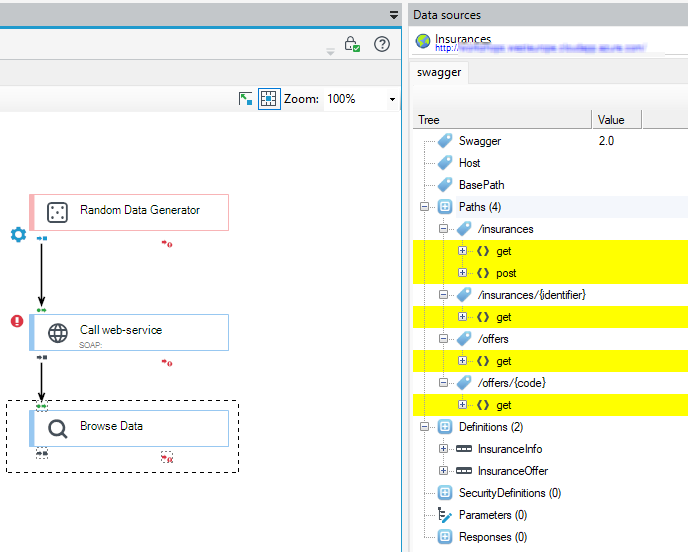
- Double-click the Call web-service block and select the Insurances data source.
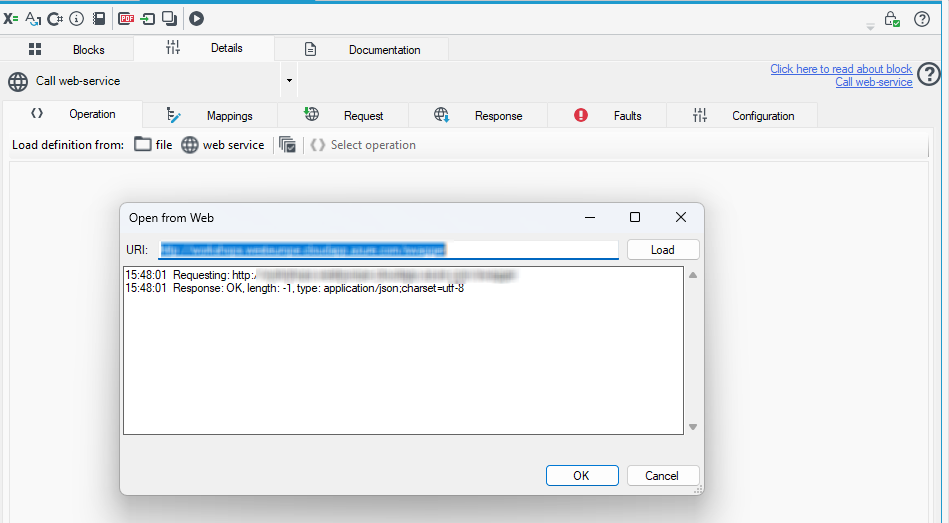
- In the next window, the service address will be retrieved.
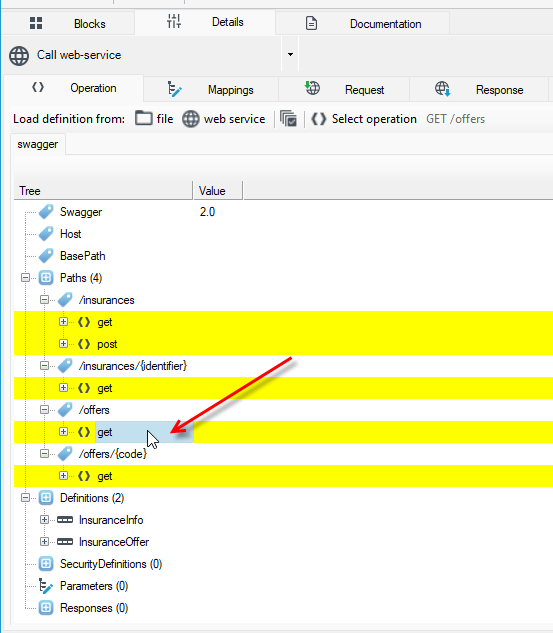
- In this case, we only want to retrieve offer data. Double-click on the get operation under the offers record. In this case, you don’t need to fill in any other tabs.
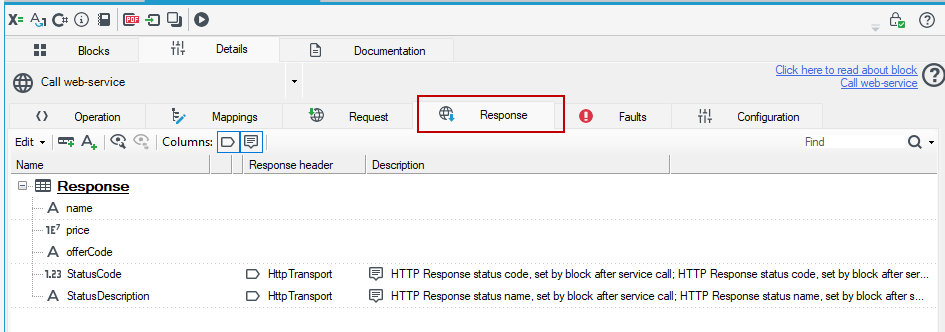
- You’ll be taken to the Mappings window. At this point, you can already run the package and go to the Response tab to see what is returned by the service.
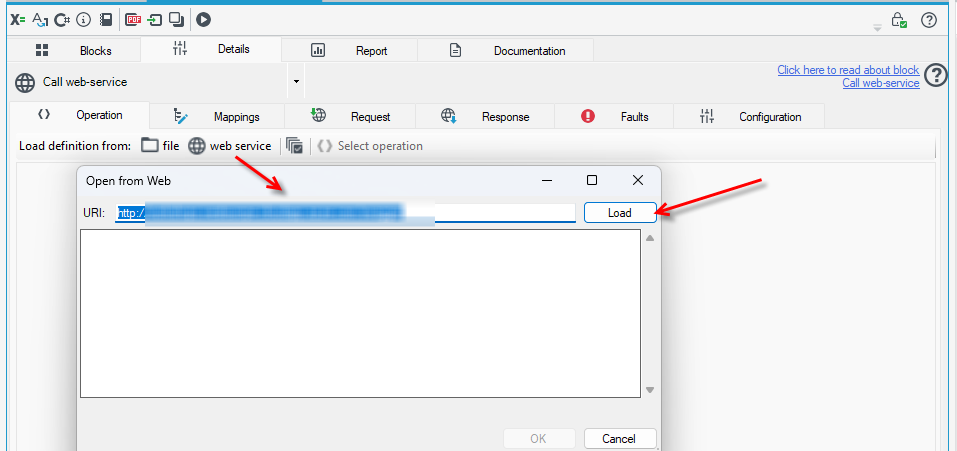
- To change the method, go to the Operation tab. If you don't see available methods, reload the service address by clicking the button from the top toolbar.
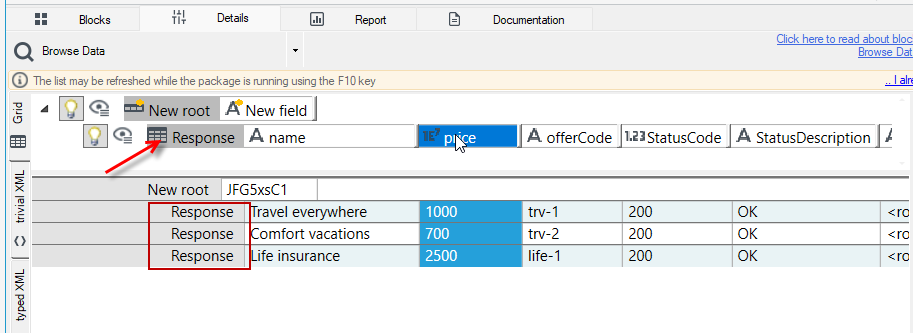
- After running the package, you can view what was returned from the service in the Browse Data block.
Authorization
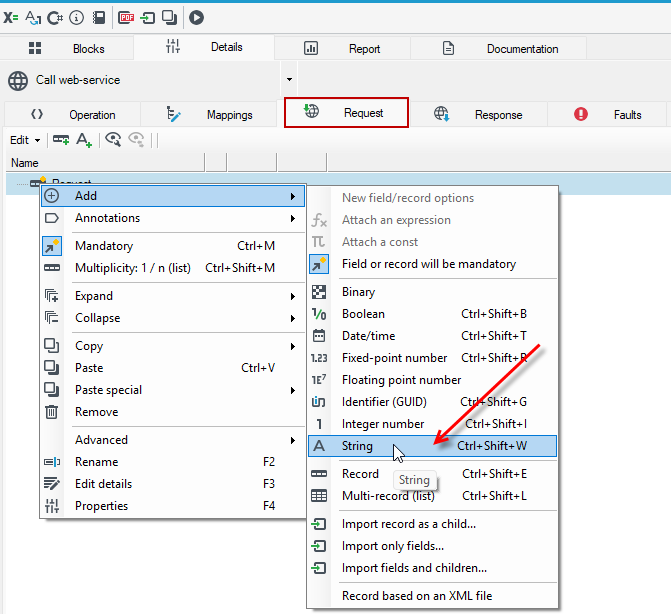
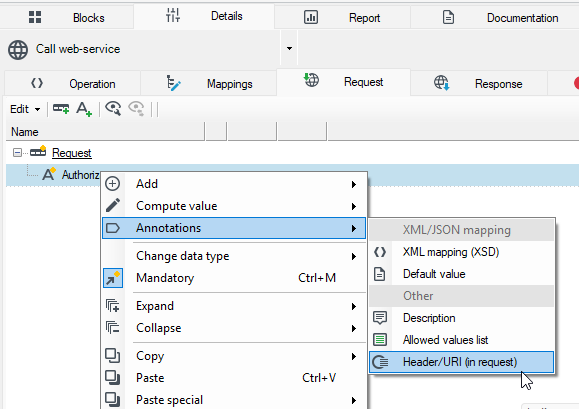
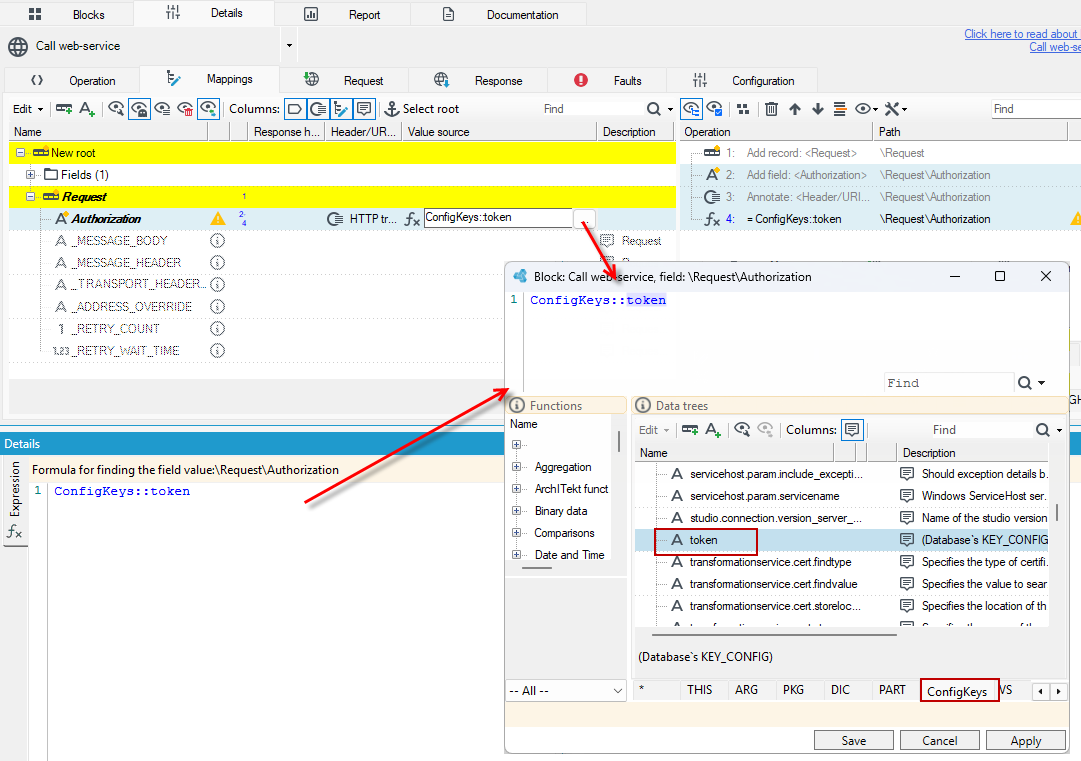
- If the service requires authorization, go to the Request tab and add a text field named Authorization.
- Add an annotation to the Header/URI (in request).
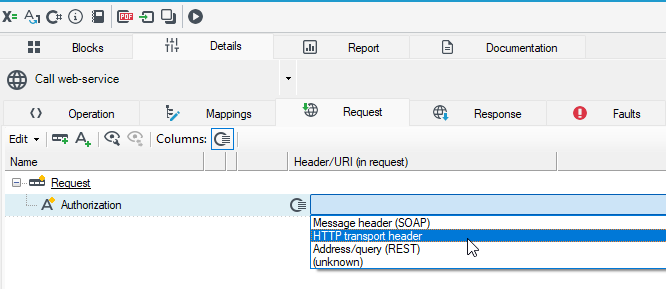
- From the list, select the appropriate option under the Header/URI column.
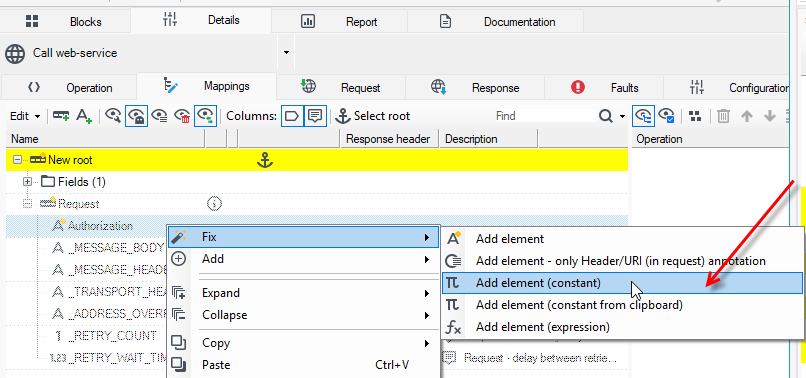
- Go to the Mappings tab. The added field will appear in the Request record. The record is grayed out and needs to be added to the data schema.
- Click on the field and select Fix>Add element. If you choose Add element (constant), an annotation will be immediately added to the field, where you can enter a constant value.
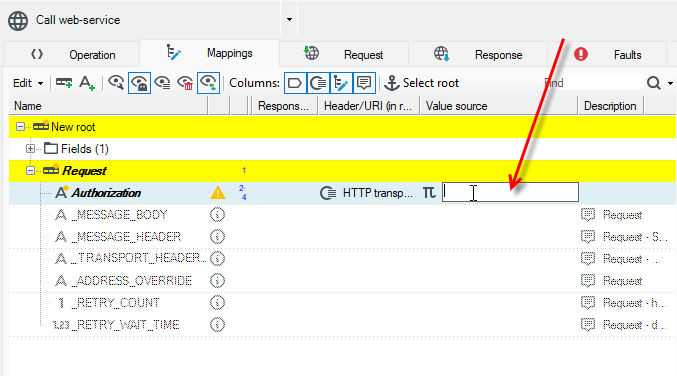
- In this case, you can enter the token as a constant in the Value source field.
- If the token is stored in the project's configuration keys, you'll find it in the
CONFIG_KEYStable, and in expressions under theConfigKeystab.
Request

Block Request waits for input request and puts it into further processing.
The service configured within the package has a name such as the name of the Request block and arguments corresponding to the structure configured in the block.
By default, services process data in an initially set maximum of one thread. If necessary, you can raise the number of threads of the block (usually it will be a Request block) to a value of, for example, 4-10.
There are several types of services:
- SOAP (version 1.1 and 1.2)
- POX - Plain Old XML
- REST
- In the case of SOAP service, the identification of the input point is based on the SOAP mechanism of the so-called Action. The value is calculated by default based on the block name and the contract namespace, but it is possible to parameterize your own arbitrary names.The content of the request / response is encoded using SOAP (as Body excluding the fields marked "Header" annotation of the "Message header" type).
- In the case of POX service, identification is done by the name of the XML request main element, and the content is encoded directly to/from XML.
- For REST, identification is based on address matching and http operations (
GET,POST,PUT, etc...) and the request/response content can be encoded as XML/JSON/UrlEncode. - In the PathTemplate parameter of the block, we specify an address template
/Resource/{id}/{subId}, where{id}and{subId}will be completed in the physical address of the request based on data from the request body, as long as they are marked there with a "Header" annotation of the type "PathAndQuery". - The rest of the request fields annotated in this way that do not appear in the address template will be completed to the http request, e.g. ?q=abc&id=123 will be completed from the q and id fields. The remaining request fields (not so annotated) will be interpreted as request content elements (XML / UrlEncode).
- The definition of a package available as a WebService must begin with a Request block and may end with a Response block.
- Services that do not return a result do not have to have a Response block.
Processing packages defined as WebService returning responses cannot use the functionality of packages:
- queues,
- asynchronicity
on the reason that it wouldn't make sense - the service has to wait for all the data along the way to return a response to the client anyway.
In normal use, request blocks are matched to published WCF service points based on contracts defined in the host program's XML configuration, which will typically include a lot of extra security, additional behavior, and so on.
However, for the initial design and testing of services in a design environment, it is possible to use some simple off-the-shelf WCF bindings like BasicHttpBinding (SOAP 1.1), WsHttpBinding (SOAP 1.2) and WebHttpBinding (POX, REST).
Response

Block Response returns a query's response to caller.
- The service configured as part of the package returns in response parameters corresponding to the data structure configured in the block
- The definition of a package provided as a WebService must begin with a Request block and end with a Response block.
Processing packages defined as WebService cannot use the functionality of packages:
- queues,
- asynchronicity
due to the fact that the technology for handling WCF services on the Microsoft .NET platform does not support such a scenario.
Using the Request and Response blocks, you can expose services. To call an external service, use the Call web-service block.
Example of building a REST Service
In the following example, a REST service will be built to perform an insurance cost calculation. The cost calculation will involve multiplying the value of the field named monthCount by a constant value sent to the service.
- Create a package consisting of the Request, Mapp In Place, and Response blocks.

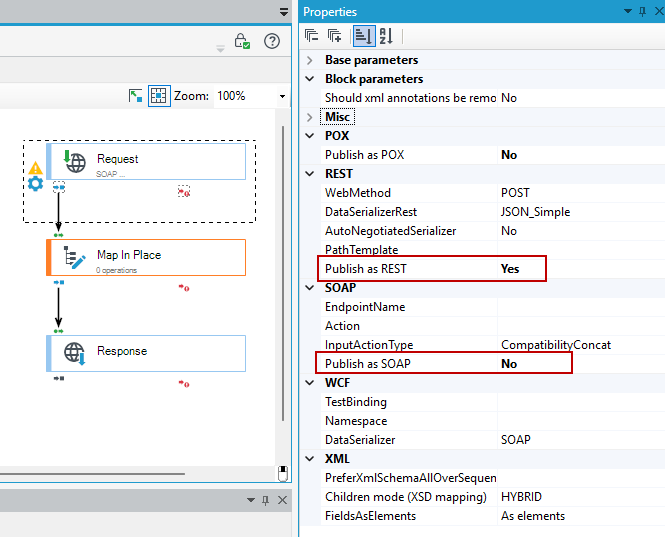
- Go to the properties of the Request block and select Yes for the Publish as REST option and No for the Publish as SOAP option.
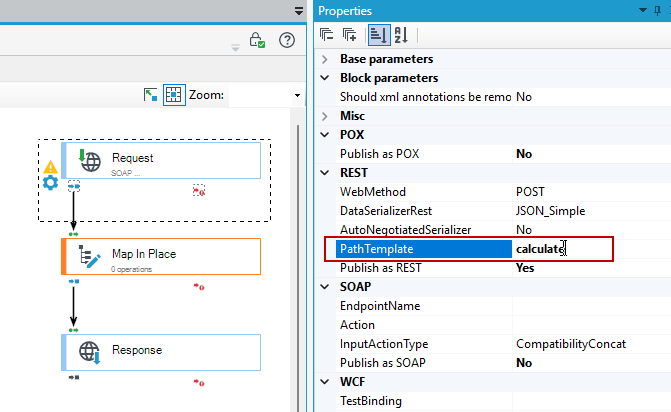
- Set the value of PathTemplate to calculate.
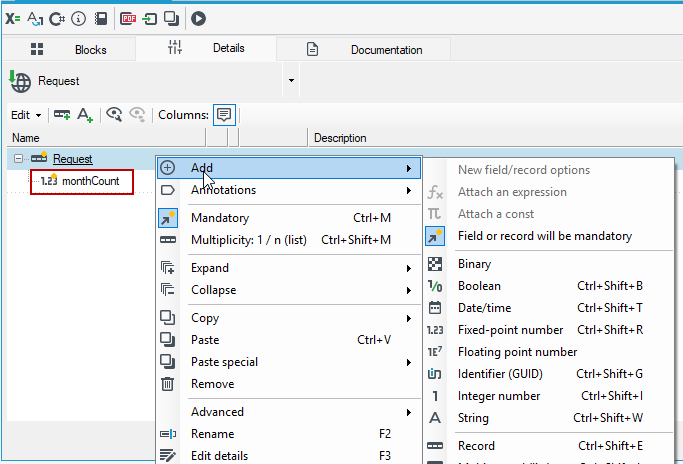
- Go to the details of the Request block and add a numeric field named monthCount.
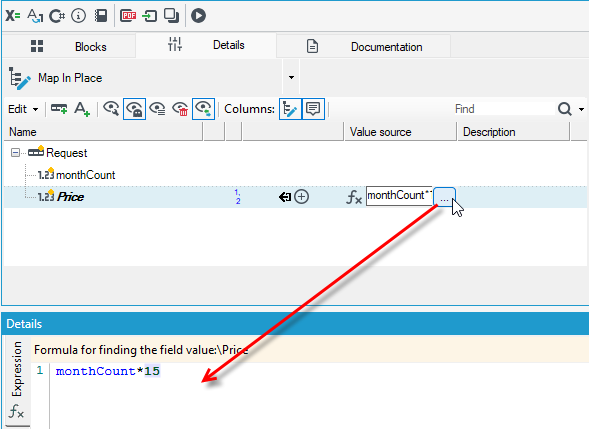
- Go to the details of the Map In Place block and add a numeric field named Price. The value of this field will be calculated using an expression, e.g., monthCount*15.
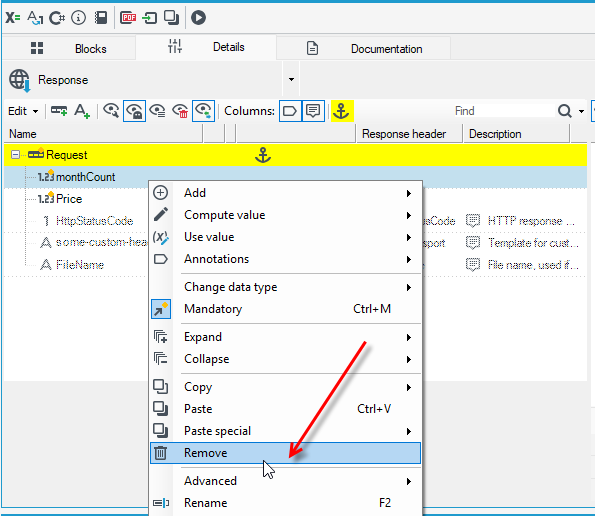
- Go to the details of the Response block and remove the monthCount field.
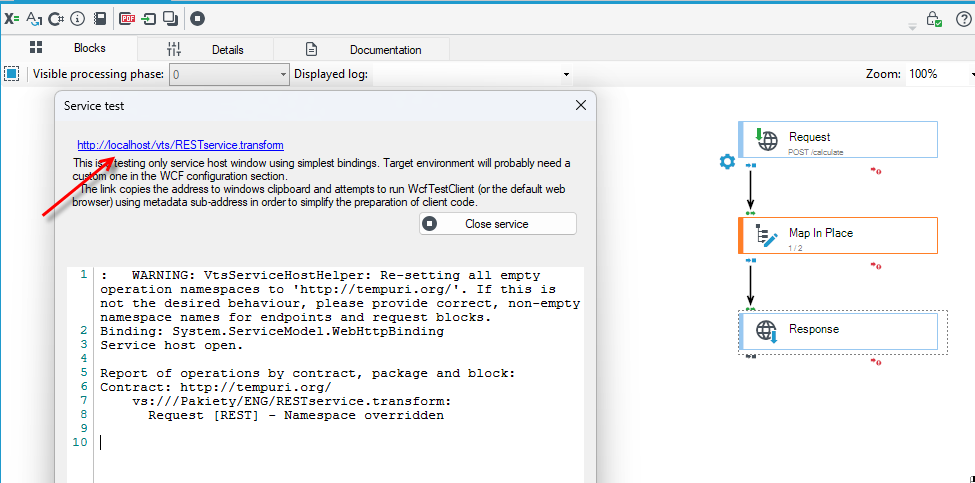
- Return to the main workspace and run the package. A window will appear allowing you to open a web interface for testing the service.
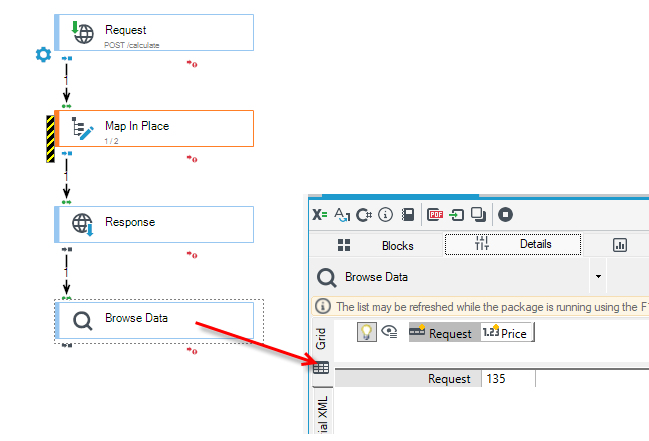
- You can add a Browse Data block to the package to check if the data returned from the service after execution is correct. In this case, whether the calculations for the Price field were performed.
Watch a video illustrating the above topics and discussing web services in archITekt.
Web services
SOAP service called from a workflow
A processing package published as a SOAP service can be called from a workflow using the Web service activity. See: Communication with the processing package.
Building the service package
- Create a package with the blocks connected in the following order:
- Request – receives the call,
- Map In Place – prepares the response data,
- Response – returns the result,
- optionally Browse Data for testing in archITekt Studio.
- In the Request block details, define the input structure, e.g. the CustomerId field. Give the root element (root record) of the structure its own name, e.g. Customer, instead of the default Request. This avoids name conflicts with other services in the environment, see: Root element name conflict.
- In the Response block details, define the output structure, e.g. the Name, TaxId and Address fields.
- In the Map In Place block, fill in the response fields based on the CustomerId field.
- Select the Request block and set the following in the Properties panel:
| Property | Example value | Description |
|---|---|---|
| Block name (Basic parameters section) | GetCustomerData | the block label on the diagram |
| Publish as SOAP (SOAP section) | Yes | the operation is exposed on the SOAP endpoint |
| Publish as REST / Publish as POX | No | |
| Action (SOAP section) | CustomerData | the operation name shown in the WSDL and on the Method list of the Web service activity in the workflow; if the field is empty, the block name is used as the operation name |
| Endpoint name (SOAP section) | Customer | optional; the name of the contract the operation is added to |
| Namespace (WCF section) | http://example.com/archITekt/Customer | optional; the service namespace. It is not required to call the package from a workflow, but it helps avoid name conflicts, see: Root element name conflict |
If the Action field is filled in, it determines the operation name. In the example above, the block is called GetCustomerData, but in the workflow the operation is shown as CustomerData. If you leave the Action field empty, the block name is used as the operation name – in this case GetCustomerData.
A yellow triangle next to the Request block indicates a missing Namespace or endpoint name. The service will start, but the host will use default values: the http://tempuri.org/ namespace and the shared ServiceContractSeed contract.
- Save the package and restart the Transformation Services of the environment.
- Check that the service is available: open the service address with
?wsdlappended in a browser, e.g.http://localhost:44311/<ENVIRONMENT>-TransformationService?wsdl, and check that the CustomerData operation is listed.
The service address contains the environment name (<ENVIRONMENT>-TransformationService). Proxy code generated in a workflow for one environment will not connect to the host of another environment.
Root element name conflict
All SOAP services of an environment run in a single Transformation Services host. Two SOAP operations in the same host cannot have an input root element with the same name in the same namespace. This usually happens when two Request blocks have an empty Namespace field: the host assigns the http://tempuri.org/ namespace to both, and the input root element in both is called Request.
Symptoms
Generating the proxy code in the Web service activity in the workflow displays the Proxy refresh error window with the message "Cannot refresh proxy". The Proxy generation date and Proxy code fields keep the value <no_proxy>, and the Method list is empty.
After selecting Show details, the following message is displayed:
No connection could be made because the target machine actively refused it 127.0.0.1:44311
This message almost always means that the service host did not start. Look for the cause in the host log, not in the workflow.
Diagnosis
- Open the log
_RUNTIME\LOGS\ERROR.TransformationServicesHost.<MACHINE>.active.log. - Find an entry similar to the following:
Root element of an input or output block is not unique among all other hosted services.
Conflicting name: http://tempuri.org/:Request
... block CounterService ... Other service using same name: Usluga.transform, request block PobierzDaneKlienta
Packages successfully started: 1 / 2, failures: 1
Some packages were not started correctly and 'IgnoreInvalidPackages' is set to False
The entry shows both packages whose Request blocks use the same root element name. One of the packages does not start, and because IgnoreInvalidPackages is set to False, the host does not open any endpoint. This is why the connection is refused.
Solution
You can resolve the conflict in one of two ways.
Option 1 – different root element names. In the Request block details, rename the root record of the input structure so that it is unique in the environment. In the example below, the CounterService service has a root record with the default name Request, and the GetCustomerData service has the root record Customer. Such services can run in the same host even if the Namespace field is left empty.
Option 2 – own namespace. Give each service its own namespace in the Namespace field (WCF section) of the Request block, e.g.:
| Request block | Namespace |
|---|---|
| GetCustomerData | http://example.com/archITekt/Customer |
| CounterService | http://example.com/archITekt/Counter |
Optionally, also set the Endpoint name, e.g. Customer and Counter. Each service then has its own contract instead of the shared ServiceContractSeed.
Other options:
- setting
SuffixDuplicateMessageRoots='true'in the host configuration – the host automatically appends the suffixes_1,_2etc. to duplicate names. Use this only in non-production environments. See: Service runtime environment. - setting
IgnoreInvalidPackages='true'– the host starts without the invalid packages. This does not solve the problem, it only hides it.
Verification
- Restart the Transformation Services.
- Check that the log contains
Packages successfully started: 2 / 2andService host listening at: http://localhost:44311/<ENVIRONMENT>-TransformationService. - Open the service address with
?wsdlappended in a browser and check that both operations are listed. - Generate the proxy code again in the Web service activity in the workflow.
- If the environment contains several SOAP services, make sure their Request blocks do not have an input root element with the same name in the same namespace. An empty Namespace field means the
http://tempuri.org/namespace, so two services with the Request root element and an empty Namespace will prevent the host from starting. No alive operation found ... transfer/Getmessages in the log are harmless. They are attempts to retrieve metadata via WS-Transfer, after which the designer switches to another method.- The
Endpoint with no dynamic operations ... WebHttpBindingwarning only means that no operation is published as REST.
Testing a Web Service Call
To verify the complete content of the request sent by the Call web-service block, it is necessary to configure a test environment and properly prepare the package components.
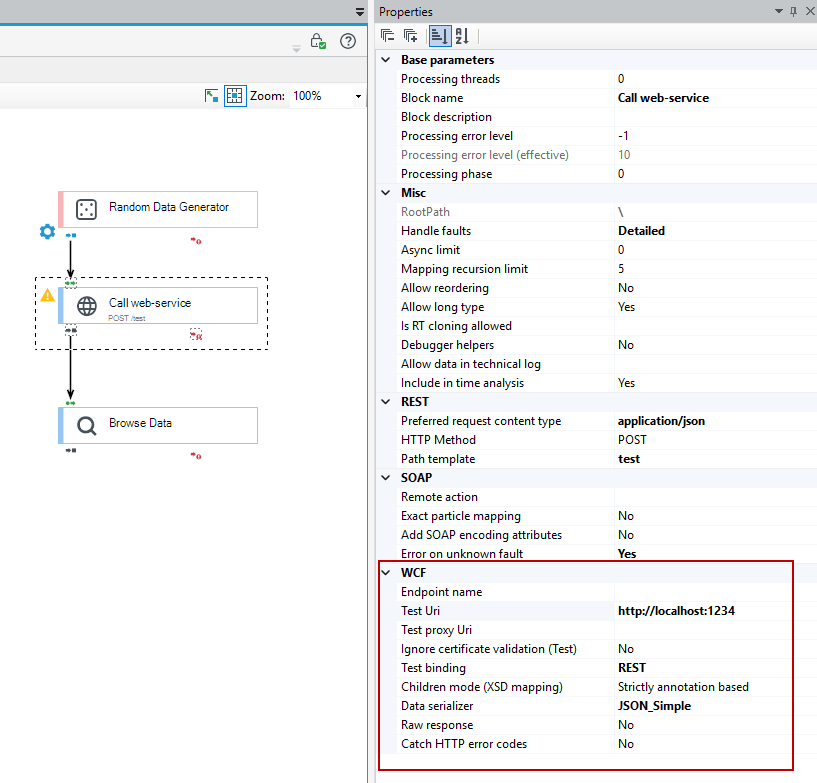
1. Configuration of the Test URI and test parameters
In the configuration settings of the Call web-service block, specify the following:
- Test Uri – the address to which test requests will be sent.
- Test binding – the binding used in the test scenario.
- Data serializer – the preferred data serialization format (e.g., JSON or XML).
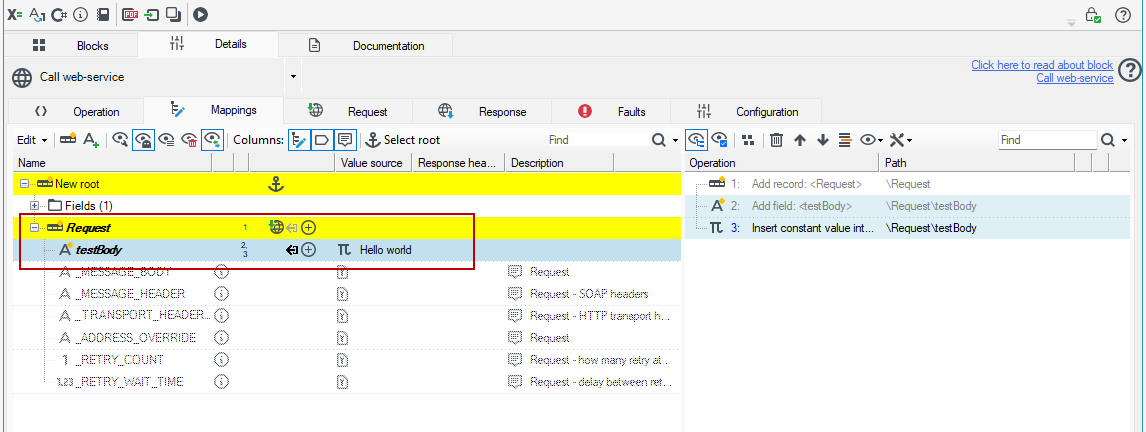
- Within the Call web-service block, add a Request record that will contain the request body.
2. Testing the package using PowerShell and ncat
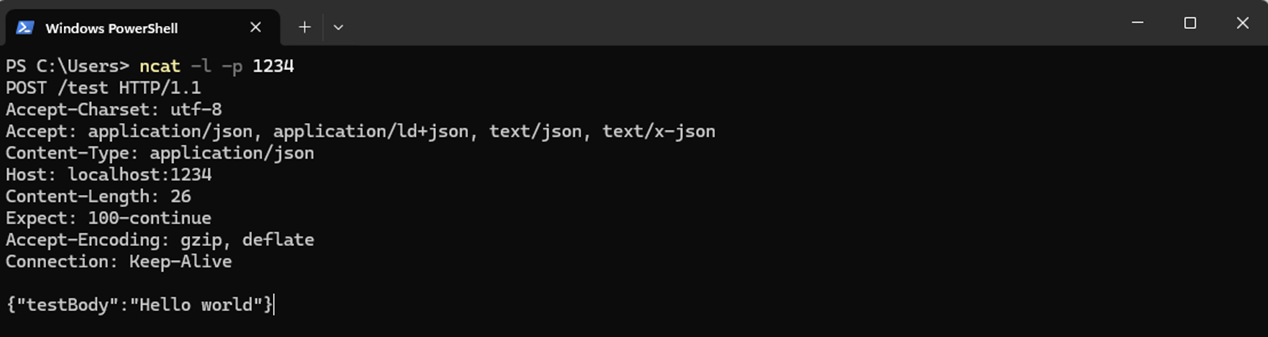
To monitor outgoing requests, the following tools can be used:
- PowerShell,
- ncat, which allows you to start a local listener and capture the content of the request.

After running the package, the full request payload will be available, enabling detailed analysis and troubleshooting.
JSON Parsing
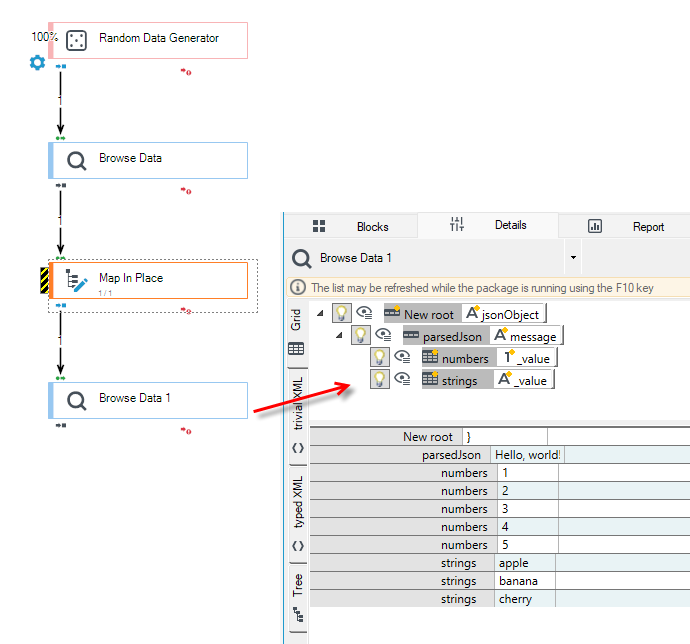
The data structure used in the package may contain a string field with JSON data (e.g., jsonObject). To process this data, the JSON must be mapped to a record structure.
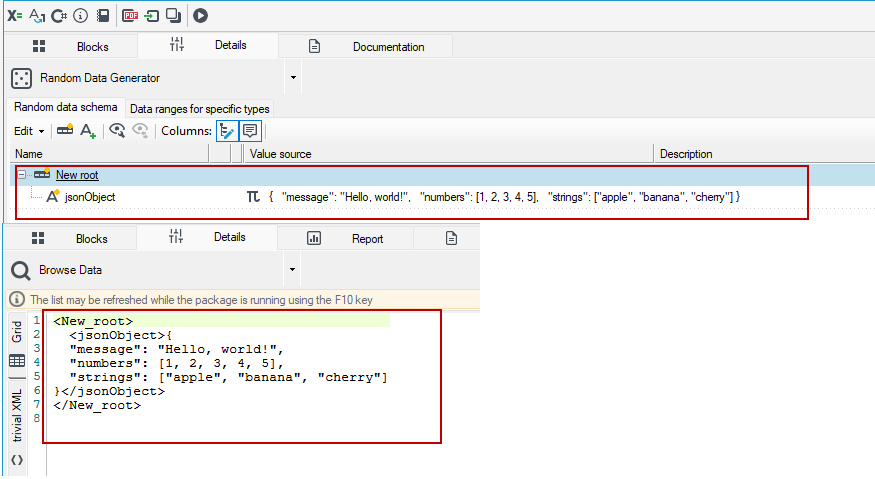
1. Configuration of the Map in Place block.
- Open the Map in Place block and navigate to the record containing the JSON data.
- From the context menu, select: Use value>Parse XML/JSON
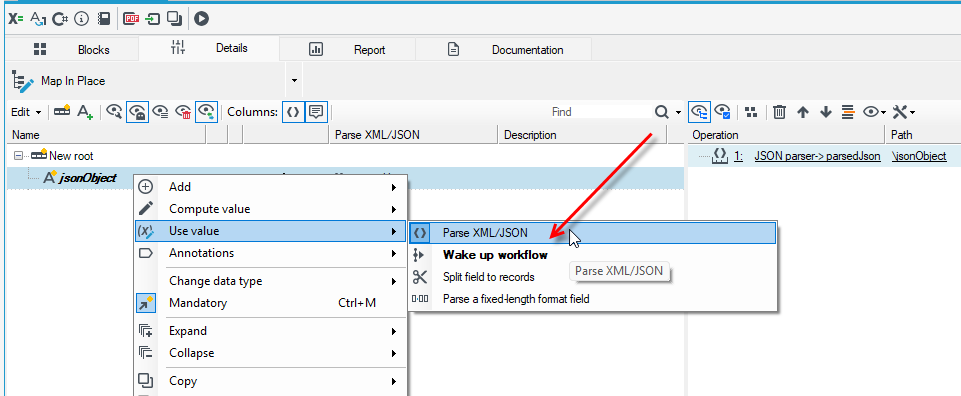
2. Parsing action settings
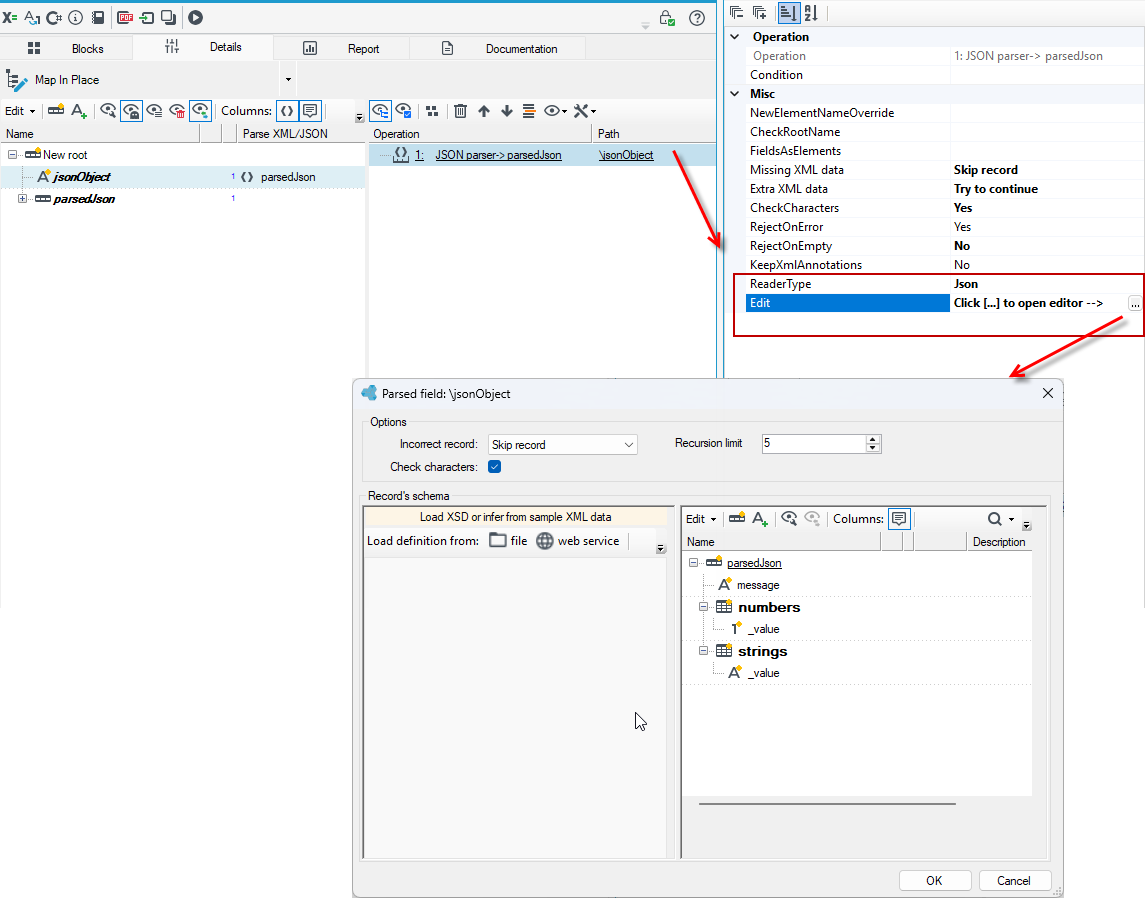
Open the parsing action properties and configure the following parameter:
- ReaderType: Json
- Open the structure editor and map the data format according to the JSON structure.
Structure mapping rules
- Create a result record (in this case named parsedJson) to represent the parsed data.
- For simple fields (e.g., string, number, boolean), add fields with the same names as those used in the JSON object.
- For arrays:
- add a multi-record with a name matching the array name in the JSON,
- inside the multi-record, add a field named _value with the appropriate data type.
3. Previewing parsed data
To verify that the configuration is correct:
- Add the Browse Data block.
- Run the package.
- In the data view, the resulting structure containing the parsed JSON will be displayed.