Output blocks
Configuration of output blocks relates only to saving to database and saving to selected XML file.
Remaining blocks do not require configuration in the tab Details. The only parameterization is done after the package is run in the window Values of block runtime parameters and it comes down to defining the location of the output files action.
The blocks are located on the right-hand side of the window in the menu Toolbox.
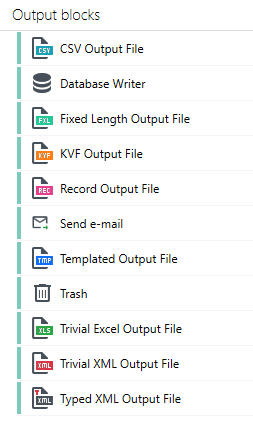
These include the following types of blocks:
- Typed XML Output File
- Fixed Lenght Output File
- KVF Output File
- CSV Output File
- Trivial XML Output File
- Templated Output File
- Record Output File
- Trivial Excel Output File
- Database Writer
- Send e-mail
Blank files support
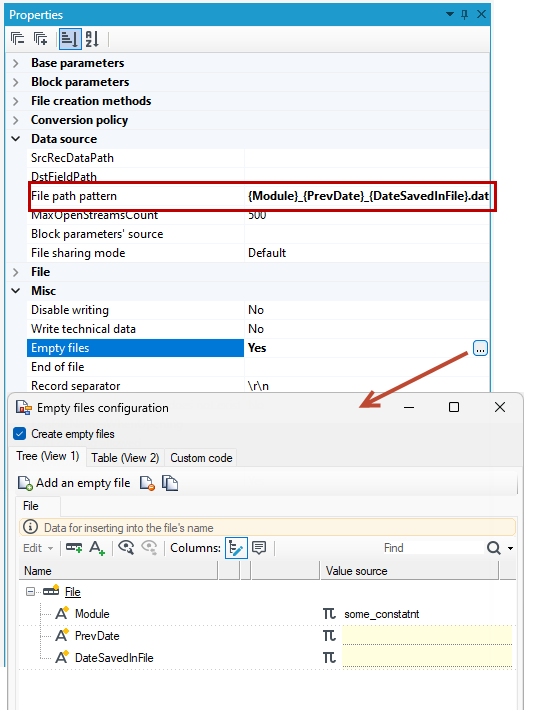
Configuration of blank files enables defining any number of blank files based on the name pattern (the parameter of the block: File path pattern) that are to be created while the given block is being processed.
- If the filename pattern is not given, and the option to create blank files is checked, one blank file with the name corresponding with the output file will be created.
- Additionally, it is possible to complete the fields of filename pattern through external library. It can be done by invoking an external method with appropriate parameters.
- It is also possible to combine the ways of generating blank files e.g. through completion in the code and definition established in the application.
- Configuration of output files also relates to configuration of blank files, i.e. headers, header separators, encoding etc. may be set.
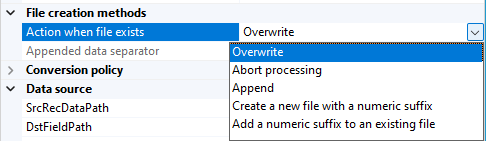
Ways of files creation
There is a possibility to define an operation performed while the file is being created, if the defined path already has a file in the given location.
Five operations are available:
- Overwrite (default) – overwrites the existing file,
- Abort processing – aborts processing. It is checked at the moment of saving to the file,
- Append - appends data to the existing file and separates with the string defined in Write in data property,
- Create a new file with a numeric suffix,
- Add a numeric suffix to an existing file.
End of file
It is possible to define a string (and special characters e.g. \n) that is added at the end of each file. In case of completely blank files (without data, headers, footers etc.) the mechanism of adding to the end of the file is omitted.
Typed XML Output File

The block Typed XML Output File enables saving processed data to an XML file.
- The saved file is divided into a root part and a list of data represented by the list blocks.
- Details are divided between two tabs:
XML schema
- The tab XML schema allows for automatic creation of output schema on the basis of an exemplary file or XSD schema.
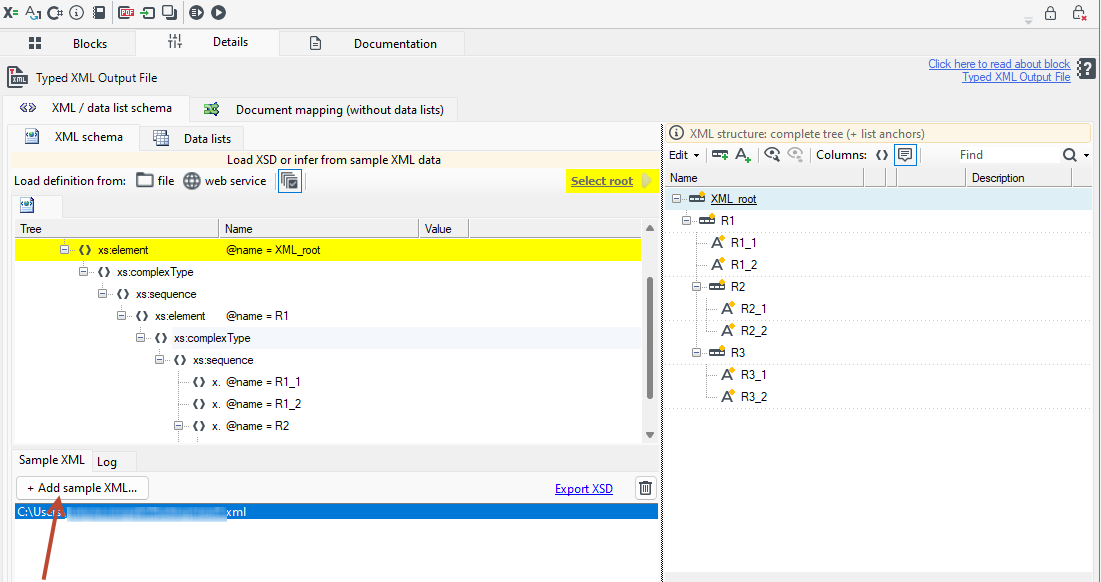
- An exemplary file is loaded to the System with the use of the button +Add sample XML... or by pressing the button file and entering an exact path to the file.
- An output schema will be presented after the element from the XML tree is selected and the option Select root is chosen.
Data list
- Each processing path is written to a single list of records. Such list is written to XML file to a multiple element selected by a User.
- Operation is performed using of the tab Data list.
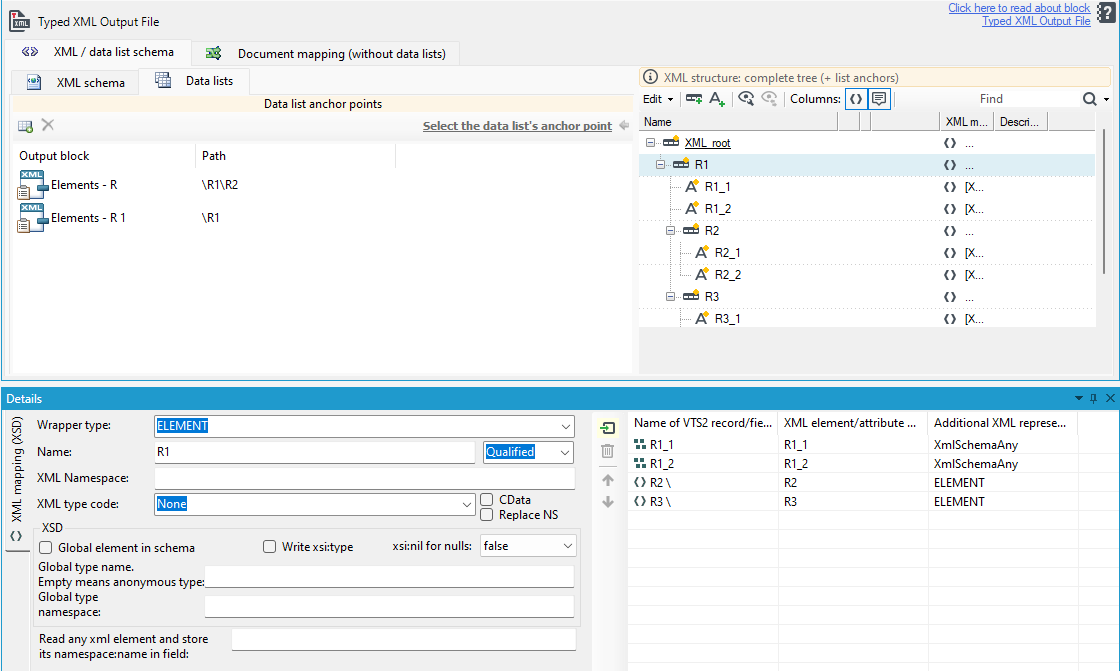
- After a new list is added with the use of the option available in the tab's task bar and the mount element is selected in the output schema, the User selects the button Select the data list's anchor point.
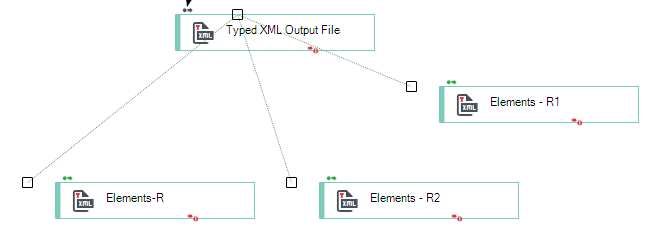
- The created data lists are represented by the list blocks on the package schema:
Fixed Length Output File

Fixed Length Output File - it is an option that allows for saving earlier-processed data to a fixed length file.
- The file format characterizes data that always has the same specified location in the structure and the same specified parameters (number of characters).
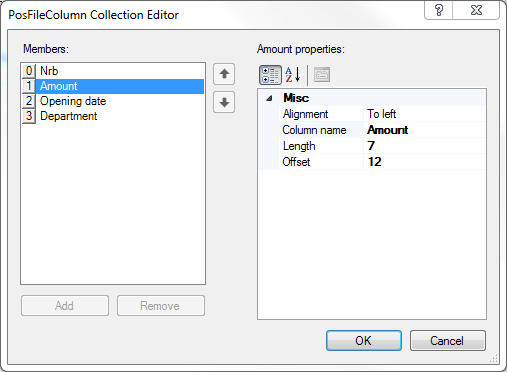
- The most significant option that should be edited in case of this block is an attribute Columns that is available after the panel Properties is selected. After an edit button is selected, a window will be displayed where it is possible to edit the length and offset of specified fields that are to be in the file.
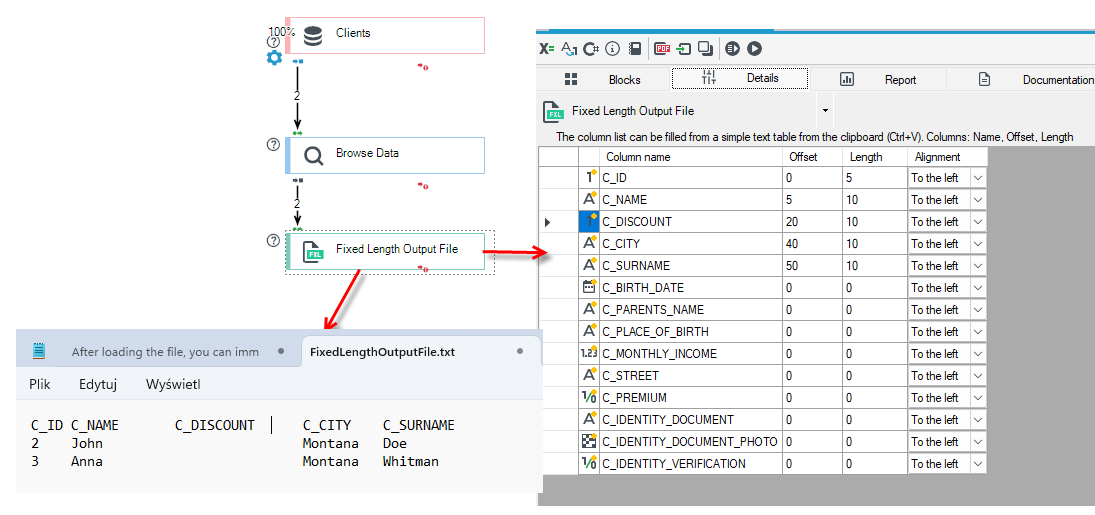
In the example below, the data retrieved from the database is written to a fixed-length file.
With the defined offsets and lengths for each field, the data can be written to the output file.
KVF Output File

The KVF Output File block allows saving flat records to a file with the lines of the form "key=value" with an additional records separator.
The block does not have its own editor, the only options may be set with the use of the panel Properties.
The options are the following:
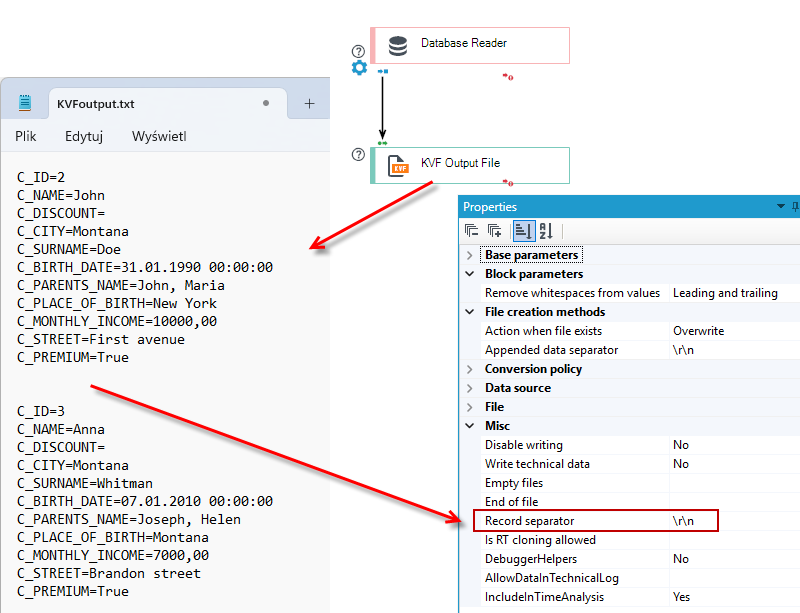
- records separator – a string that will be inserted between particular records,
- delete "white space" from the value – setting the value will cause deletion of "white spaces" from the beginning and the end of the saved value.
Below is an example of retrieving data from the database, and then saving it to a KVF file:
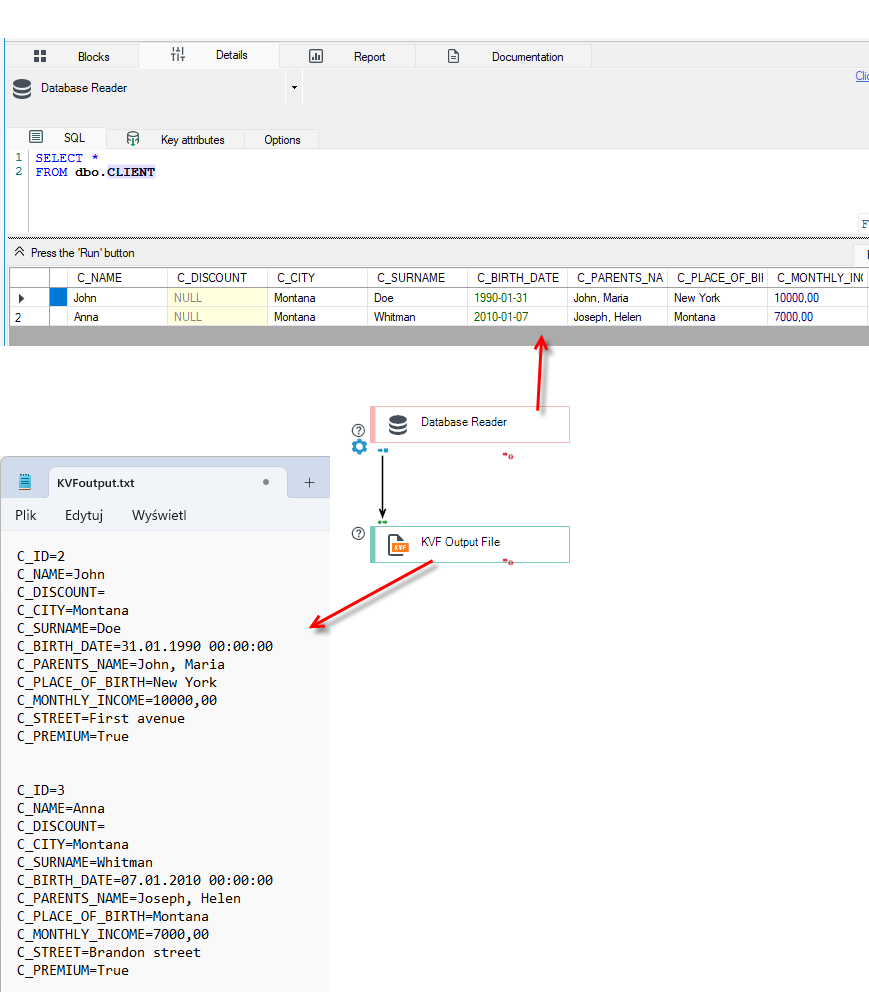
An important element is the selected option in the Record Separator field. By default, the separator is a new line, i.e., \r\n When attempting to load a KVF file via the input block, we need to know the record separator in the file and specify it as well. See: Input Blocks>KVF File.
CSV Output File

The block CSV Output File enables saving processed data to a file with CSV format that is supported by most of spreadsheets and database programs.
The block, similarly to other blocks saving data to a file, does not have its own editor. Significant options may be set with the use of the panel Properties:
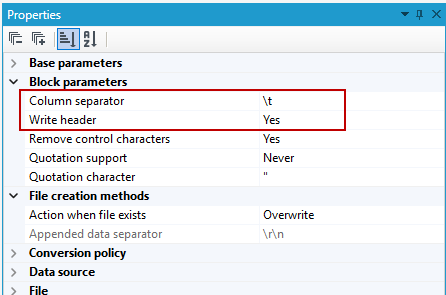
- columns separator – a string that will be written between particular values in a single row,
- write header – the option enables writing a header to the first row in a file.
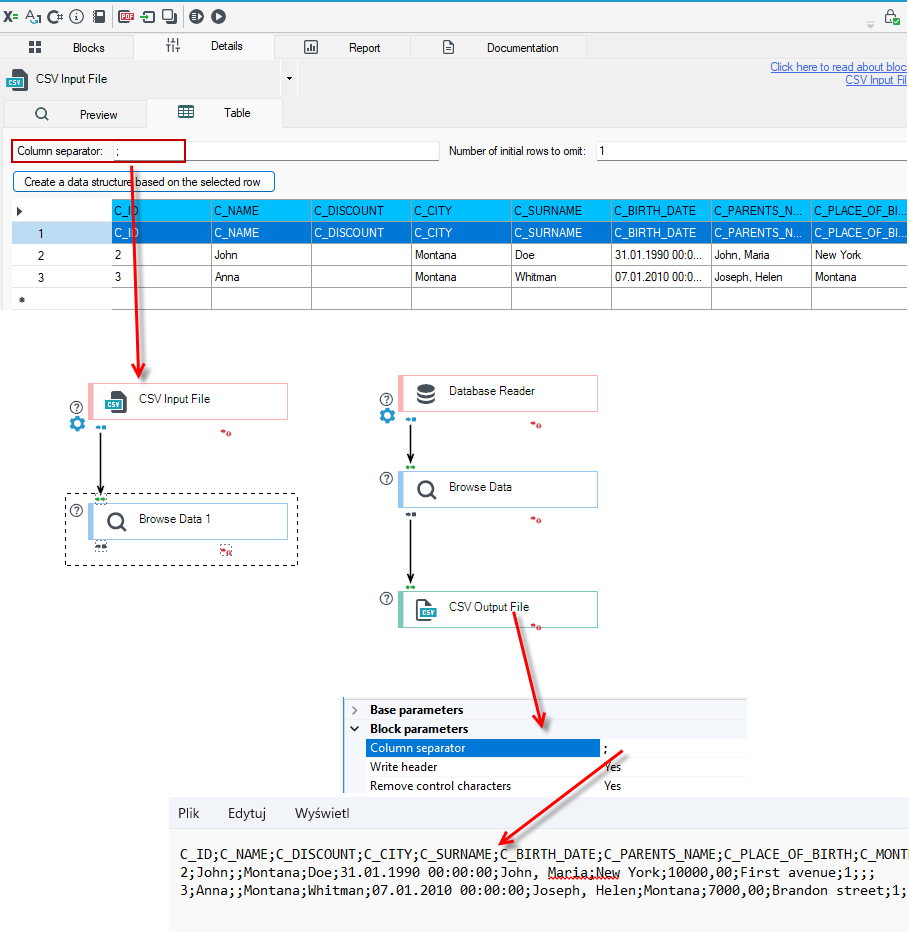
It is important to remember to specify the correct record separator when loading a CSV file. If the output file uses a semicolon ; as the record separator, then the same data separator must be specified in the input block when loading the file.
Trivial XML Output File

The block Trivial XML Output File allows for saving records to a file with an XML format as multiple elements directly under the root. Data fields values may become attributes or elements.
Significant options that may be set with the use of the panel Properties:
- fields as elements – the attribute allows for defining if the fields in data records will be saved to an XML file as attributes or as elements,
- indent characters – the characters used for formatting an XML file - to create indentations while saving to a file.
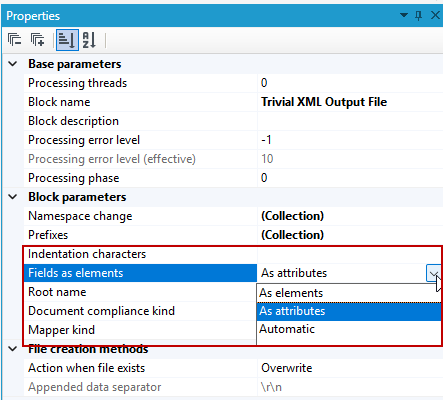
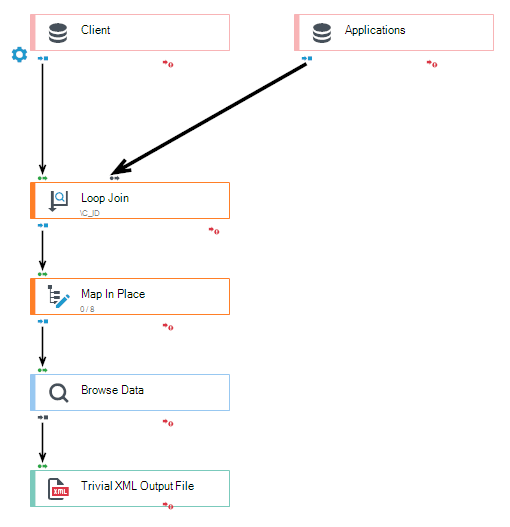
The simplest example of using the block is to create a package that retrieves data from database tables and then saves it to an XML file. For more information, see: Reading from the database and saving data to a file.
Templated Output File

The block Templated Output File allows for saving data to a file with any text format, defined with the use of:
- template of an entire file referring to templates assigned to records, and
- individual data fields (with optional parsers adjusting the value form).
- As a result, with the use of this block, other file formats can be obtained for which there are no dedicated (faster, more convenient) save blocks (e.g. CSV, POS, XML).
- The block may be treated as an "inverse" of the File analyzed by regular expression block.
An example of a block editor view:
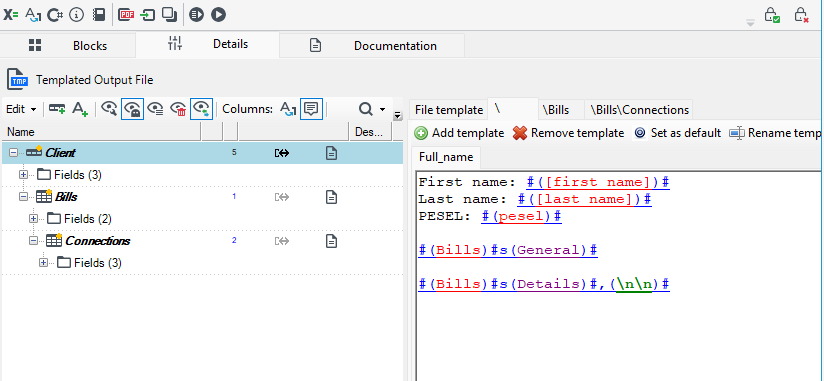
- More than one template may be attached to the record (you may name them diversely to refer to them later), multiple records may be separated with the selected string - separator.
- Template editor has a few functions that simplify work, e.g. exemplary data may be converted to a template.
Editor
A file format is specified with the use of an editor:
- The left part is used for defining templates for records with the use of an appropriate annotation: Record template and Parser.
- The right part of the editor enables editing a selected template. Templates are written in a simple language that enables referring to any record or field in a data structure. Depending on the selection, the option Switch tabs based on selection enables or disables automatic tabs switching in the right-hand side of the window to the one corresponding with selected record in the left-hand side.
Defining a file template
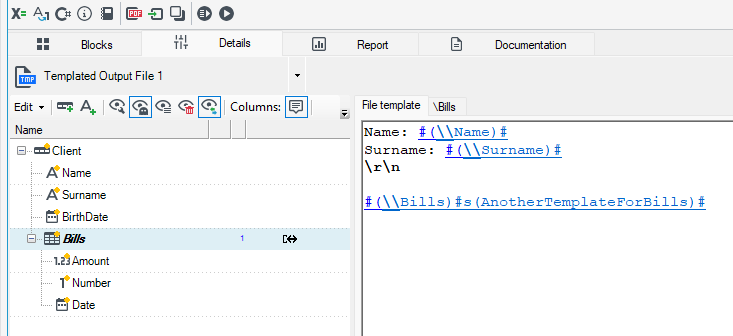
- A template for a file is defined in the tab File template in the right part of the editor.
- The content of each file saved by the block will be created on the basis of this template.
- In contrast to other templates, references to the fields will not be replaced by their entire series, but by the value located in the first record that will be processed by the block.
- With the template file defined as below, we will get a file that will display the client's first name and last name in the content.
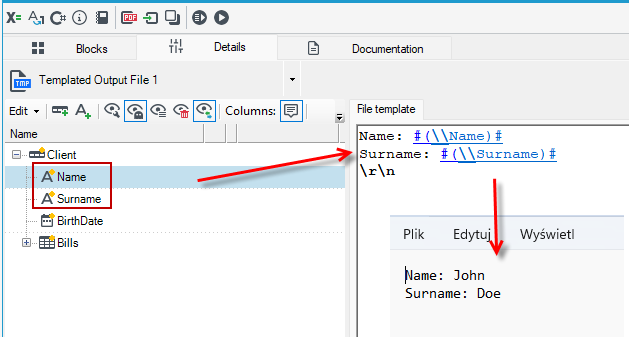
Defining record templates
- A template for a record is defined with the use of the annotation Record template.
- After such an annotation is added, a new tab corresponding to the selected record will appear in the right-hand side of the editor.
- A record may have a few templates, each with a different name, and one of them may be a default template.
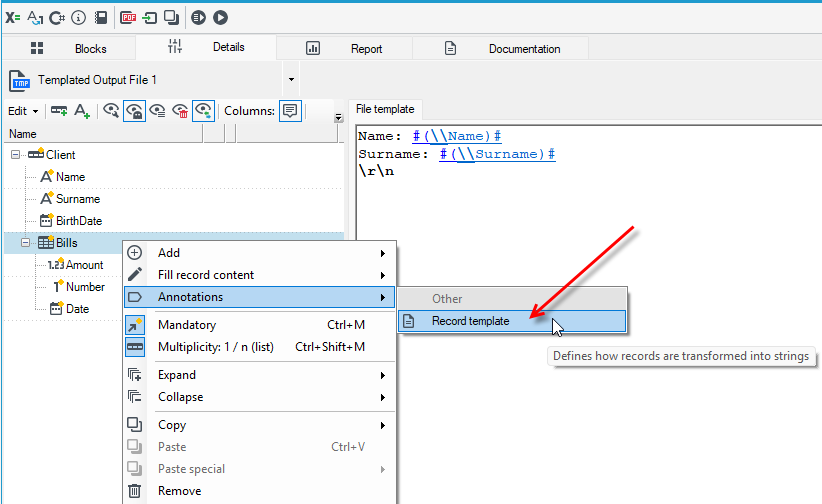
- To assign a template to a record, you must first add the 'Record Template' annotation to it.
- You can now define templates. To do so, select the appropriate tab and then press the Add template button.
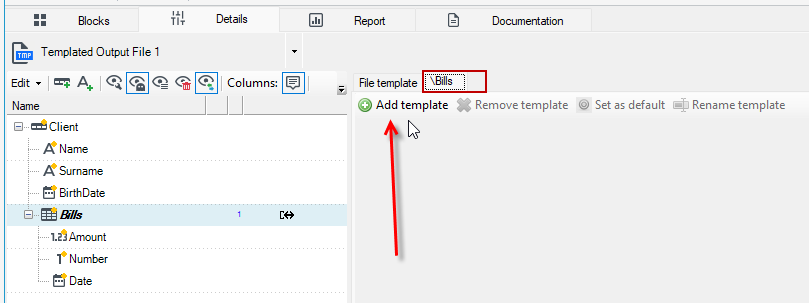
- A window will appear asking you to enter a name for the new template. When it is unique, it will be created, and the editor will display another tab with the name of the newly created template.
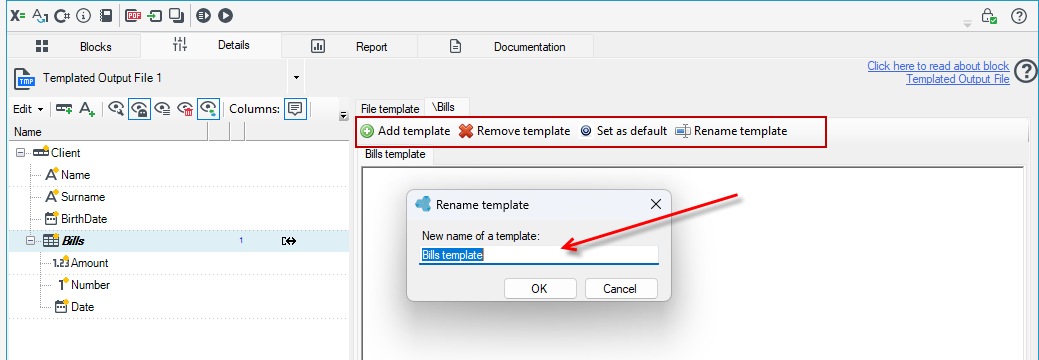
- One of the templates can be the default template, which will be selected in case the user does not specify the template name in the record reference (see: Template definition language).
- To set a template as the default, select its tab and then press the Set as default button. A default template must always be set for the record.
- To rename a template, you should double-click on the title of the tab of the given template. A new window, where a new name should be typed, will appear.
- In order to delete a template, you should select its tab and press the button Remove template.
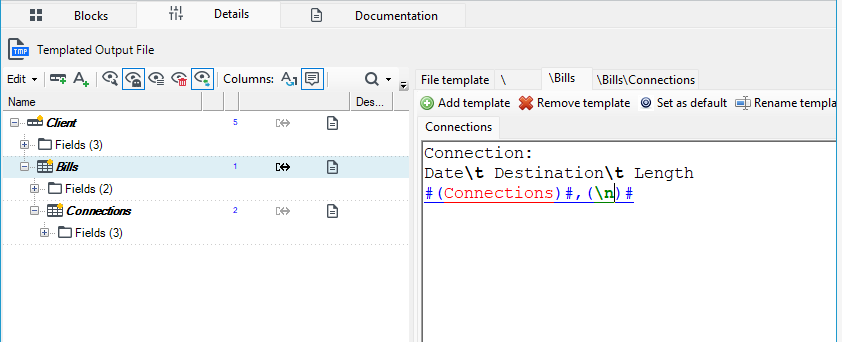
- Now you can define a template for the data retrieved from the Bills record.
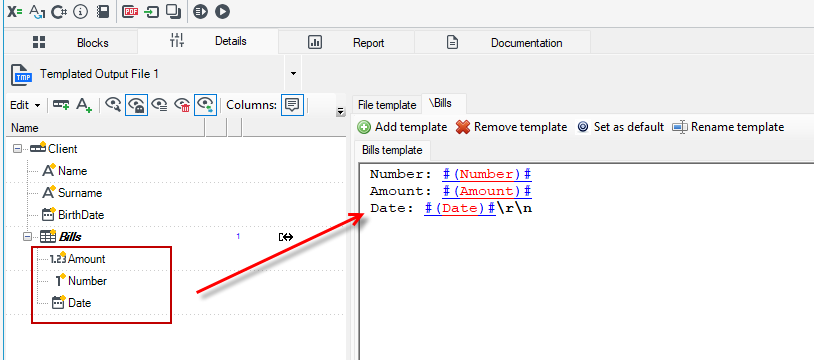
- To ensure that the data from the bills record are also generated in the file, you need to add a reference to the created record template or to the data record itself in the file template. In the example below, the file template includes a reference to the Bills data record.
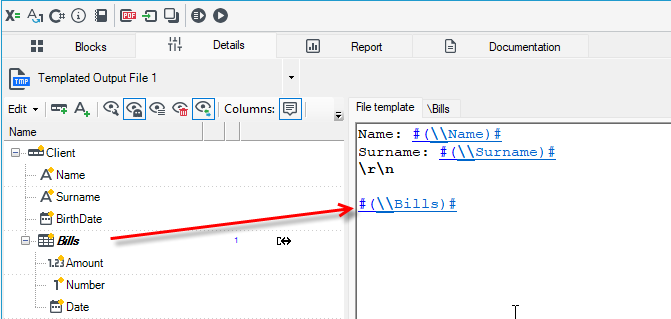
- If no other record template is specified in the file template, the default record template will always be used to generate the file.
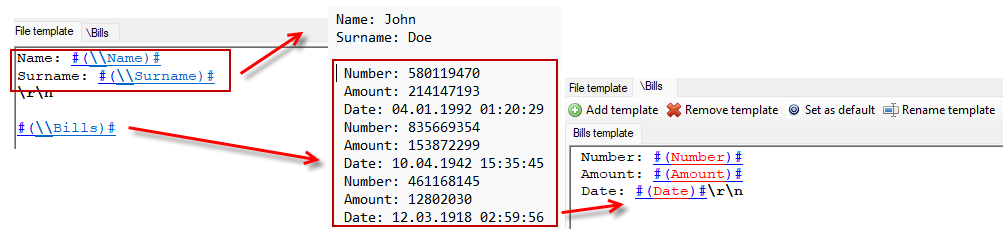
- If additional templates are added to the same record, you must specify in the file template which record template should be used to generate the data, if it is not the default template for the record. Below, a second template for the Bills record is defined.
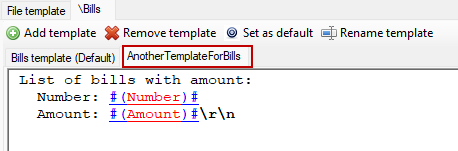
- In the file template, you need to specify the name of the record template—otherwise, the data will be generated using the default template. The reference to the template is made by using
#s(record template name)#
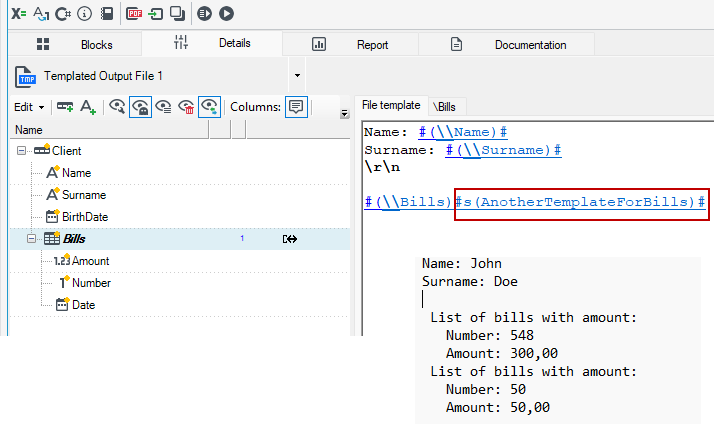
Parser defining method
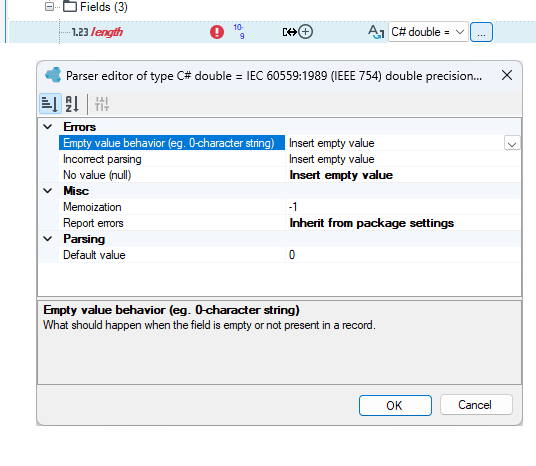
- Each field in a record may have a parser assigned with the use of the annotation Parser.
- It enables conversion of data to any other type or writing to a file in non-standard formats.
- Parsers may be defined only for fields and they allow for changing the type of fields.
- In order to do it, the User should add the annotation Parser, and then select and configure an appropriate value parser.
- When the output type is not a string, the field value will be converted to it with the use of the selected type conversion policy.
Referring to fields and records
- To each template, a reference to another record or field may be inserted. In case of the situation when the reference target is a field or a multiple record, it will be inserted in all copies that are in the record, one by one.
- A reference also allows for specifying a template that will be used while the record is being inserted and a separator that separates subsequent records or fields in the output file.

- Syntactic coloring usually indicates where the record template should be inserted. However, there may be situations where the coloring does not clearly indicate this. For more information, see: Template definition language.

Multifiles handling
- The block allows for writing to multifiles.
- A template of a name of such a file is defined in the panel Properties of the block. Each of the multifiles will be generated on the basis of the file template.
Template editing facilities
The main part of the right-hand window of the block editor is a text field used for direct editing of the selected template. In order to accelerate writing templates, a few facilities have been entered.
- Syntax highlighting is a basic and the most visible facility: references to fields and records are highlighted and particular parts have different colors. Also escape sequences are separated visually - they are bold.
- The editor has also an implemented drag-and-drop technique – dragging a field or a record causes a reference to it to be inserted. This effect may also be achieved by double-clicking on the record or field - the reference will be inserted in the place of the cursor.
- In order to prevent automatic switching tabs with templates, you should disable the option Switch tabs based on selection.
Template definition language
Definition language consists of three basic elements:
- Clear text that will be rewritten to the file in the same form as it has appeared in the editor.
- Escape sequences allowing for adding characters that are difficult to be entered with the use of the keyboard or that are not clearly visible in the editor. They will be replaced by the characters which they symbolize. Available escape sequences:
\n– it will be replaced by the character of a new line (LF)\r– it will be replaced by the character of a carriage return (CR)\t– it will be replaced by the character of a tab\\- it will be replaced by the character\##(- it will be replaced by the string#()##- it will be replaced with the string)#
- References to records and fields. Format of such a reference is the following: #(path to record/field)#s(template name)#,(separator)# (optional parts are in italic):
- path to record/field – it is a path in a data structure tree that specifies the record or field that is to be inserted in the reference place. The path is resolved in relation to the record, in the template of which the reference has been used.
- template name – it is used only in case of references to a record. If the target of the reference has more than one template, then here the name of the particular template that is to be inserted in the place of the reference should be written. In the situation when the name of the template is omitted, a default template will be used. And when the name will be given but it will be invalid, an error will be reported.
- separator – used in case of references to both fields and records. It defines a template separator when the reference target is a field or a multiple record. Each two fields or records inserted in the reference place will be separated with the given separator.
Simple, exemplary templates:

If you use the drag&drop option to move fields from the data schema or double-click a field to insert it into the file template or record templates, the syntax coloring may behave differently or may not be applied at all. There may also be differences in the path notation for records or fields, but regardless, both notations are correct and will allow the file to be generated correctly.
Record Output File

Record Output File - allows writing records to a file in a binary format. The file takes little space and is written quickly. The block is useful for temporary writing and storing data in the simplest form in order to use them in the next processing stages e.g. to sort data before processing
- Like other blocks which write data to a file, the block neither has its own editor nor configuration options.
- The block is usually used with its equivalent - the Record Input File input block.
Below is an example of reading data from a database and writing it to an output file.

Trivial Excel Output File

Trivial Excel Output File allows you to write records to an Excel file. The record can have a multi-level structure.
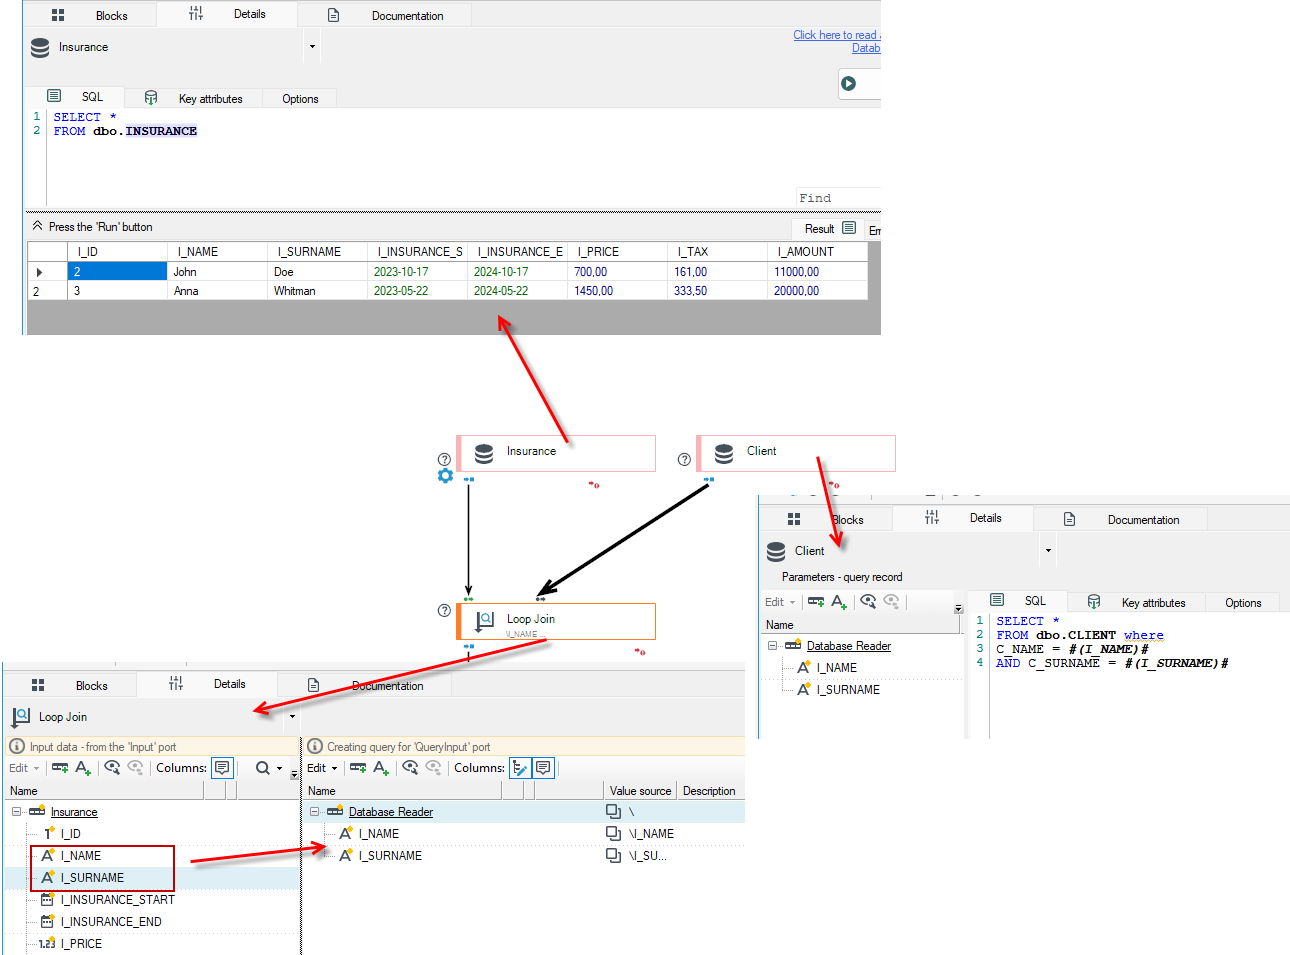
In the example below, the processing package retrieves insurance and client data from two different tables in the database, and then saves them to a single output EXCEL file.
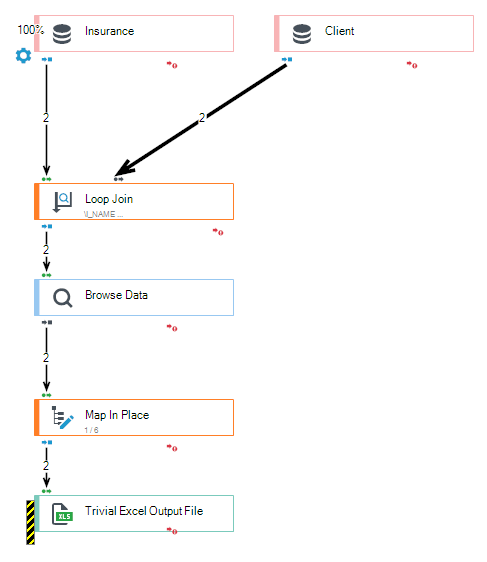
- Read the data from the tables and join them using the Loop Join block.
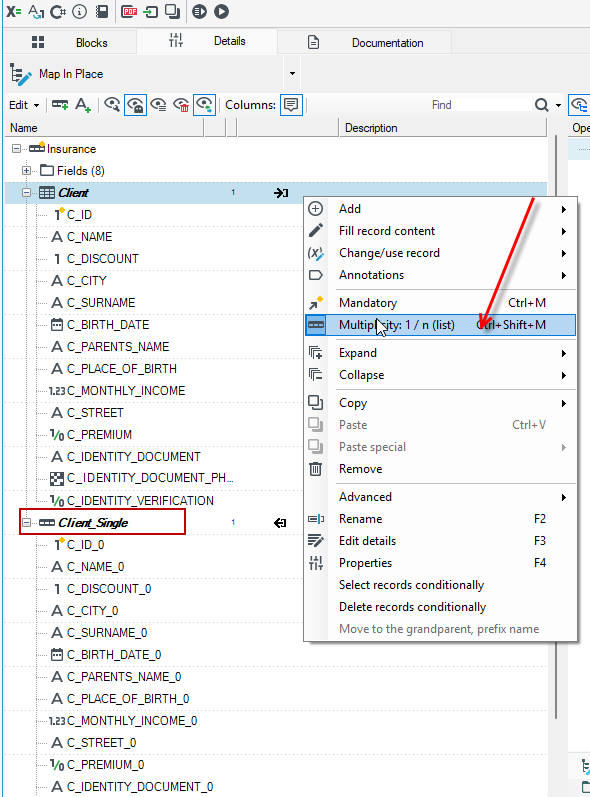
- Add an Map In Place block and change the Client record to single occurrence. The input schema used to generate the file must not contain multiple-occurrence records.
- After this action, a single-occurrence record will be added to the schema with the label Single.
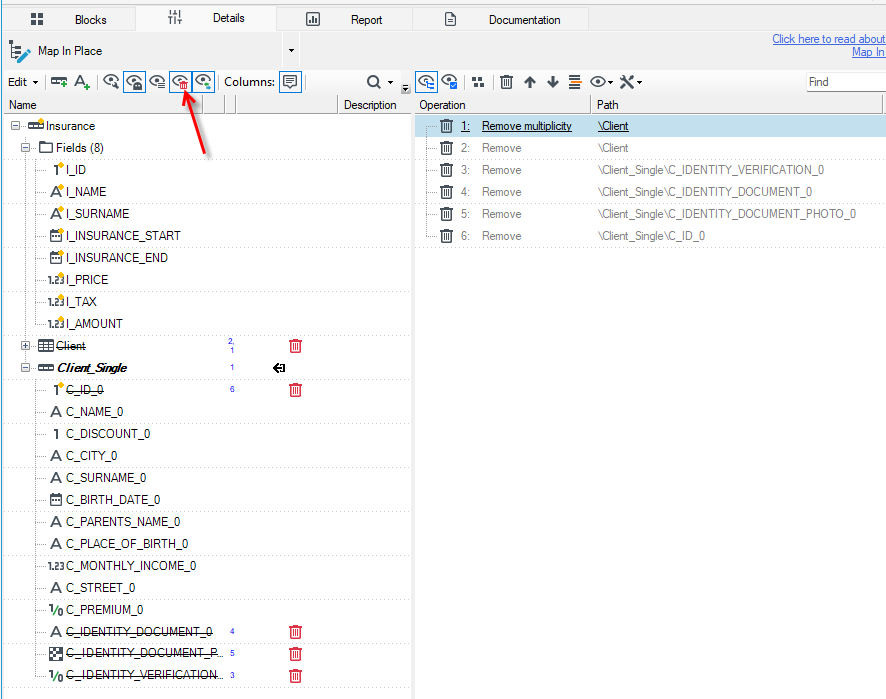
- Remove the multiple-occurrence Client record and any fields you do not want to include in the output file.
- Add a Trivial Excel Output File block and run the package.

Send e-mail

Send e-mail allows you to send e-mails. You can select recipients, message content and attachments.
- The messages sent can be either plain text or have formatted content (email content as HTML).
- In the case of sending emails with formatted content, the content itself is generated using the Documents Generation functionality- it is created as a fill in document template, which is then converted to MHTML format and pasted as the email content.
- In the block, using map in place after selecting the "root" of the call (analogous to calling an algorithm or service), we fill in the required fields of the call such as priority, subject, content, recipients, sender, attachments and so on.
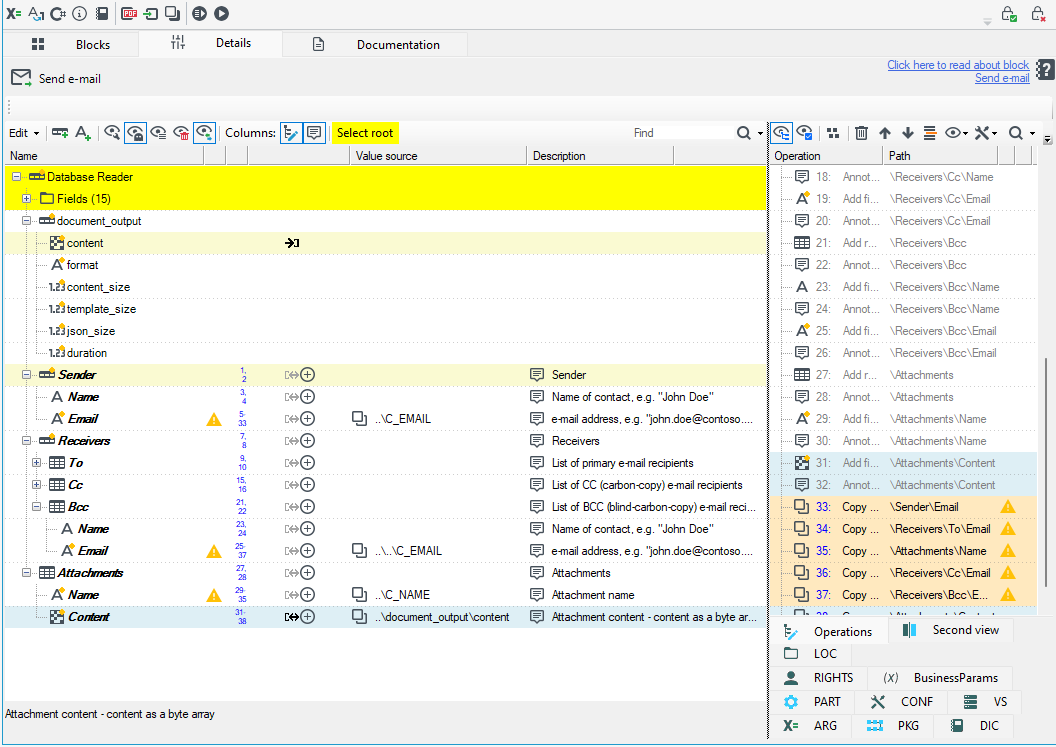
For the email sending functionality, SMTP server configuration is also required. See: SMTP Configuration – common.param.smtp_(..).
Database Writer

The block Database Writer enables writing records marked with a special annotation to a database.
In order to configure the block, you should:
- define a database name - (in the panel Properties, see also: Data sources and Input blocks>Database Reader),
- specify the details of records to database tables mapping.
The block Database Writer consists of two consecutive elements:
- Map in place which determines the method of adjusting a record to tables and table columns and which inserts special database annotations interpreted by the next element,
- writing data to tables (one of many mechanisms - to be selected by using the property Database write method).
Currently, the tool offers three methods of table writing:
SQL_INSERT_UPDATE_DELETE– writing using SQL queries (works virtually with any database),BULK_MSSQL_BCP_PROTOCOL- quick writing using the BulkCopy protocol - works only with Microsoft SQL Server databases. If this method is used, the only operations available are Insert and Dynamic (note that the evaluation result must be the Insert or Skip operation). Additionally, while the Insert operation is performed, the option does not set a relation between records. (The User must do it separately before performing a Database writer).BULK_ORACLE_SQLLDR- quick writing using the SQL Loader tool - works with Oracle databases only. Similarly to using the BulkCopy protocol, this method enables only inserting data to a database (the Insert operation or the Dynamic operation evaluated to Insert or Skip).
The Map in place editor is used for preparing data for writing to database, see: What are the Mappings .
Apart from the standard annotations available, the User may also use Database annotations (see: Annotations).)
- The Write record to a database annotation is used for specifying the kind of operation which should be performed for a record it marks (INSERT, UPDATE, DELETE).
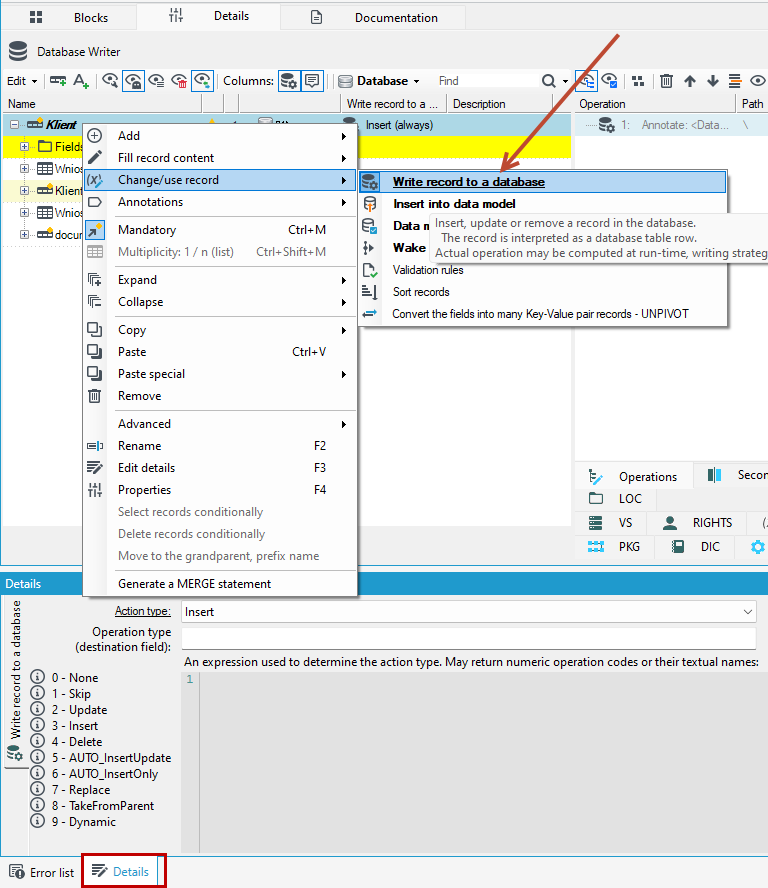
- If no record is marked with the Write record to a database annotation, data will not be written to a database.
- All records marked with the Write record to a database annotation must have tables with the same names in the base. If the names of the schema record and the required table are different, the User should:
- rename the record so that its name is the same as the table name,
- add an annotation Name of the table/column to a record and enter a table name as the annotation value.
- Such record should also have a field which represents the primary key in the table (the Primary key annotation).
- If the User has defined a data source and marked the given record with the Operation annotation, the differences in a data structure between the given table and the original record schema will be marked in the schema view (e.g. missing fields, redundant fields, etc.). See: Required schemas validator.
- Automatically generated fields (usually false master keys) occur in most data bases.
- To complete the field values after inserting them to a base, they should be marked with an annotation Autogeneration.
- In order to mark a database relationship between two tables, you should use the annotation Foreign key and set the annotation value to a path to a parent field of the relationship.
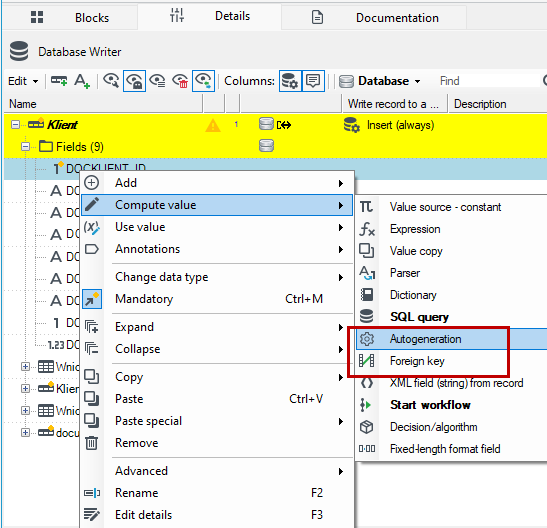
Additionally, platform enables setting conditions for inserting or updating the selected fields in records. Setting conditions is done by marking fields with special annotations.
- The parameter Transaction range has been added in the database block.
- The isolation level refers to a group of database transactions and defines the degree of their mutual separation, i.e. to what extent the effects of the given transaction are visible and influence other transactions.
- Each session, and each transaction within it, reads and/or modifies the shared data in a database which enables concurrent access to one data set for many Users. As a result, inevitable conflicts occur which may be avoided by isolating transactions from each other.
Actions on the particular tree elements have been described in details in the chapter devoted to adjusting record schemas and fields (see: Data processing).
Example of Performing a Database Operation
In the example below, a package is created that retrieves data from the database, modifies the data, and writes it back to the database.
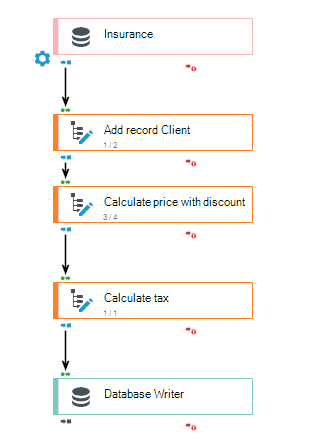
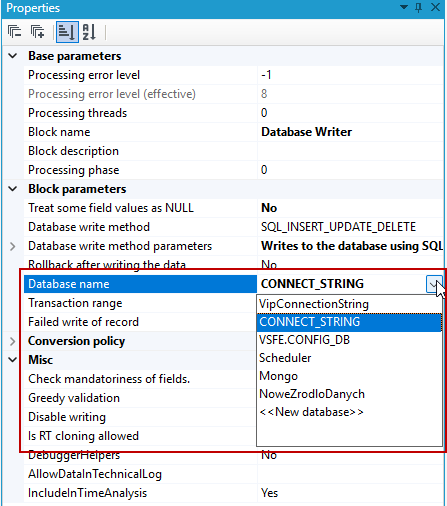
- Go to the details of the Database Writer block. In the Properties panel, make sure you are writing to the correct database. (By default, this is usually
CONNECT_STRING)
- Open the block details (double-click the block). Specify the target table where the data will be saved.
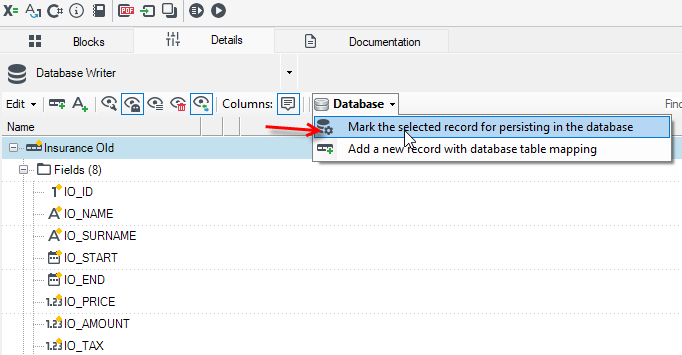
- Select the record and, from the top menu, choose Database:
- Mark the selected record for persisting in the database – the selected record will be added to the database
- Add a new record with database table mapping – adds a new record intended for database insertion
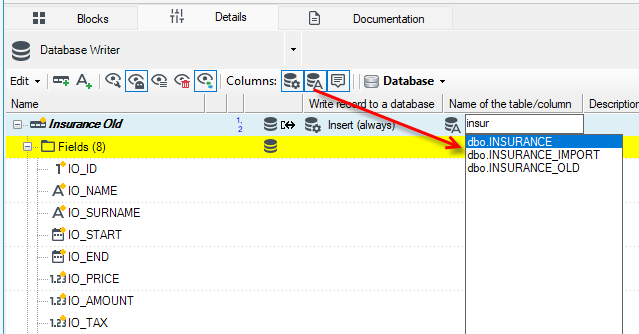
- After selecting Mark the selected record for persisting in the database, choose the table to which you want to write the record. If you don’t see the table selection option in the data schema, click the appropriate icon in the top toolbar.
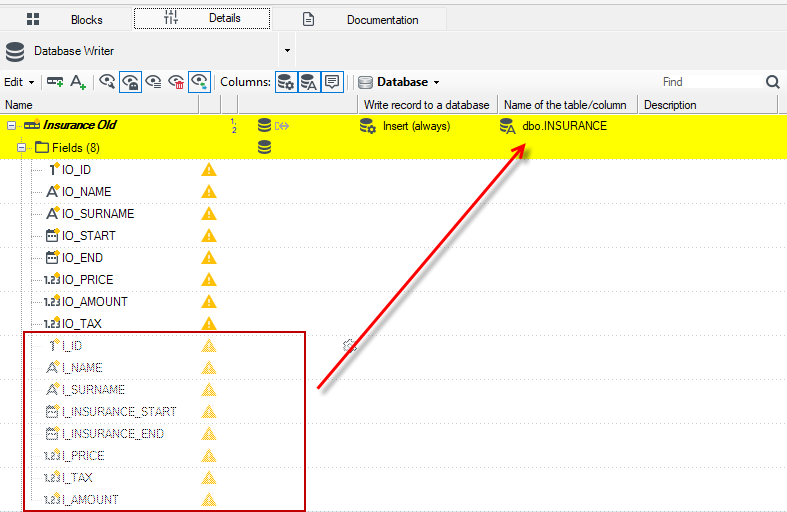
- Once the action is completed, greyed-out fields ("ghosts") will appear, indicating columns from the selected database table.
- These greyed-out fields need to be mapped. Drag fields from the schema onto the greyed-out ones and from the context menu choose Rename. The column name will be updated to match the name in the target database table.
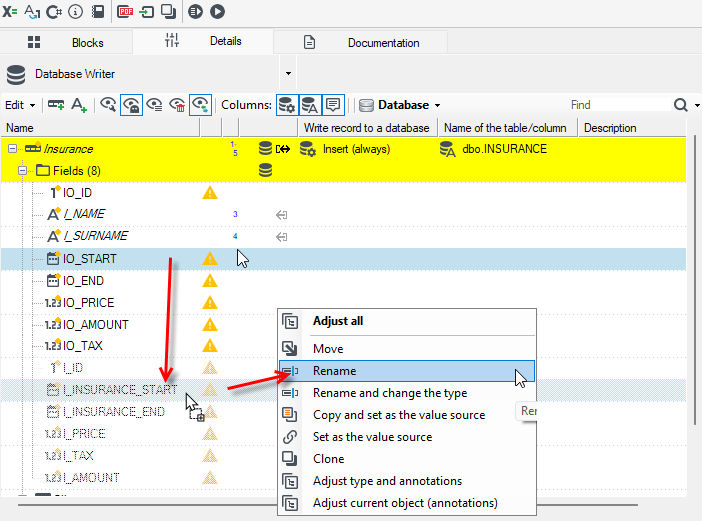
- You can also use the Adjust all option.
- If there are any extra fields you don’t need, remove them from the schema using the context menu.
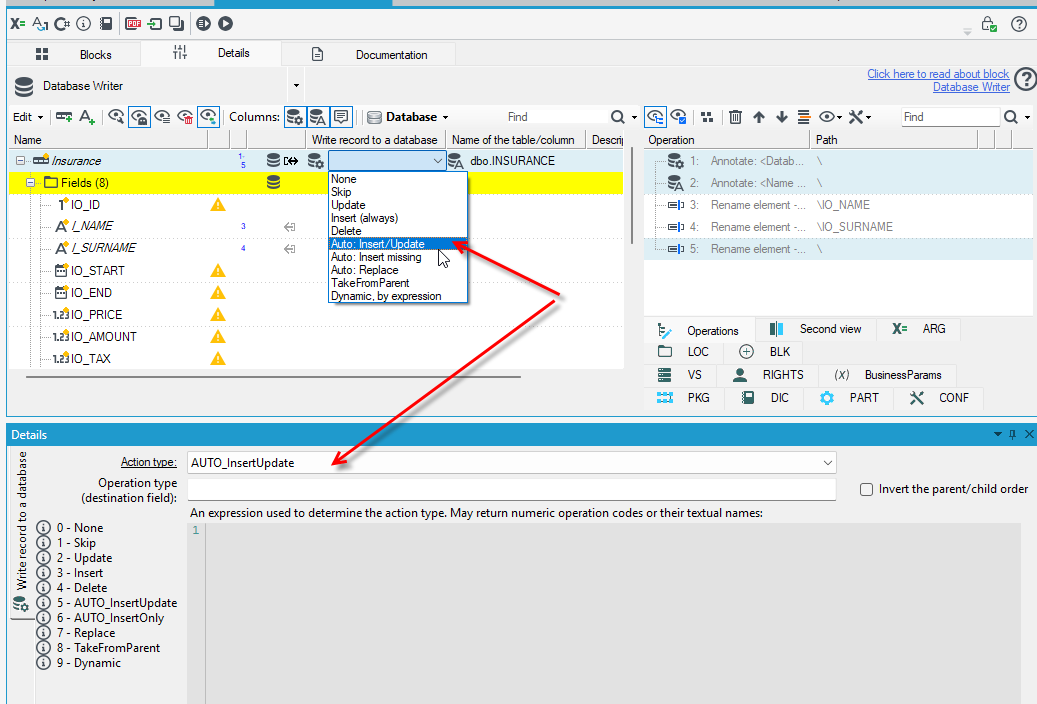
- If you want the package to be executable multiple times, change the operation type from Insert to Auto Insert/Update in the appropriate column in the data schema or in the Details panel (after selecting the data record marked for database write). After this change, the package will overwrite existing records in the database on each run.
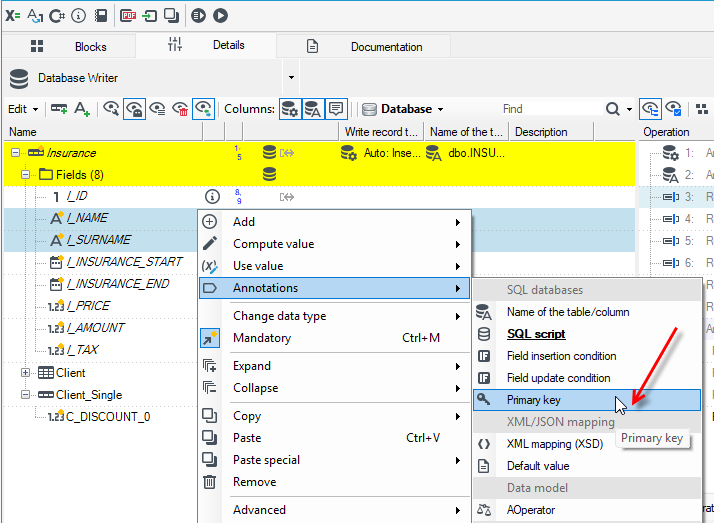
- Lastly, define the primary key for the table. In this example, we assume the primary keys are the client’s or insured person’s first and last names.
- Select the fields
I_NAMEandI_SURNAME, right-click, and choose Primary key from the context menu.
BULK_ORACLE_SQLLDR - manual
The SQL Loader manual.
Usage
-
in the configuration file in the
SQL_LOADER_PATHkey, the directory in which sqlldr.exe is located (optional) should be specified, -
in the Database Writer block,
BULK_ORACLE_SQLLDRimplementation should be selected, -
another step is to create (if it does not exist) and to enter the name of the exceptions table in the block properties in UpdaterImplementation>ExceptionsTableName ,
-
next, other UpdaterImplementation properties should be changed, depending on the needs,
-
when launching, a target directory where the log files and the invalid records files will be stored should be specified.
Method of loading
SQL Loader
- SQL Loader is a tool provided by Oracle which is used for quick loading of a large number of data to a base.
- The file name is sqlldr.exe and it is located both in the server and in the Oracle database client in the bin subdirectory of the appropriate product.
- When loading data in the database or client versions earlier than 9i, make sure that the versions of the SQL Loader and the server are the same.
- Application control is carried out by the control file, and (to a lesser extent) by the command line parameters.
- The entire control in platform is done by the Application.
- During operation, the SQL Loader generates a log file containing the processing details (extension. log), and a file with invalid records if the permissible number of errors is greater than 0 (extension .bad). These files will be created in the directory specified while launching a package and are useful for analyzing the import errors.
Direct path
- SQL Loader enables loading data using two paths.
- The Conventional Path is to generate and perform inserts to a database.
- The Direct Path is to save directly to data files.
- Only the direct path is supported in the current implementation as the performance of the conventional path may be compared to the basic implementation of the Database writer (using dynamic SQLs).
Data Loading Methods
The method is the same for all tables in the block.
The user can choose one of four methods for loading data into a table:
INSERT- Saves data to an empty table. If the table is not empty, an error will occur.APPEND- Appends new data to the data already in the table.REPLACE- Deletes the data in the table and writes new data. Cascading delete works (deleting data in other tables based on foreign keys when the parent record is deleted). Requires DELETE privileges.TRUNCATE- Quickly clears the table and saves new data. Cascading deletion does not work. Requires theDROP ANY TABLEprivilege, or the table must be in the User schema. Requires manually disabling all foreign keys referencing this table, except those on other tables in this block.
Many tables
Loading data to many tables (a schema with child records) is executed by launching a separate SQL Loader instance for each table (it is done automatically as a part of the block execution).
Foreign keys
- The foreign keys defined in the table (or tables) being loaded are disabled while loading data.
- The foreign keys in the tables which are not loaded but which refer to the tables being loaded are not disabled - they must be disabled manually while loading data using the method
TRUNCATEorREPLACEif cascade deletion is not possible. - After data loading has been completed successfully, the disabled keys are enabled again with the data validation option.
- Validation checks if the loaded records refer to the existing parent table records. It there are no proper records in a table the key refers to, the rows including the
ROW_IDidentifier of an invalid record and the name of the foreign key which has been violated will be added to an exception table and the key will remain disabled.
SQL Loader output files
- When running SQL Loader, the operation log file named
table_name.logortable_name_<guid>.logwill be created for each loaded table if overwriting log files and invalid records is enabled. - If the acceptable number of invalid records is greater than 0 and an invalid record occurs, a file with invalid records named the same as the log file will be created and it will have the .bad extension. Records in this file are in the format passed to SQL Loader.
- Fields are text fields in UTF8 separated by the characters
|except for text fields which consist of a single character column containing 1 (for the NULL value) or 0, the character|, the length of the text entered (the number of characters is always the same for a column and it is a minimum number of characters which enables writing a maximum acceptable text length for this column in the base) and the text.
Behavior if errors occur
Foreign keys
- If loaded data does not contain valid references, errors will occur while enabling the foreign keys.
- Such keys will remain disabled and invalid records identifiers will be added to an exception table. Invalid records should be corrected or deleted and then a foreign key should be enabled.
- Suitable records should also be deleted from the exception table. The foreign keys which remained disabled after the failed data import will not be enabled during the next import even if it is fully successful.
- After each failed import (aborted by an SQL Loader data loading error) the User should verify these keys' state and enable the necessary ones (deleting invalid records may be necessary) before a package will be run again.
Invalid records
- If SQL Loader recognizes a record to be invalid, it will not write it to a database but to a file with invalid records.
- If the acceptable number of invalid records is exceeded, loading data to a table will be aborted.
Processing Error
- If an error occurs during package execution or if its operation is aborted unexpectedly, restarting the editor (or another program which executes a package) may be necessary so that data import by SQL Loader could work again.
Parameters
appSettings
SQL_LOADER_PATH
A path to a directory in which the file sqlldr.exe is located. If this key does not occur in appSettings, SQL Loader - which is indicated by the environmental variable PATH - will be called.
Block parameters
AllowedErrorCount
The number of invalid records after which loading data to a table is aborted.
DataPipeBufferSize
The size of the data stream buffer for SQL Loader specified in bytes. 0 means automatic value selection. The proper value should be selected experimentally or the default one should be left.
ExceptionsTableName
The name of the exceptions table. A table is created by the script named utlexcpt.sql which is located in the \rdbms\admin subdirectory of the Oracle client or server..
LoadMethod
The method of loading data to tables.
MaxCLOBLength
The maximum length for CLOB columns.
OverwriteLogAndBadFile
Overwriting log files and invalid records when launching a package again.
Runtime parameters
BadRecordsLogDirectory
The existing directory where log files and invalid records will occur.
Special types of Oracle columns
CLOB
The equivalent of varchar(max) or text, it is possible to load this data from separate files which name is specified in a record field.
Date/time
Time is loaded to the nearest hundredth of a second.
Limitations of fast load methods
Fast methods for inserting records to databases (BULK INSERT, SqlLdr, etc…) give a large acceleration but they also impose many restrictions:
- values generated by a database (Identity, calculated by triggers etc..) are not read from the server and do not complete records. Particularly, relational fields do not work within the written records, based on such calculated values.
Restrictions specific in accordance with particular implementations:
- loading by
BULK INSERT(MS Sql Server) works with batches, by default up to 1000 items, but sending records by a block is not conscious (bulk is an active side of "PULL” and it is on another side of an internal path in the block). - With option Write retries disabled, if at least one of the batch records is thrown out in the BULK layer, then the entire batch is thrown out and a record last read by BULK with attached error is sent to error output.
- If option Write retries is enabled then in the case of an error all records of the current batch are written one by one. The valid ones will be written to the database and the invalid will be directed to the error port. After all records of the errorous batch are written writing in batches of a given size will be resumed. Write retries option reduces the speed by less than 5% and requires batch size to be different than 0.
- Quick Oracle method (SqlLdr.exe) imposes slightly different constraints - they are described in the chapter SQL Loader.
If a record passed through to the output port in a quick write method, it does not mean that it is saved to a database. The package execution logic should cause processing abortion in case of at least one record rejection while writing. Such situations are treated as an error in the package definition, and possible, exact checking of particular values may be done earlier in Map in place.
Example:
If you try to save about 1500 records to a database with a quick method to MS Sql Server (BCP_PROTOCOL, working in batches 1000 elements each), and only the first and the last package record causes a write error and the batch rollback then:
- when Write retries is disabled 2 errors will be generated and no data will be written to the database,
- when Write retries is enabled all valid records will be written to the database and 2 invalid ones will be directed to error output.
Database transactions
Database management is an essential feature of platform. Skillful usage of the database server capabilities, transactions (with their scope, serialization level, lock range etc.), optimization (order of records, indexes, partitioning) enables creating efficient, valid and clear definitions of processing.
The following terms should be mastered:
- Serialization level of transactions and types of locks used by diverse operations.
- Transaction range in a sense of the scope on the process graph and records.
- Threads and process phases.
A transaction is the basic database access unit (read or write). With default settings, transaction includes a single read (of a record or records, in case of sequential read - that are not a response to the query) or an entire record write (from the root to the leaves).
The range of a write transaction may be decreased (so it includes only a single write of one record) or increase (so it includes all records written in an entire thread - adjacent records, not bound in a data structure).
Transactions take place in the context of a session (of connections with a server). With default settings, session is shared by all database action blocks and query read blocks within processing thread. It means economical management of server resources and it entails a few things:
Possible extended locks of read or write in one block do not lock other operations in another one because everything is done in one transaction (while increasing its range).
By default, sequential read (without a query) provides read locks on the data read pages (inside SQL engine) that last to the end of the read operation. If "hints" of "with(no lock)" type are not used or the level of transaction serializability is decreased, it may lead to deadlocks in the course of further data processing. In such a read mode, care should be taken to enforce the order of records with the use of SQL clause: ORDER BY ..., without which the server may (sic!) return the same data record several times.
Mging results to main tables - MERGE generatinger
Very often, there is a problem related to efficient data update in a database. The problem concerns:
- updating records (most data),
- inserting new records,
- removing unnecessary records (very rare).
The easiest method of performing such changes would be using an annotation - a "dynamic" database operation which would result in performing dynamic SQL commands: INSERT, UPDATE, DELETE. Such data handling is completely sufficient for small amounts of data. However, it may result in too long processing times (and also too much usage of the database transactional log) for the amounts of data like hundred of thousands or million records.
Additional transitional tables which have very similar structure to target tables are usually used to solve the problem.
- Such tables are used only for inserting into them the records which should be processed (using quick methods) and then for performing appropriate
INSERT,UPDATE,DELETEoperation inside the server. - In case of the present-day SQL Server or Oracle databases, such three operations may be replaced with one
MERGEoperator which will do all the work saving on physical read/write operations.
No matter if three operators or just one are used, it is still necessary to write SQL commands content. They must mention all columns involved in the process which may result in hundreds of strings in real cases.
Support in the editor
Data processing supports this popular pattern of conduct by offering an SQL code generator.
- The option is available in the context menu of the mapping editor of the Database Writer block.
- The field marked with an annotation Primary key is used as a record key. It is also possible to fill in the content of the scripts after generating.
- In the displayed dialog box, Users may select operations which they are interested in. It is possible to select the
INSERT/UPDATE/DELETEoperations. The User may also decide if the operation should be more effective (byMERGE).
The generated scripts are used for:
- once-only creating a table similar to the investigated one -
CREATE TABLE, - performing the target table update operation (
INSERT/UPDATE/DELETE/MERGE), the script should be placed in the next sentence or in the content of the "manual" write of any, random, single record (a "database" script annotation).
History log – change history when writing via a package
The Database Writer block can record every row it writes into the system change history — the same history the web application shows. A migration or a batch run from a package therefore leaves the same trail as a change made by hand on a form.
- Where you turn it on – in the block properties, the History log branch.
- What gets recorded – only the fields marked in the data model as covered by change history.
- When – together with the data, in the same transaction: if the block rolls back, no entry is left.
- What is missing – in an installation without the VBP module the History log branch does not appear at all.
WRITE BLOCK                                 CHANGE HISTORY
  CONTRACT         (modify)         ──►     Change set      user, date, source "VTS"
    NUMBER         = "C/2024/17"              Contract 17         (modify)
    AMOUNT         = 1200.00  ← was 900.00      AMOUNT  900.00 → 1200.00
    LINE           (add)                        Line 41           (add)
      CODE         = "A1"                         CODE    → "A1"
Prerequisites
For a table to produce history, all of the following must hold:
- The table is described by a data model object – the same one the web application uses. A write to a table outside the model is not recorded.
- The fields have change-history recording enabled in the data model designer. A field that is not marked never reaches the history, even if the block writes it.
- The block runs with transaction handling set to
Block(the TransactionHandling property). InRecordmode there is no transaction, so the history could not be saved together with the data – a package with history active simply will not compile. - The node writes to the same data source as the block – the history tables live in the same database as the written rows. A node redirected to another source (the DataSourceName property on the annotation) reports a compilation error, provided its table is described in the model. Such a block has to be split in two, or have history turned off.
Settings
All of them live in the History log branch of the write block properties.
| Setting | Meaning |
|---|---|
| Active | Turns history recording on for this block. When off, the block behaves as if the mechanism did not exist. |
| UserSource | The "user" audit field the change author is taken from. Format Object.Field; the drop-down fills in once the package has been compiled. |
| ConstantUser | A fixed change author. Used when UserSource is empty, or when none of the written rows carries that field. |
| Uncovered | What to do about a write to a table the data model does not describe: Error (compilation error, the default) or Skip (skip silently – the row is written, no history is produced). |
| RecordDeletedValues | Whether a deletion records the values the row had before it was removed. Off by default – only the deletion itself is recorded, with no field detail, exactly the way the web application does it. Turn it on if the history has to show what precisely disappeared. |
| BusinessContext | Where the business-context note kept with the change set comes from: Constant (from the setting below – the default) or PackageAndBlock (the block and package name, the same one the processing log shows). |
| ConstantBusinessContext | A fixed note. Empty by default – the column is left empty, the way it was before this setting existed. |
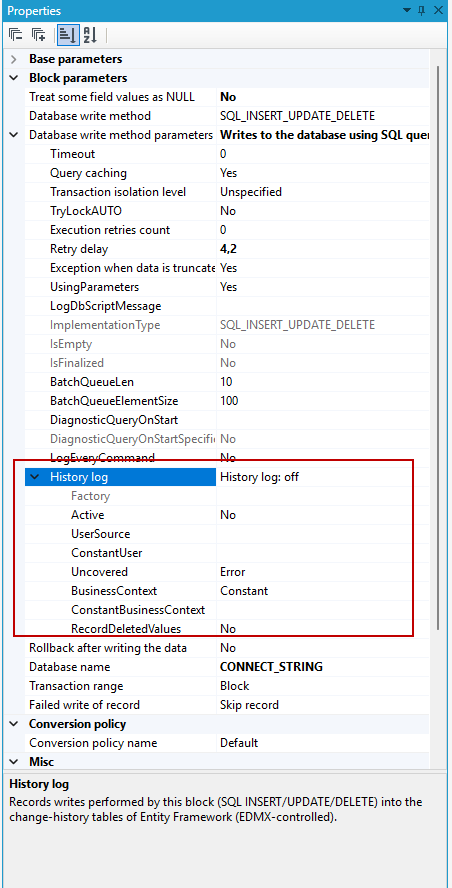
You must set either UserSource or ConstantUser – without one of them the package will not compile. History with no change author would be pointless.
Change author
The order is simple:
- If UserSource points at a field the written rows actually carry, the author is taken from the first such row in the transaction and used for the whole change set.
- Otherwise ConstantUser is used.
The UserSource drop-down lists only the "user" audit fields of the objects this block actually writes to – it is not a catalogue of every object in the system. Until the package has been compiled the list is empty: it is compilation that establishes which tables the block reaches.
What exactly gets recorded
One block transaction is one change set in the history. Every row written in it lands there together, keeping the record tree layout – a child points at its parent, exactly as in the history of changes made from the web application.
For each row the history notes the object it concerns, the kind of operation, and the changed fields.
| Operation | What reaches the history |
|---|---|
| Add | New values of the fields covered by history. |
| Modify | Old and new value – only for fields that actually changed. A field rewritten with the same value produces no entry. |
| Delete | Just the fact of the deletion, with no fields – and, once RecordDeletedValues is turned on, also the values the row held right before it was removed. |
Notes on values:
- Dates are stored in a normalised form, independent of regional settings.
- Binary data (attachments) is stored as a digest, not as content. The history shows that an attachment changed, but keeps no copy of it.
- Entries produced by a package are marked with source VTS, which tells them apart from changes entered by a user in the web application.
What you see when the package is compiled
Every tree node that writes to the database gets a message:
| Message | Meaning |
|---|---|
| History log: recorded as data model object 'X' | Information – this node will be recorded in the history as object X. |
| History log: no data model object describes table '…' | The table is not described in the data model. Whether this is an error or just information depends on the Uncovered setting. |
| History log: the table name is known only at runtime | The table name comes from an expression, so it cannot be matched against the model at compile time. Treated as a table outside the model. |
| History log: this node writes to data source '…' | Error – the node writes to a different data source than the block, while the history goes wherever the written rows go. See prerequisite 4. |
This makes it visible on the tree which writes will leave a trail and which will not – before the package is ever run.
Performance
On modify the mechanism has to read the row before it is overwritten – otherwise there would be nothing to show as the "previous value". That means one extra query per modified row. Adding costs no read.
Deleting costs nothing either, by default – with no field detail going into the history there is no point reading a row that is about to disappear. Turning RecordDeletedValues on adds a read of every deleted row, so for packages that delete a lot of data this is a throughput decision, not a cosmetic one.
In practice:
- Turn it on where the trail is required – corrections to production data, operations performed at a customer's request, batches subject to audit.
- Do not turn it on for bulk loads counted in hundreds of thousands of rows – the throughput drop is directly proportional to the number of modified and deleted records.
Common problems
| Symptom | Cause and remedy |
|---|---|
| Package does not compile: History log requires BLOCK transaction handling | The block runs in Record transaction mode. Switch TransactionHandling to Block. |
| Package does not compile: History log needs a change author | Neither UserSource nor ConstantUser is set. |
| Compilation error about a table outside the data model | Add the table to the data model or – if this write is deliberately meant to stay without history – set Uncovered to Skip. |
| The UserSource drop-down is empty | The package has not been compiled yet, or none of the written objects has a "user" audit field. The value can also be typed in by hand. |
| History entries appear, but with no fields | The fields do not have change-history recording enabled in the data model designer. |
| Compilation error: this node writes to data source '…' while the block writes to '…' | The node has been redirected to another data source, while the history goes wherever the written rows go. Split the block in two, or turn history off for it. |
| The History log branch is missing from the block configuration | An installation without the VBP module – the mechanism does not exist in such an environment. |
| The change author is not the one expected | UserSource points at a field the written rows do not carry, so ConstantUser was used. |
Write to MongoDB
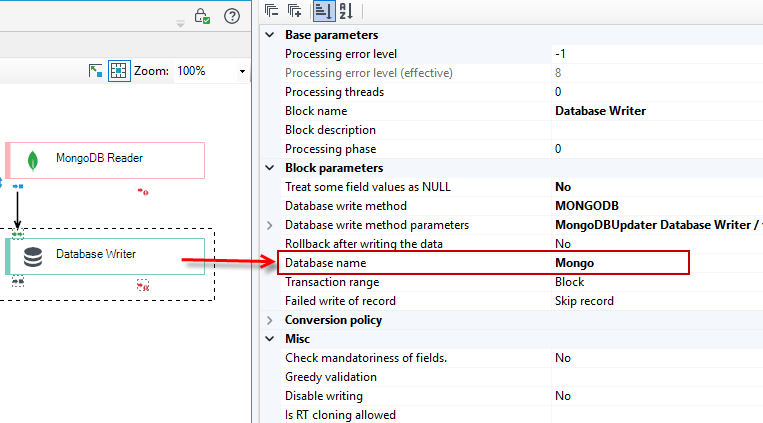
Writes to MongoDB are performed by Database Writer block.
- In the block’s properties a MongoDB database should be selected.
- Data is stored in the form of BSON documents.
- Each document is written in an atomic operation, however it is not possible to combine few operations into one – there is nothing like a transaction.
- The root of a document to store is a record annotated with a Write record to a database annotation. The name of this record is the name of a collection to which the document will be written, unless the record is also annotated with Name of table/column annotation. There can be additional Write record to a database annotations on the subrecords of that record, but usually they don’t indicate a new document root.
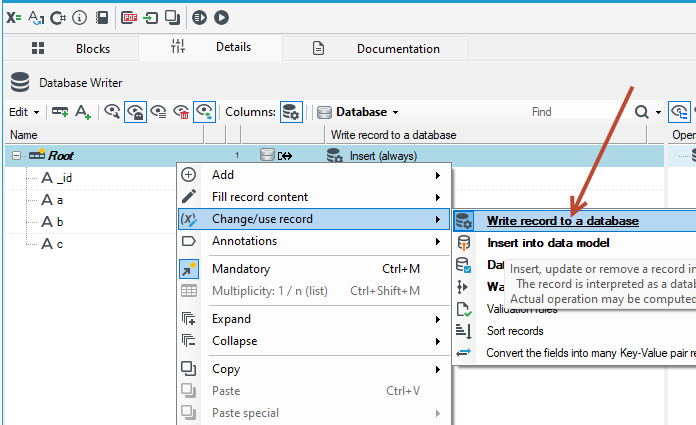
Schema elements marked with a Technical data annotation are not included in the document. If this annotation is on an record then neither it nor any of it’s subrecords will be included in the document. If ,in addition to that, this or any subrecord of that record is annotated with Write record to a database then it will become the root of another document, which will also be stored in the database.
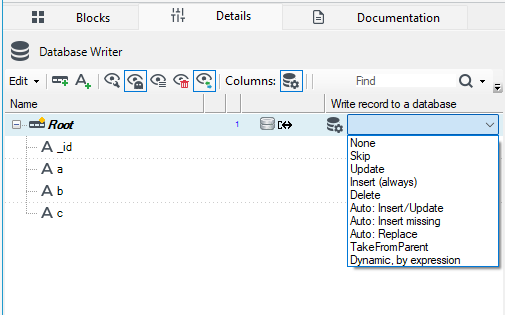
The root record of a document can have one of the following database operations:
- None - Document will not be stored.
- Skip - Document will not be stored.
- Insert - Document will be inserted into the database
- Update - Modification of an existing document. All matching documents will be modified.
- Replace - Document will be replaced, if it exists.
- AUTO_InsertUpdate - UPSERT operation – document will be modified if it exists or inserted if it doesn’t.
- Delete - Document deletion. All matching documents will be deleted.
- In
Update,AUTO_InsertUpdateandDeleteoperations, a query document is constructed and used for finding documents to modify. - Fields that are to be used for finding the documents should be annotated with a Primary key annotation. If a record contains an
_idfield it will be used by default, unless it has a Technical data annotation or another field in this record has a Primary key annotation. If a field is to be used in a query as well as in a modification then that field should be annotated with a Primary key annotation and another field with a different name should be added and annotated with a Name of table/column annotation in which the target field’s name should be entered. - Fields of a record are mapped to values and the records to documents. By default, the name of a field/record is used as the name of a document field to which a value/subdocument will be assigned. This name can be changed with a Name of table/column annotation.
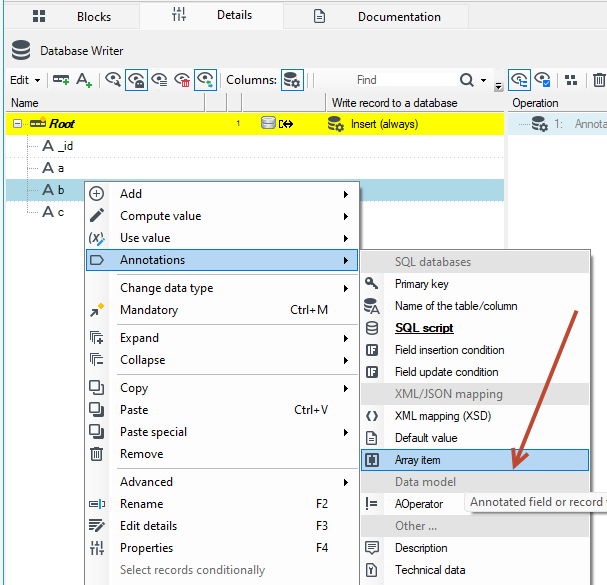
- Records of a multiple type are mapped to arrays of documents or values. In the first case the elements of the array will be documents – this is the default behaviour. In the second – the values from an indicated field of the record. In order to store a multiple record as an array of values one of it’s fields should be annotated with a Array item annotation. This annotation can also be placed on a subrecord of a multiple record – in such case the array’s elements will be the documents corresponding to the annotated record.
In modifying operations (Update, AUTO_InsertUpdate) a type of array modification can be selected by annotating the multiple record with a Write record to a database annotation. Specific operation types have following effects:
| Database operation type | Effect |
|---|---|
Insert | All new items will be added to the existing array. |
Update or Replace | The existing array will be replaced with a new one. |
AUTO_InsertOnly or AUTO_InsertUpdate | New items that were not present in the existing array are added to it. |
Delete | Items are removed from the existing array. |
By default, data types are mapped to MongoDB types as follows:
| Type | MongoDB (BSON) type |
|---|---|
| Logical value | Boolean |
| Date/time | DateTime |
| Fixed point number or Floating point number | Double |
| String | String |
| Binary or Identifier (GUID) | Binary |
MongoDB does not have a fixed point (decimal) data type.
The MongoDB data type annotation allows specification of the data type if there is more than one possible type. The value “AUTO" means the default mapping, the remaining values have following meanings:
| Type | Possible MongoDB data types |
|---|---|
| Fixed point number or Floating point number | Int32 lub Int64 or Double |
| Binary | Binary or ObjectId |
| String | String or ObjectId |
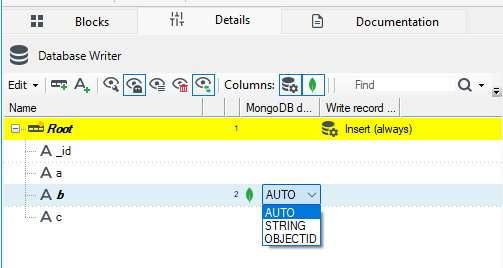
If a Binary or String field is annotated with annotations Autogeneration and MongoDB data type with a type of ObjectId then a new ObjectId value will be generated and stored in that field.
Document mapping examples:
| Schema | Collection name: document |
|---|---|
 Record A will be inserted into a collection named "Record A". | "Record A": { "Field 1": "a" } |
 "Record B" will be inserted as a subdocument of the record "Record A". | "Record A": { "Field 1": "a" "Record B": { "Field 1": "a" } } |
 There is a Technical data annotation on the record "Record B", which causes that record will not be a part of the parent document. | "Record A": { "Field 1": "a" } |
 There is a Technical data annotation on the record "Record B", because of which that record will not be a part of the parent document. The annotation Write record to a database on this record causes it to be inserted as a separate document to a collection named "Record B". | "Record A": { "Field 1": "a" } "Record B": { "Field 1": "a" } |
 "Record B" is a multiple record, it will be inserted as an array of documents. | "Record A": { "Field 1": "a" "Record B": [ { "Field 1": "a" }, { "Field 1": "b" }, { "Field 1": "c" }] } |
 "Record B" is a multiple record and at the same time one of its fields has an Array item annotation. The record will be inserted as an array of values of the indicated field. | "Record A": { "Field 1": "a" "Record B": ["a", "b", "c"] } |
 A multiple record "Record B" will be inserted as an array of documents. The record "Record C" will be a subdocument of the documents in the array. | "Record A": { "Field 1": "a" "Record B": [ { "Field 1": "a" "Record C": { "Field 2": "x" } }, { "Field 1": "b" "Record C": { "Field 2": "y" } }, { "Field 1": "c" "Record C": { "Field 2": "z" } }] } |
 The Array item annotation on the record "Record C" causes that the record "Record B" will be inserted as an array which items are the documents created from the "Record C" record. No other elements of the record "Record B" will be included. | "Record A": { "Field 1": "a" "Record B": [ { "Field 2": "x" }, { "Field 2": "y" }, { "Field 2": "z" }] } |
File blocks - common mechanisms
The chapter contains a description of common mechanisms of all file blocks.
Saving compressed files
- The blocks: Fixed Length Output File, KVF Output File, CSV Output File, Trivial XML Output File, Typed XML Output File and FWDK Output File may save data in compressed files in the zip or gzip format.
- In order to save an output file in the selecte format, you need to write the name of the output file with ".gz" extension for gzip format or ".zip" for the zip format. Extensions are not case-sensitive.
- The file name in the zip archive will be the same as the archive name after the ".zip" extension is cut off, i.e. if result.csv.zip is a name of an output file, then one file named result.csv will be in the archive named result.csv.zip.