Testing through GUI
Data flow packages can be tested using a GUI testing framework. It facilitates both the development and debugging of packages. Test cases can be also run from a continous integration task like Nunit.
Creating a test case involves the following main steps:
- Pick a part of a data flow (block, blocks) to be tested
- Build some testing data records, that will feed the subgraph
- (optional) set up parameters
- (optional) set up assertions for the data flowing out of the test
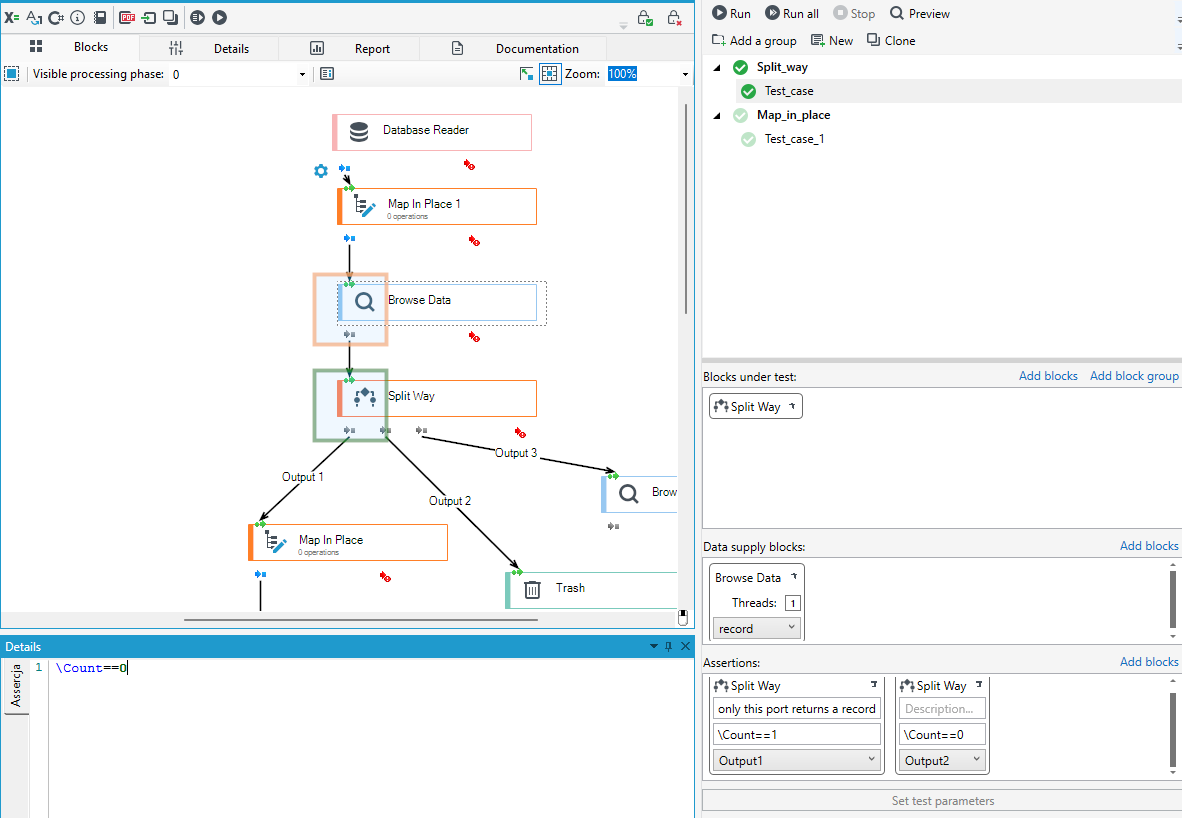
The following picture shows an exemple of testing formulas within a Split way block:
- Input data to be fed into the test can be specified in the Browse data block:
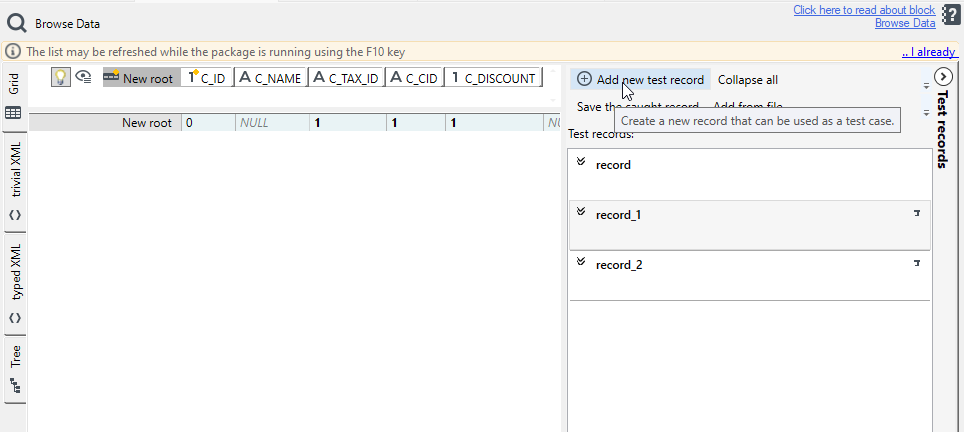
- The process of creating input data was designed in a way that minimizes potential problems stemming from future changes made to the packages, that would influence schemas of the data:
- Test cases persist only the very data that was specified by hand at test creation. All the rest is being dynamically filled in during test run based on the current schema.
- All future schema conflicts are being silently resolved, leaving a trace only in the designer`s log.
- Input data can be composed of several "layered" templates. One, single data specification (a few field-value pairs) can serve as a base for many other specifications (and so on). In the end we get the final data to be put into a test.
- Data browsing block can be used to "capture" whole data record for future use as a template.
- Tests (data templates, assertions) are being persisted aside of packages, in separate folders.
Testing panel
The packages editor is supported by an external panel for unit tests.
It allows for the following operations:
- Manage test cases (or groups thereof) - add, clone, remove, reorder (drag&drop) etc..
- Run tests (groups, all)
- GUI-integraged mode - data can be viewed and moved in/out of the template
- Performance-oriented mode
We need to perform the following operations while creating a new test case:
- Select blocks or their preconfigured groupings (from the navigation pane) that will constitute a test. This accomplished by selecting a block on the designer panel and then clicking Add blocks button on the test pane.
- Specify the input data - this is done through the Browse datablocks, that will now act as "testing here" markers in the package. We need to add some, if necessary.
- In their editors, we can build data templates using a panel inside them. This is described in greater detail in another subtopic.
- Set values for packages input arguments and block`s parameters.
- Write assertions (using the expression language). This is accomplished by selecting a block included in the test, and then selecting its port, where the assertion is to be attached.
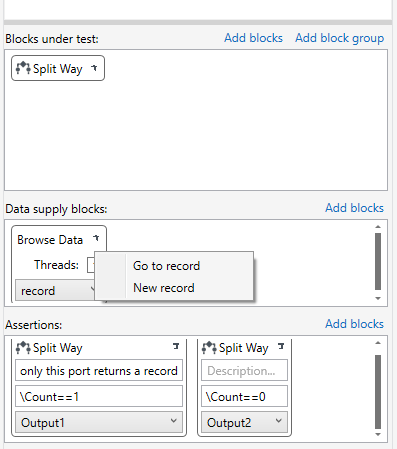
Creating assertions
- Select block and a port for the assertion inside a test on the designer panel.
- Add it to the assertions panel with a button Add blocks.
- Using a Details editor panel, specify the boolean expression.
The expression can refer to several special data elements:
- \Count field - how many records have passed through this port
- \FirstRecord - the first (and often the only) record that have passed through the port
- \Output - a multi-record containing all of the records, that have passed through
Hints
- The blocks to be tested, the blocks providing records and the blocks to which assertions are attached must be added to the list by selecting them in the editor and pressing the corresponding button on the test panel. Clicking on any block in the mentioned lists jumps to the block in the editor.
- Tests after changing the package may break. Fixing them may require you to preview the actual package being run in the engine.
- Block groups are the preferred way of handling functional groups of blocks, i.e. for testing purposes.
- If some error output port is not referenced by any assertion, any error record on that port will fail a test.
- Deleting block removes them from eventual named groups and tests. Appropriate notifications will be displayed to warn the designer.
- Package and its tests are saved to different "files", which makes some impact on eventual version control systems. Saving the package always saves the test data. If the package cannot be saved, it is still possible to save the test data.
- The test data saving mechanism, unlike the package saving mechanism, does not rely on the "dirty" flag. It checks only if there are any changes in the data file.
- The status icon of a test that has not been run recently is grayed out. From a logical point of view, running a test of some kind means that changes have probably been made to the package. After the changes in the package, it is uncertain whether a test that recently passed or did not pass would still behave this way.
- When a single test is selected in the test panel, the blocks that are tested by it are highlighted. A block with a orange border indicates a block providing data, a block with a green border is a block on which an assertion is attached.
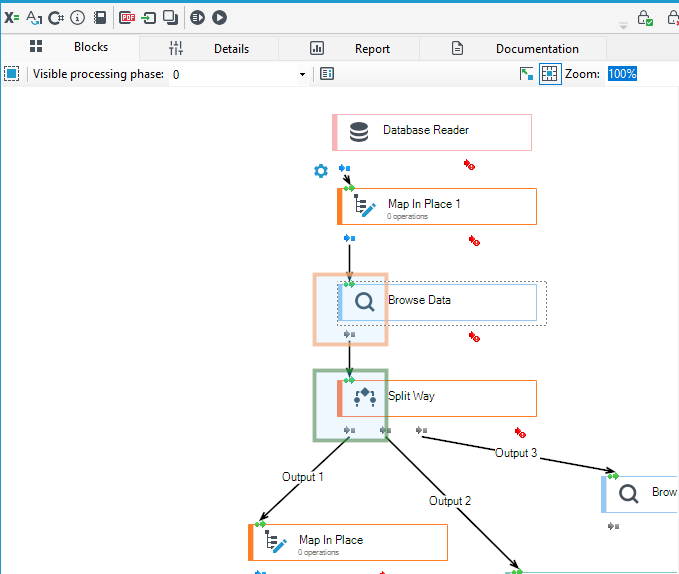
Creating test records
The Browse data block, in addition to being able to preview the records that flowed through it when the package was run in the editor, also has the ability for the user to create records. The created records can be used to create test cases.
The capabilities that the record previewer provides for creating records with test data are listed below.
- Save the current captured record to the test record list. Useful when you can run a package with some data, but when you want to experiment with special cases that would be difficult to obtain by manipulating the input data.
- Creating a new record. The new record is filled with the default data for the type (fields and records not required: NULL; number: 0; text: ""; date: 01-01-1900; etc.).
- Each record can be based on values from another record. By adding a record pattern to the record definition, changes that are made by the record pattern will be applied to the default values of the record, and then changes that are made to the current record.
- A record that is used in a test or as a template for another test record cannot be deleted. The record's dependencies are listed in the record's tooltip.
- The value entered by the user in the current test is displayed in bold.
- A field that has or had a value taken from the master records will have a pink background.
- Each record preview block keeps the test record data in a separate file. Only the information that the user himself has entered (changing the value of a field, adding a record, deleting or moving a record) is saved.
The test record creation algorithm has been designed with special emphasis on ease of test maintenance, even in the case of frequent record schema changes due to package modifications. Any conflict of value types (in the current schema and in the test data), any value that no longer has its place in the current schema (e.g., as a result of removing a field from the schema), and fields newly added are handled silently. Any conflict of value types (in the current schema and in the test data), any value that no longer has its place in the current schema (e.g., as a result of removing a field from the schema), and fields newly added are handled silently.
- It is possible to add new records from the test panel. To do this, select the right mouse button on the representation of the block providing data, and then click New record.
Running tests from the NUnit level
Tests created from the editor level can be run from the auto build level. The 'VtsGuiTestRunner' class is used for this purpose. Below is a suggestion on how the 'VtsGuiTestRunner' class can be used to create readable tests in NUnit.
public static class NUnitVtsGuiTestRunner
{
public static IEnumerable GetRunneres(string a_packageFile, string a_logDir)
{
var testCases = new List<TestCaseData>();
VtsGuiTestRunner.GetRunneres(
a_packageFile, a_logDir,
Console.WriteLine,
Assert.Fail,
_ => testCases.Add(
new TestCaseData(_.TestRunner)
.SetCategory(_.TestCaseGroupName)
.SetName(_.TestCaseGroupName + "." + _.TestCaseName)
.SetDescription(_.TestCaseDescription)
)
);
return testCases;
}
}
[TestFixture]
public sealed class VTS_GUI_Tests
{
[Test, TestCaseSource(typeof(VTS_GUI_Tests), "TestCasesAllPass")]
public void AllPass(Action a_test)
{
PerformanceConfig.State currentPerfState = null;
try
{
currentPerfState = PerformanceConfig.GetCurrentState();
PerformanceConfig.OptimizeForTest();
a_test();
}
finally
{
PerformanceConfig.SetState(currentPerfState);
}
}
public static IEnumerable TestCasesAllPass
{
get
{
var settings = new TestSettingsVTS2();
String pathToTestFile = Path.Combine(settings.InputDataPath, "TestCreatedInGui");
return NUnitVtsGuiTestRunner.GetRunneres(pathToTestFile + @"\" + @"all_pass.vts2p", pathToTestFile + @"\Logs");
}
}
}