Creating a new list
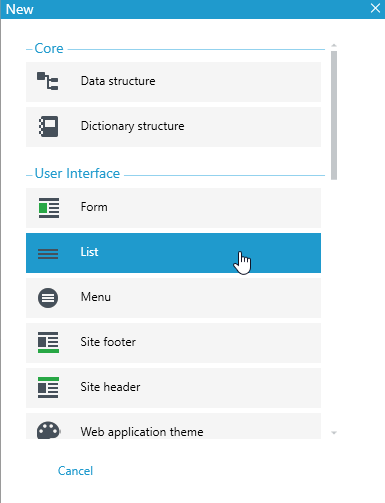
- In the main window, select New.
- click New List.
or
- From the File menu, choose New>List.
Using the predefined list settings
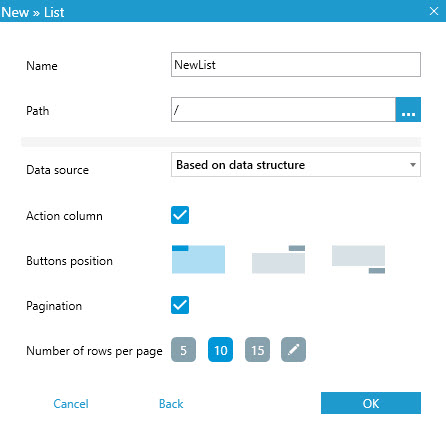
- In the window for creating a new list, you can decide what is the data source for the list, that is, choose whether the list is based on a given structure or not.
- If you choose a data structure, you can add an action column to the list.
- Next, select the position of the buttons i.e. in the list header, above the list or below the list.
- If you select the pagination option you can choose the number of rows per page.
- Select the button
 to go back to the possibility of changing the basic parameters of the list.
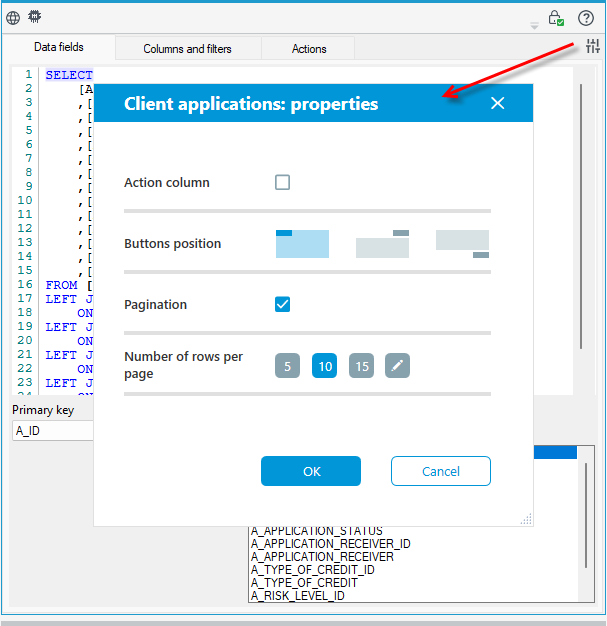
All the options you have selected or not can be changed on the Properties panel.
- If you have selected the data source for the list, that is, the data structure, then in the next window select the structure from the version server.
- In the Data fields window, an SQL query will be automatically added and the data fields will be retrieved.
- You can, of course, delete the given query and enter another one.
- If there were dictionary fields in the data structure, they will also be automatically added to the query in the list and retrieved.
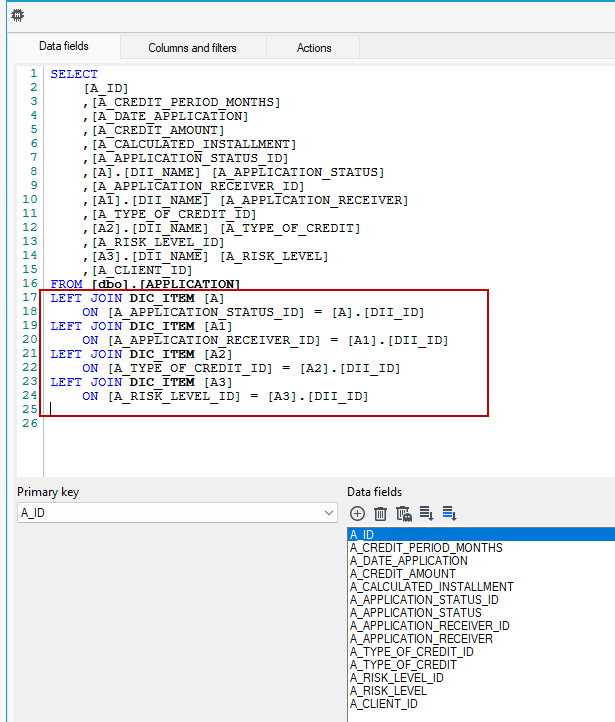
The SQL query will be executed automatically if you drag the data structure directly from the version server or from the Database panel.
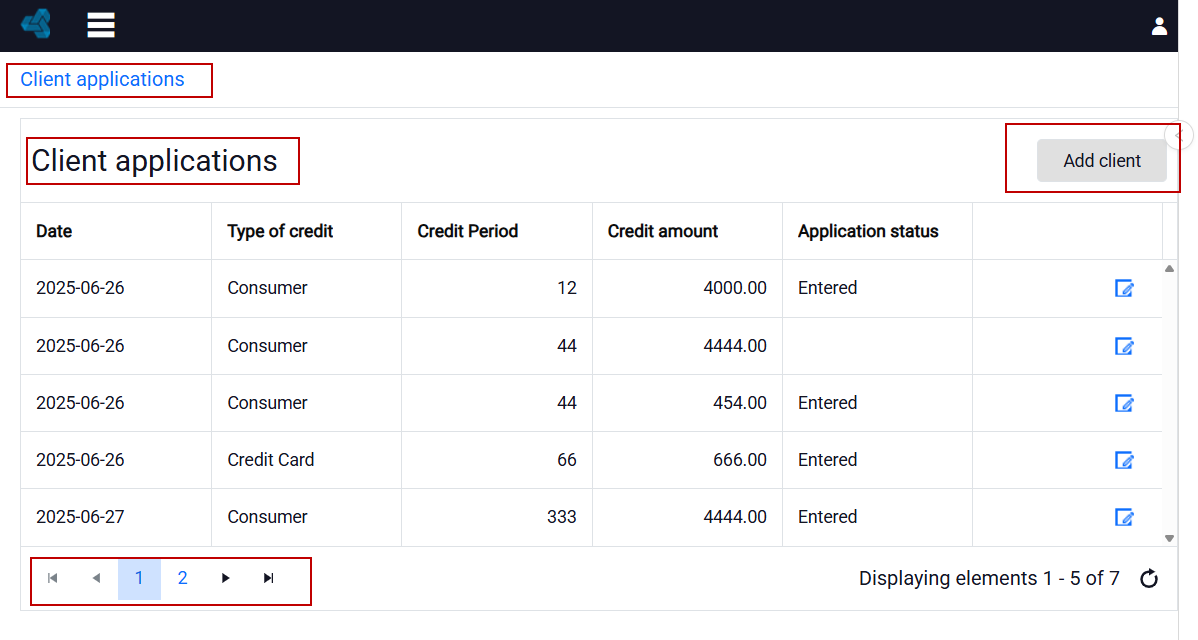
- The name of the list in the navigator and toolbar will be set to be the same as the file name you entered when creating the list. You can change the name on the Properties panel.
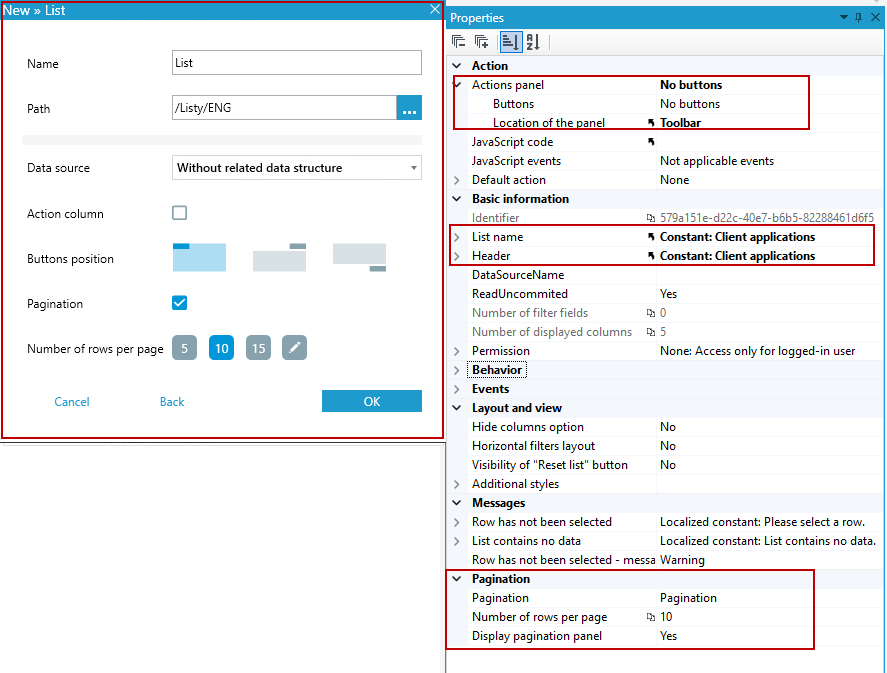
- You will also change the location of the buttons panel and the option to paginate and display the number of rows per page in Properties panel.
Selecting Data Fields
To define a list, you must specify the data structure fields to be used in the list.
- Use the SQL query language and type your query in the editor. You can also drag the data structure directly from the version server or from the Databases panel, then the query will be executed automatically.
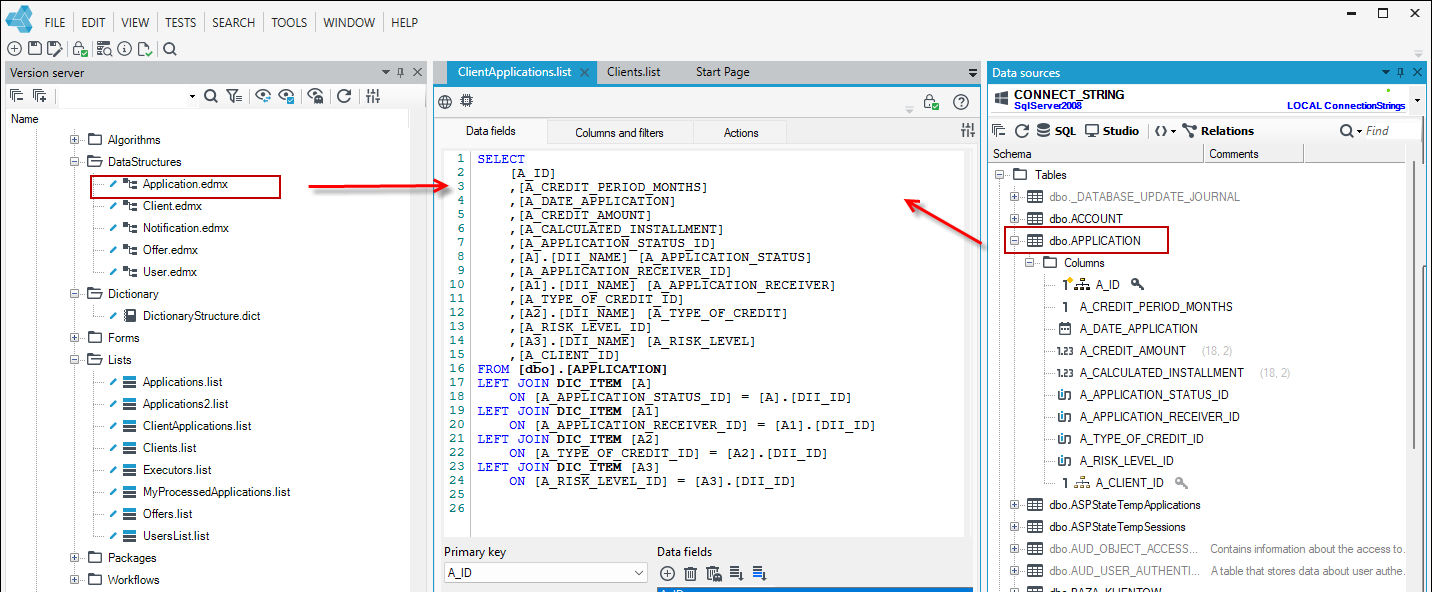
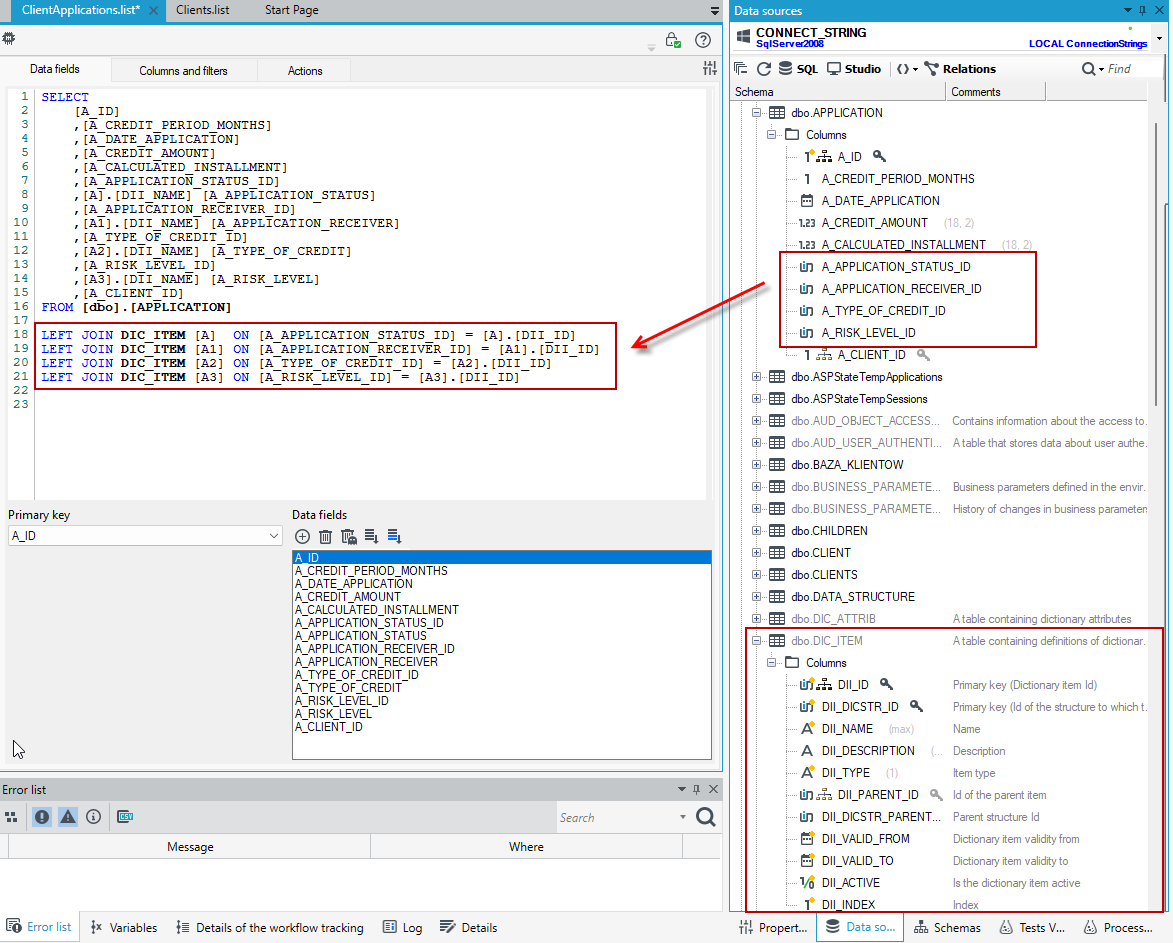
- If you want to add dictionary fields to the list, you need to include a
DIC_ITEMtable in the query, which contains the names of dictionary elements. In the data structure, the dictionary elements are stored as a GUID field, which is the dictionary identifier. To retrieve the dictionary name, use theLEFT JOINoption and include the dictionary names from theDIC_ITEMtable, which is located on the database panel. - The example below shows the syntax of the query when you want to add 3 dictionary fields to the list:
SELECT **Column_1, Column_2,**
D.DII_NAME AS DS_NAME,
D1.DII_NAME AS DP_NAME,
D2.DII_NAME AS DT_NAME
FROM dbo.MY_TABLE
LEFT JOIN DIC_ITEM D  ON DICTIONARY_FIELD_ID = D.DII_ID
LEFT JOIN DIC_ITEM D1 ON  DICTIONARY_FIELD_ID = D1.DII_ID
LEFT JOIN DIC_ITEM D2 ON  DICTIONARY_FIELD_ID = D2.DII_ID
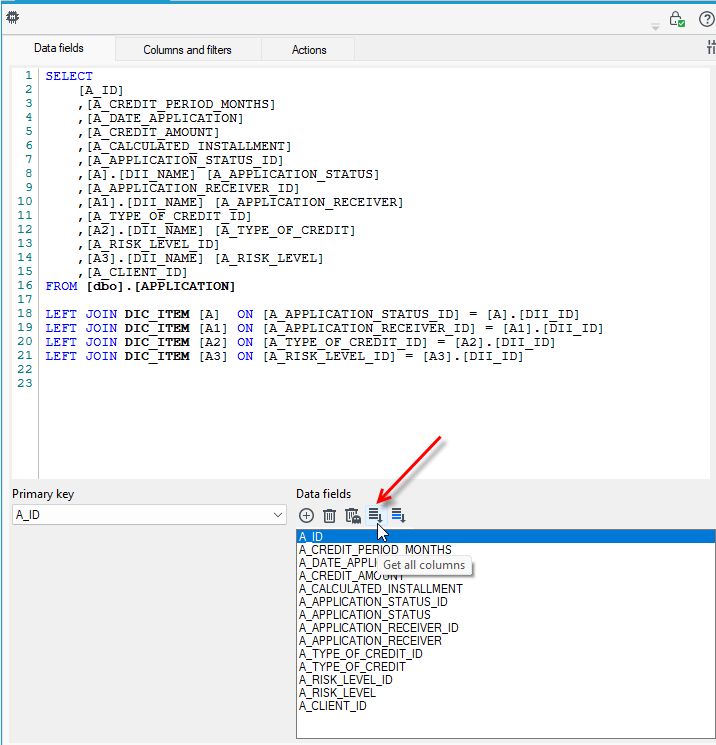
- In the Data fields section, select the button to automatically retrieve the columns. These are the fields from the data structure from which values will be retrieved.
- Based on the selected fields, you can now configure the filters and columns in the list.
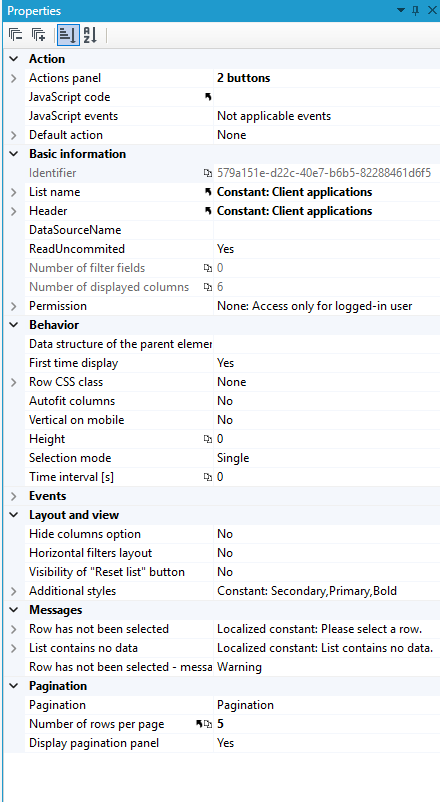
On the Properties panel, you can configure
- general data about the displayed list, such as the title, permissions, or the content of displayed messages,
- buttons on the search panel,
- list paging options,
- other list configuration data is collected in the Behavior section,
- actions and events - these data can also be defined on the Actions tab - see: Actions.
For more information see: List properties.
AI assistant
The List is equipped with an AI assistant to automatically generate SQL queries based on natural language descriptions. The assistant uses the GPT-3.5 / GPT-4 module provided by OpenAI. The principles of using GPT models are described in AI Assistant configuration chapter.
Using the assistant
The AI assistant is launched by activating its icon. In the AI assistant window, enter a command, based on which an SQL query will be automatically generated and placed in the main window of the list designer.
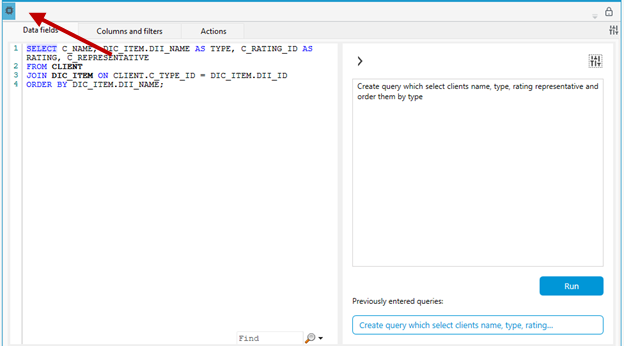
The commands on the basis of which the SQL query for the list is to be generated can be entered in any language. The queries should be based on the business names used when building the application's data model. Below are examples of queries based on which SQL commands were generated in several demonstration applications:
- Create query which select clients name, type, rating representative and order them by type.
- Create query which select orders witch they status, total items, client name, deadline where order status is shipped.
- Create query which select product names, it's category, producer, unit location and price.
- Create query which shows products less than 20. Select columns product name, unit and amount.
- Create query which shows parcel id, status, type, weight, label.
- Create query which shows number of packages in shipment, including packed packages. For shipping, show columns delivery date, project name, shipping status. Sort by shipping date.
- Create query showing the details of an item and the number of its children (
E_BIRTH_IDrelation) divided into shipped and unsent (E_REL_SHIP_IDfield). - Create query returning transport details (transport type, vehicle number, driver, contact), shipping and loading dates, project name and number of parcels in shipment.
- Createa query showing parcels that are assigned to shipments, but are not assigned to transportation.
How it works
The AI Assistant uses knowledge of the application's business model to generate SQL queries. Each time a specific list editor is opened, this information is updated by the AI Assistant. If the data structure/data model of the application changes (e.g., new columns are added) then the data in the details window must be refreshed (closing and reopening the editor also updates the model). Based on the data model, a query context is automatically generated for the GPT model, which is passed along with the query entered by the user.
- The automatically generated query context can be viewed using the details button available on the AI Assistant window. The context is terminated each time with a phrase that forces/suggests on the GPT model to respond in the form of an SQL query.
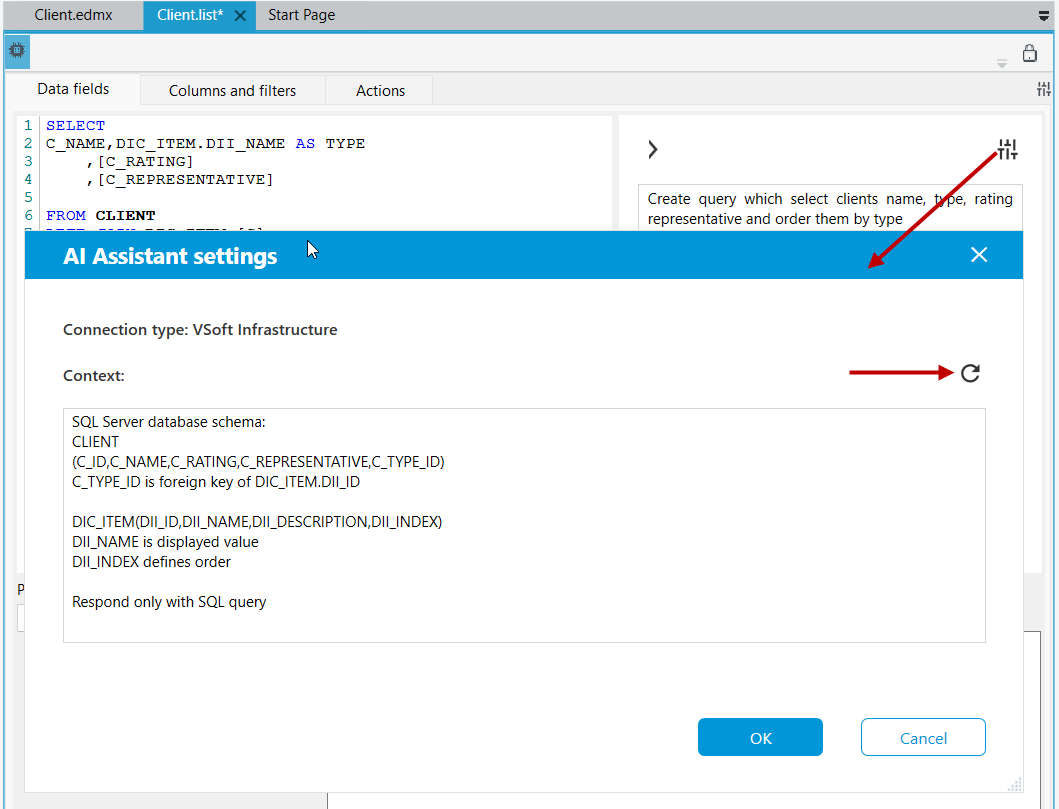
Due to the specifics of how language models work, it may happen that the answers provided will differ during subsequent queries for the same data. This is due to the default settings of the GPT models we use.
If all the data is missing, the language model may not be able to generate a SQL query in response. In this case, you should fill in the missing business information in the command and ask the assistant again.
The answer generated by the assistant will sometimes not be a syntactically correct SQL query running in the user's application. This is the natural operation of models. In this case, call the SQL query generation mechanism again or manually correct the erroneous parts of the generated query.
Selecting columns and sorting
After selecting the fields that will be used in the list, define the columns and filters that will be displayed in the list, in what order, and whether they should be sorted.
- Select the Add columns button in the Displayed columns section - select the fields from the data structure that will be visible in the displayed list (column collection). The fields to be selected are those selected in the previous step of creating the list.
- If you specified business names for the fields in data structure, then these names will be downloaded to the list and will be displayed as column names.
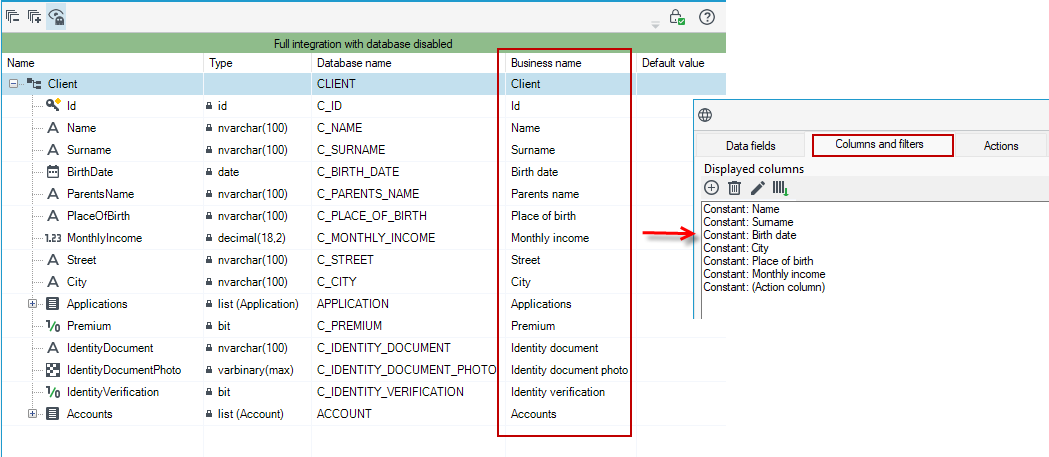
- In the section Default sorting - you can select fields from the data structure by which the data will be sorted before the list is displayed. Two sorting directions are available: ascending and descending (in the case of a text type field, descending sort means sorting from Z - A). Additionally it is possible to configure a default sorting. The field by which the list is sorted does not have to be displayed as a column.
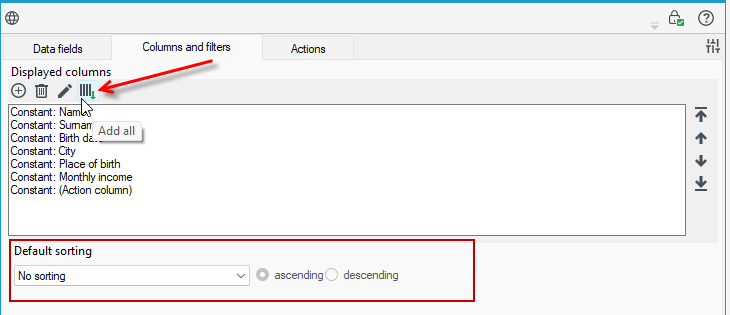
You cannot display the same column twice in the list.
You can configure the content to be displayed in a column.
Select the column and go to edit. The data you can configure:
- Column kind - how the data is displayed in the list.
- Standard - data is displayed as it is stored in the data structure.
- User data - a selected range of data about the User is displayed, based on the User ID that exists in the system and is stored in the data structure. Data that can be displayed in the column: Name, Login, E-mail, Phone.
- Action column, Compute column - for more information see: Action column and other types of columns.
- Data field - a field in the data structure from which the information displayed in the given column will be taken. You can choose only those fields that were selected in the first step of creating the list. 2.
- Data format - a choice of how the data displayed in the column will be formatted. It depends directly on the type of field in the data structure from which information will be collected.
- Column width in % - this property determines the width of the displayed column. The value determines the percentage that the column will occupy in relation to the entire list.
- Alignment and Header alignment - the way of aligning text in the column. By default, the contents of the columns are aligned to the left.
- Sortable column - property that allows the user to sort the list by the values from this column.
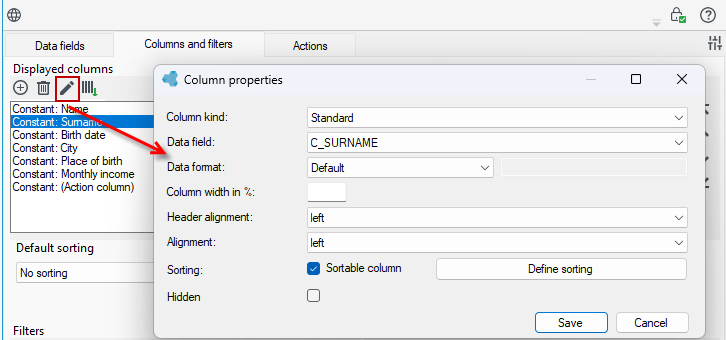
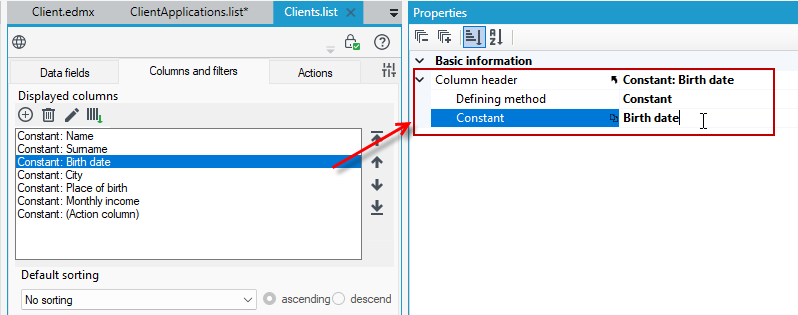
- The created column will have the name as it is stored in the data structure. You can change the name using the Column header property. Go to the Properties panel.
Action column and other column types
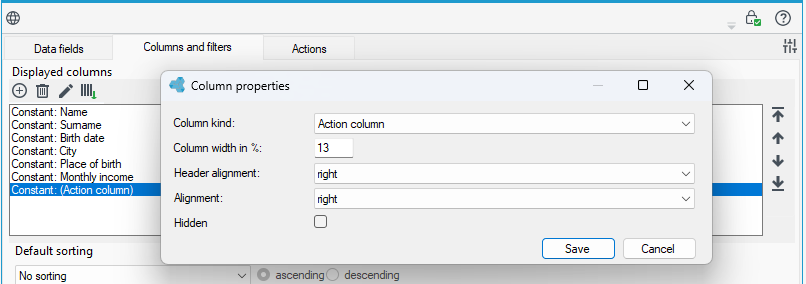
You can define an additional action column that will allow you to put actions that will apply to a particular record in the list. For more information, see: Location of action buttons.
- In the Columns and filters pane, select the Add button, and then select the column kind as Action column.
-
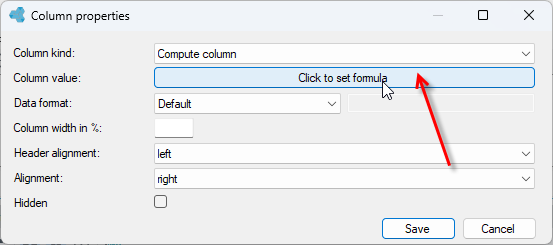
In addition to the standard columns and action column, you can also add a computed column.
-
Formula editor is available for computed column, which allows you to specify value for the column. For more information on defining formulas, see: Formulas.
Multiple rows operation
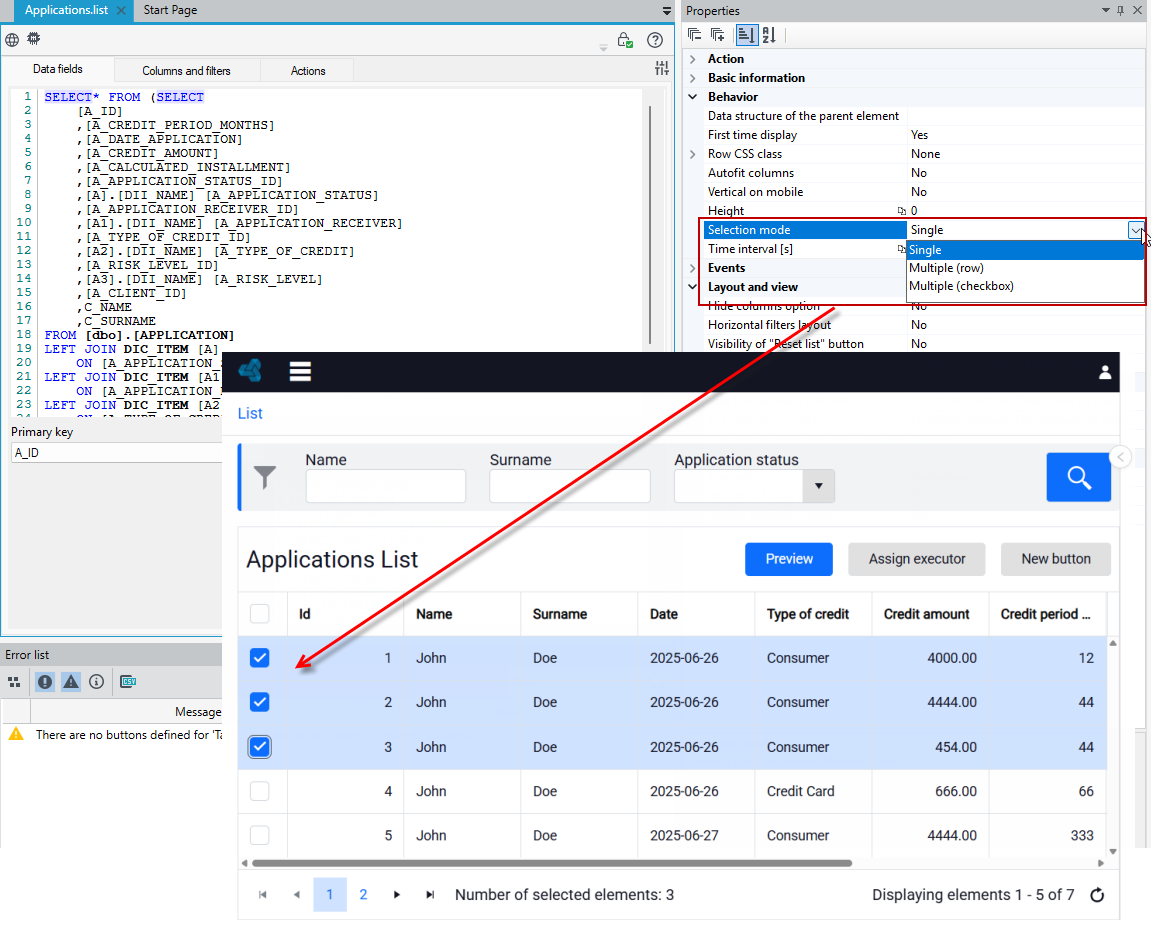
On the Properties panel, you can specify whether multiple row selection will be allowed in the list and then the action can be performed for all selected rows.
- An additional column with checkboxes will be displayed if you select Multiple (checkbox) in the Selection mode section on the Properties panel. This property determines the selection mode of multiple items:
- Single - limits the selection to a single item.
- Multiple (row) - allows you to select multiple elements using the CTRL and SHIFT keys.
- Multiple (checkbox) - allows selection of multiple elements using checkboxes.
Defining filters
In the Filters section you can define filters, i.e. select fields from the data structure on the basis of which the system or the user can narrow down the items on the list (filter collection). Filters allow you to display a list that meets the criteria specified in the filter properties.
- Select the Add Filter button and configure it in the Filters editor window.
- Select the structure data field that contains the values by which the list can be filtered.
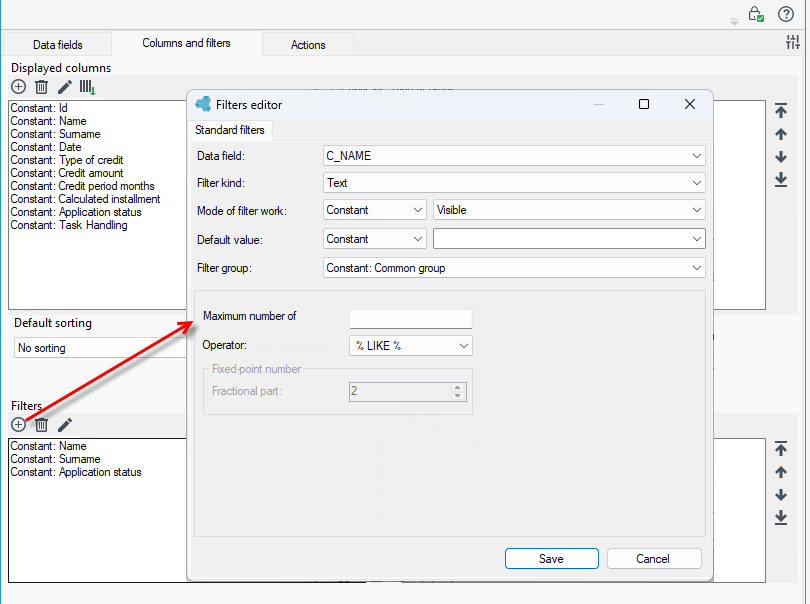
Filter type
In the Filter kind field, you have a choice of predefined filter types that define the type of data that narrows the list:
- text - a filter type that is used to search list items by text type values,
- number - the type of filter that is used for searching elements of the numeric type,
- date/time - a type of filter that is used for searching elements of the date/time type,
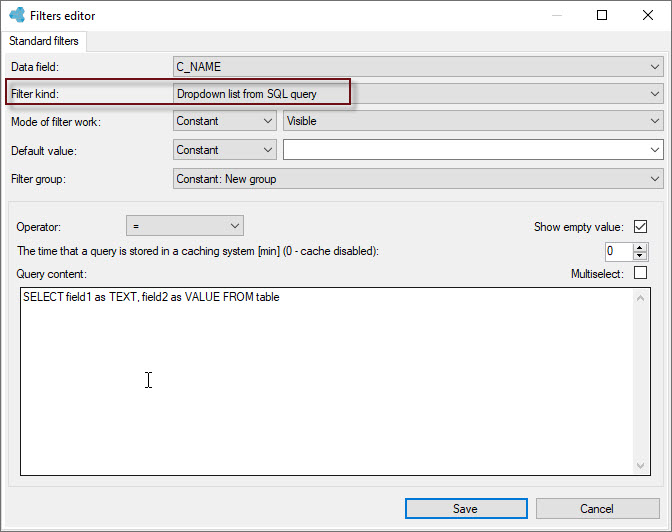
- drop-down list from SQL query - a type of filter that allows you to define your own filters using SQL language. The Query content window presents how to define the query:
- field1 - is the name of the column in the database from which values will be retrieved and displayed as filter drop-down list items.
- field2 - is the name of the column from the database from which values will be taken, by which the list will be filtered. Mostly it is the same column as for field1.
- It is possible to use two different columns, but then the column used in the place of field2 must match the column selected in the data field. Otherwise, the filter will not perform its function (the system will not display the value in the filter drop-down list).
- subquery - type of filter, which causes displaying a window, in which it is possible to enter a subquery, After defining the subquery, we can specify whether the records displayed in the list should match the results of the query or the opposite. To specify, select one of the operator values:
- IN - if the values in the list should be within the set of elements filtered by the subquery,
- NOT IN - if it is not the goal that the values in the list should be contained in the set of elements filtered by the subquery. For example, if you want to display a list of all requests that are not serviced, you can use the subquery to return a list of "Serviced" requests, and then set the operator value to "NOT IN".
- REGON - the filter type, which suggests the correct format of data to be filtered by setting the mask appropriate for the REGON number,
- NIP - type of filter, which suggests the correct format of data to be entered in the filter by setting the mask appropriate for the NIP number
- user list - type of filter in the form of a drop-down list with all the users available in the Application,
- dictionary filter - if a data structure field of dictionary type or text type has been selected in the data field, the System enables the list to be filtered by the dictionary values; when defining the dictionary filter it is necessary to indicate from which dictionary and which dictionary category the values are to be taken; optionally a dictionary view may be selected to narrow the set of filter values,
- logical filter - type of filter used for logical type fields, allows simple true/false search,
- PESEL - the filter type suggests the correct format of data to be entered in the filter field by setting the mask appropriate for the PESEL number,
- postal code - the filter type that suggests the correct format of data to be entered in the filter field by setting the mask appropriate for the postal code,
- text (for 'text' type) - a kind of filter that serves for full-text search, optimizing the search in case of long texts,
- period - type of filter that narrows the values displayed in the list to the elements for which the date is contained in the time period selected in the filter.
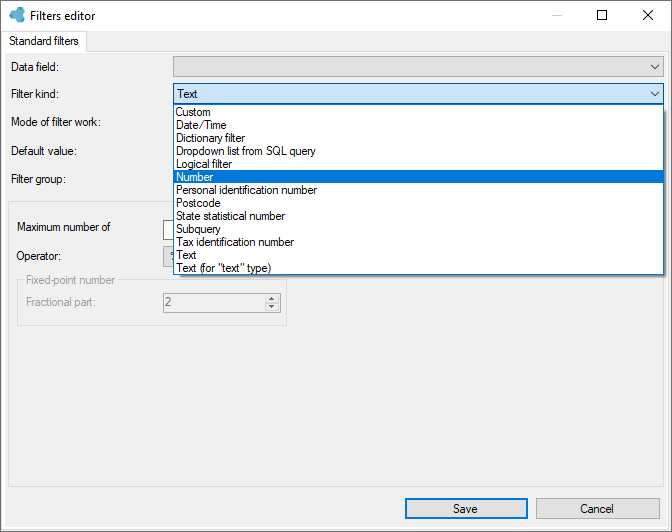
The list of filters is automatically narrowed to those types that are available for a particular structure field, previously selected in the Data field field.
Filter mode
Another parameter that needs to be defined is the Mode of filter work. Each filter can be a visible filter or an automatic filter. A filter marked as "visible" will be available in the list and the user will be able to use it to narrow the displayed items. The "automatic" filter is run every time the list is generated, it is not visible to the Application user. It operates automatically based on the default value provided when the filter was created.
The Filter mode and Default value can be specified using a constant or formula. In addition, for a filter in Automatic mode, you can specify the default value as empty or non-empty.
The Automatic filter can be used to limit the visibility of data in the system to different user groups.
Default value - the value by which the list will be filtered when it is displayed. The default value can be anything, but should be of the appropriate type. The default value can be defined:
- by a constant, specifying the value directly or pointing to one of the predefined constants, (keywords - see: Filters using keywords),)
- by a formula calculated at the moment of displaying the list,
- as empty value (only for automatic filters),
- as non-empty value (only for automatic filters).
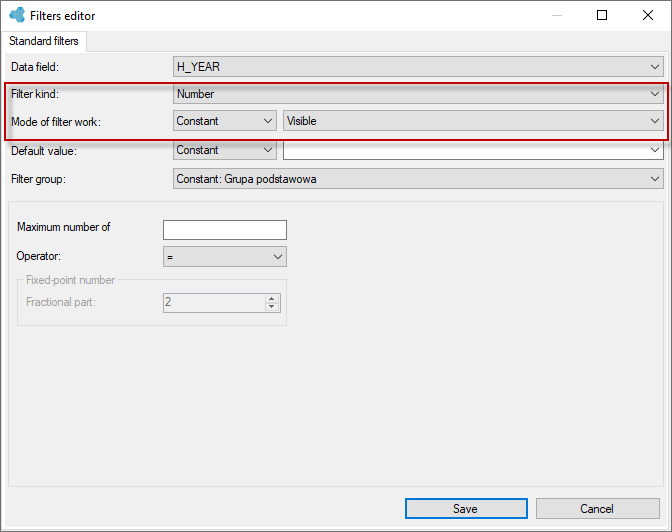
For filters, for which the filter mode was set to automatic, the default value must be specified:
- maximum number of characters - a parameter that determines how many characters the user will be allowed to enter in the filter field,
- operator - a parameter that determines the criteria that must be met by the filtered element value for the selected element to be displayed in the list.
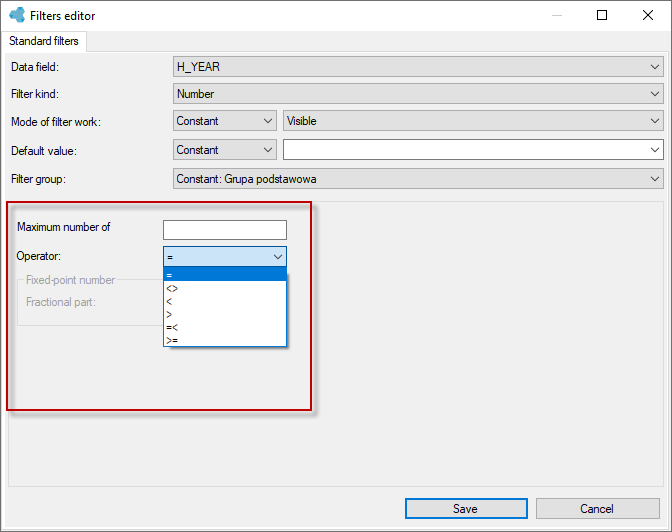
The operator allows you to compare the value from the database that applies to an item in the list with the value entered in the filter field. The values can be:
= - when the values in the filter field and in the database are identical,
<> - when the two values are different,
< - the value in the structure field is less than the value entered in the filter field,
> - the value in the structure field is greater than the value entered in the filter field,
=< - value less than or equal to the value entered in the filter field,
>= - value greater than or equal to the value entered in the filter field.
For text search we have two special operators LIKE% and %LIKE%, defining the range of search values in the database, based on the string (phrase) entered in the filter field. The operators are particularly useful in situations when we know only a fragment of some information (e.g. an excerpt of some proper name). They also enable searching for data containing a common phrase, e.g. the names of all cities in Poland, containing in their name the word "New".
LIKE%- if the filter has such a defined operator, the beginning of the string of characters searched in the database must be the same as the value entered in the filter field, the rest is not important.- If, on the other hand, we would like to find all elements that have values in which the phrase will occur (regardless of where the searched words are located) then we need to use the
%LIKE%operator.
Operators are not case-sensitive.
Filter groups
Filter groups are used to group the defined filters in a specific way. They can be defined in the Filter groups window located in the list designer. Groups can be added, deleted, and their order and properties can be changed.
Each group has:
- a unique identifier,
- a header (defined by a formula, constant or localized constant),
- number of columns with filters (from 1 to 10).
Additionally, in the group properties you can specify whether the group should be collapsed or expanded after the page is rendered and whether it should be displayed as a group.
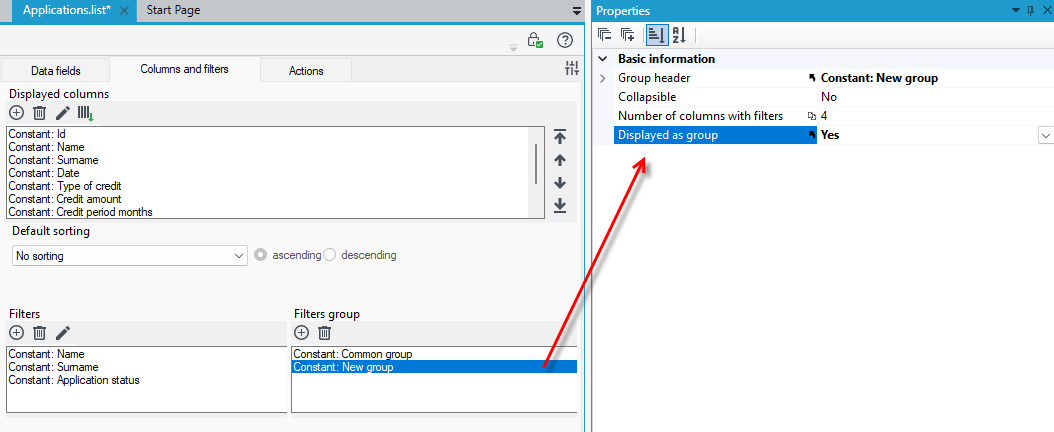
Both columns and filters are displayed in the order in which they were added. To change the order we have arrow buttons available.
Dictionary filters and filtering by columns with alias
The user has the option to add filtering by alias columns, which can be defined in the Data fields window.
- Go to the Data fields tab.
- Enter an SQL query to get the data.
- In the example below, column FullName will be downloaded to the list:
C_NAME + ' ' + C_SURNAMEasFullName
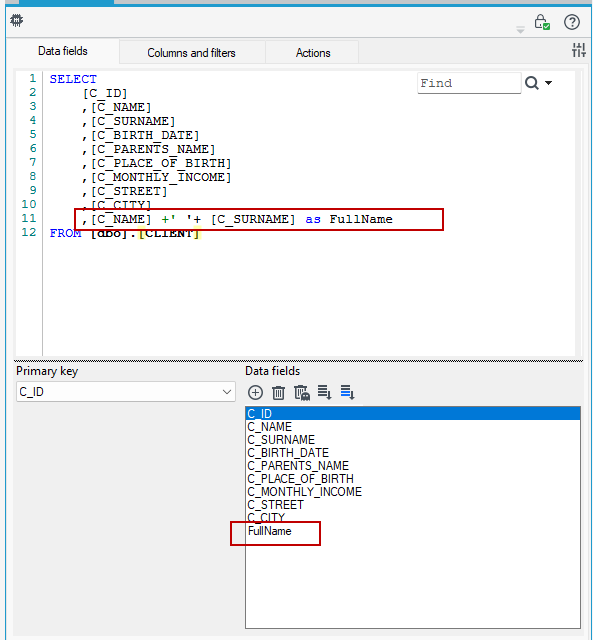
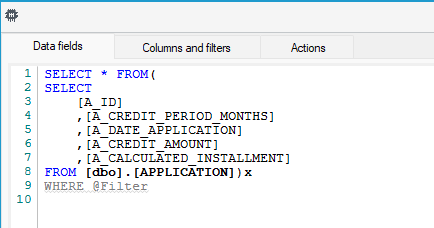
- If you want to add filtering by alias i.e. in this case by FullName column, then the whole query must be covered by one more SELECT query.
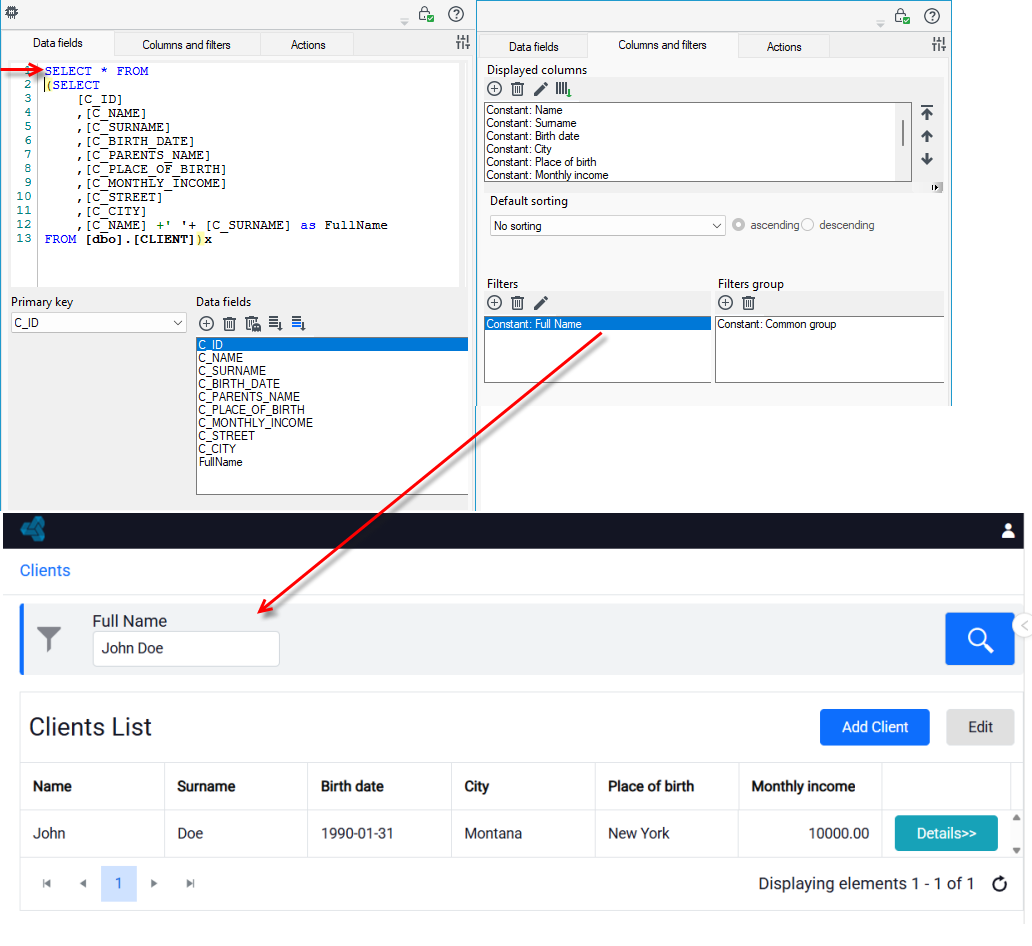
- Similarly, you need to create a SQL query if you want to use filtering using a dictionary field (in which case the entire query must be covered by yet another SELECT query).
Predefined filters in a SQL query
When creating a new list, already at the stage of the SQL query you can use keywords (predefined filters), which will filter the data you want to display in the list in an appropriate way:
@Parent- in queries means to insert the id of the parent object@Version- in queries means that you should insert the version id of the parent object@Me- Id of the logged in user@Today- the current date@Now- current time and date@Filter- in queries means that the narrowing to the query should be placed here, if there is no this tag, the place of inserting the filter will be detected automatically,@Roles- in queries means that the roles of the logged-in user should be used@Language- in queries means that the current language should be used.
For example:
In the list, we want to display the settlements assigned to a particular client. The data that will appear in the list will be filtered from the set of all settlements defined in the application and narrowed only to settlements corresponding to a specific client.
- In the Client data structure there is a list of applications (Applications).
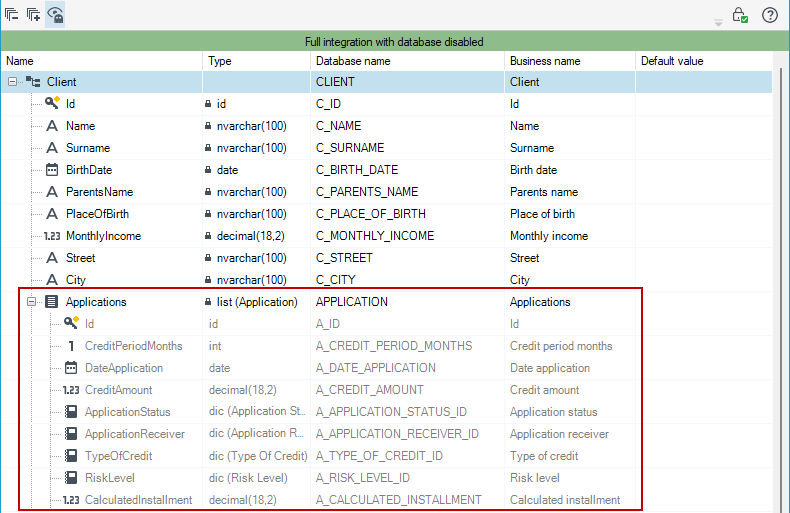
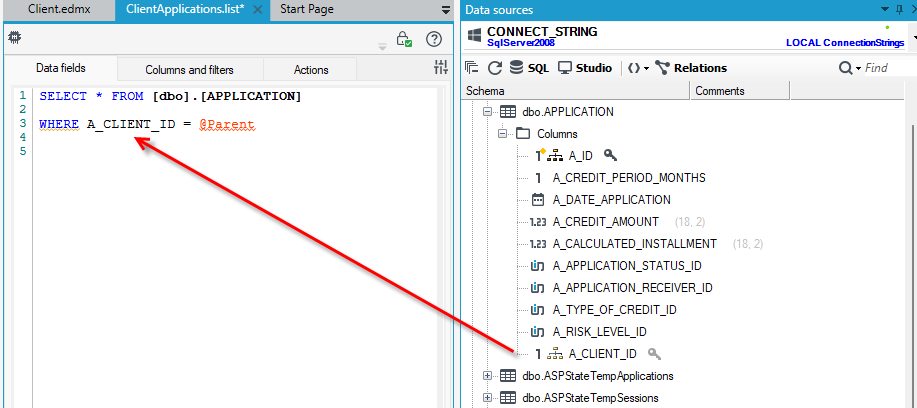
- In this example, the SQL query should look as follows:
SELECT * FROM [dbo].[APPLICATION]
WHERE A_CLIENT_ID = @Parent
- In a query defined in this way, by using the relational field
A_CLIENT_IDand the filter@Parent, we specify that only the applications of the parent element, i.e. in the context of a specific client, are to be displayed in the list.
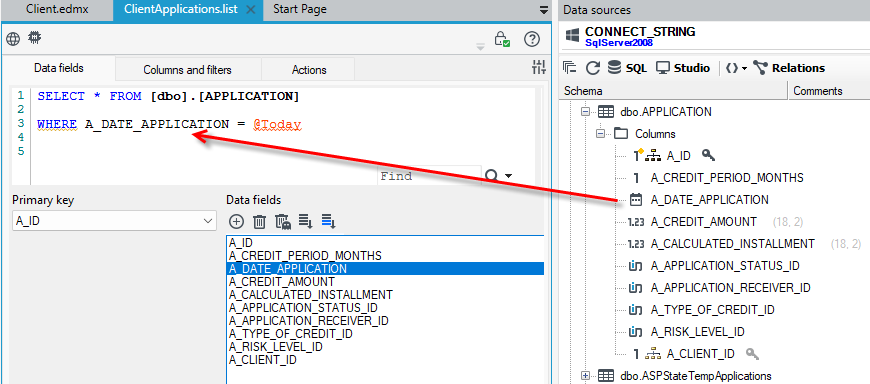
- In the following example, by using
@Todayall applications whose creation dateA_DATE_APPLICATIONis the date of the current day will be displayed.
Filters using keywords
When creating a list, you can use keywords in a SQL query to narrow the results in the list to the given parameters see: Predefined filters in SQL query, but also use them to define automatic and visible filters.
- In the following example, the columns we want to retrieve to display the applications list are defined in the SQL query.
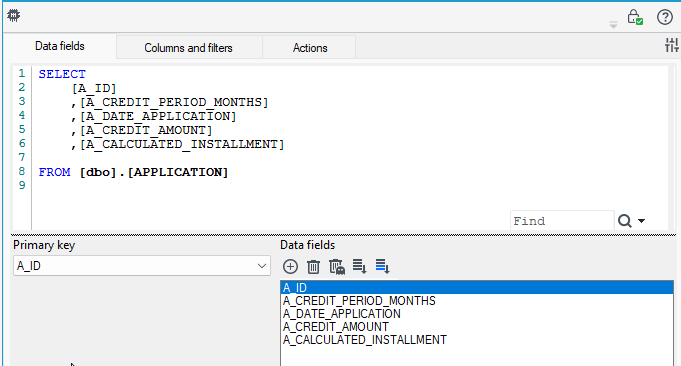
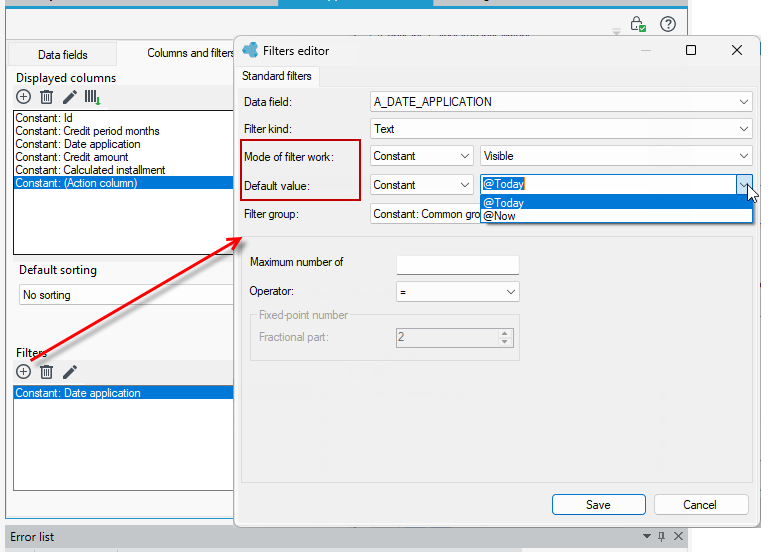
- On the Columns and filters selection tab, add a filter. In the details of defining the filter, select the data field as the application creation date
A_DATE_APPLICATIONselect the mode of operation of the filter as Visible or Automatic (if it is not to be visible on the Web) and in the Default value field select@Todaywhich means that the data will be filtered and display those applications that were created with today's date.
- You can additionally use
@Filterin the SQL query, which means that the narrowing to the query must be placed here (in this case, use the predefined automatic/visible filter), if there is no this tag, the place of inserting the filter will be detected automatically. - The entire query must be covered by one more
SELECTquery and the filter condition after the definedWHERE @Filter