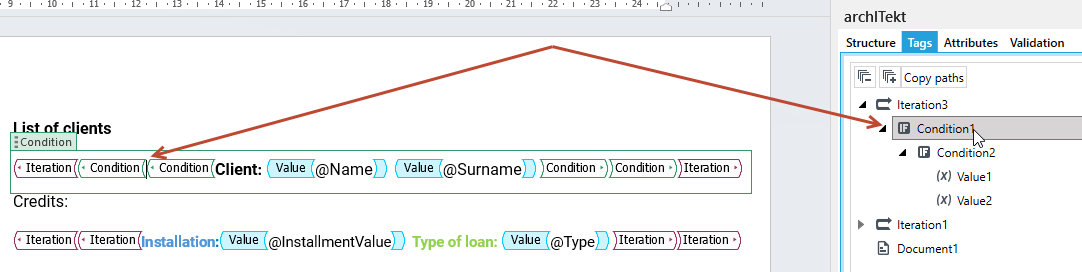
The Tags
The tags are used to mark where the data transferred to the document should be placed in the fields indicated for a given tag in the document template. You can pass text and numeric values, dates, images, content of other documents, data needed to generate a chart to a document template.

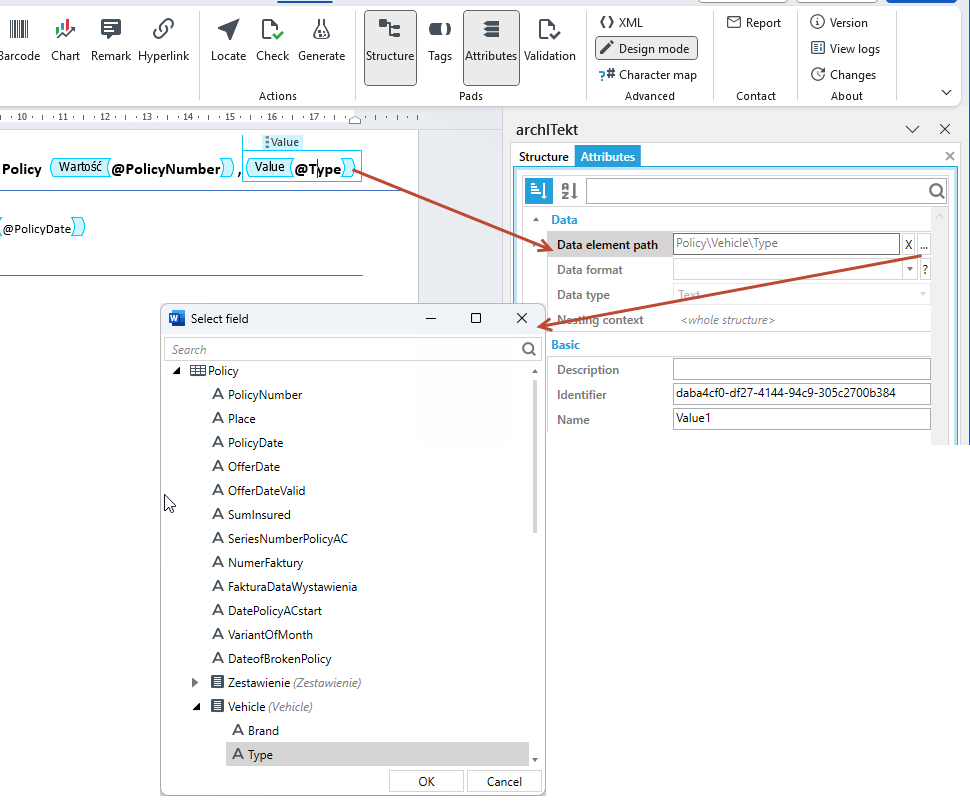
- Insert a tag by clicking in the appropriate place in the document, then place the cursor inside the tag and select the Attributes panel.
- In the attribute window for a given tag, indicate the data element on which the tag is based.
- Then configure the rest of the tag parameters.
The full and short version of tags
Tags can be full and abbreviated. When you insert a tag in a document and it has the same graphical elements at the beginning and end, it is the full version of the tag

The abbreviated version of a tag is when there is a short graphic element that ends the tag.

The abbreviated version of a tag is created when it is contained in a paragraph.
MS Word often, automatically inserts a tag in the paragraph (for example, using white space right after the tag, which do not have their graphic representation in MS Word).
The Note tag and the Sub-template cannot be included in a paragraph.

When creating any tag at the beginning of a new page, check if the newly created tag is not incorrect. If such a situation occurred, most likely MS Word wrapped the tag with a paragraph, which would cause a validation error.
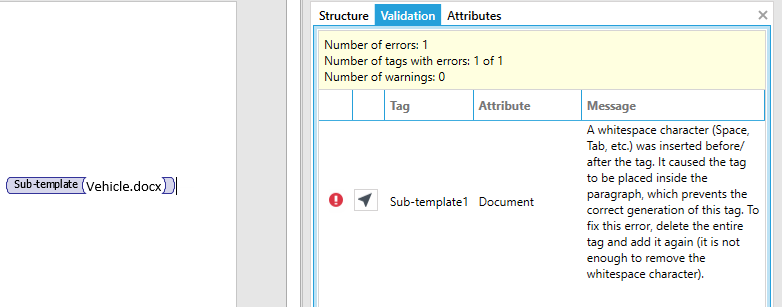
To fix a tag, delete it or undo it and click Enter. Then enter the tag again. Also check that there are no spaces after the tag. All you have to do is press the Space key after the tag and then Enter and the tag will not work properly.

The tag version is also important for the Iteration tag, because the tag can be configured so that the content inside the tag is generated as a single line or as separate paragraphs. For more on Iteration tag configuration see: Single-line or paragraph iterations.
The Value

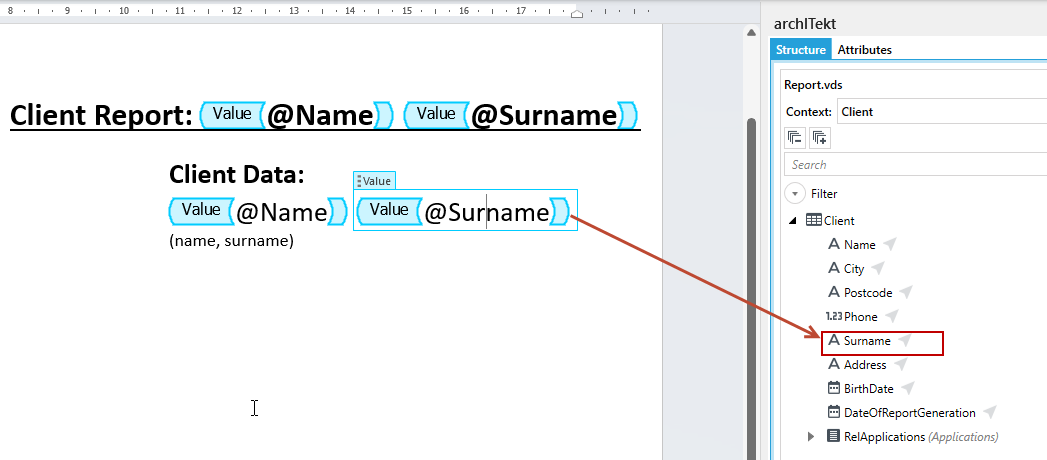
The Value tag allows you to pass text, numeric and date / time values to the document.
This tag will be inserted into the document after double-clicking a Text, Number or Date field from the data structure.
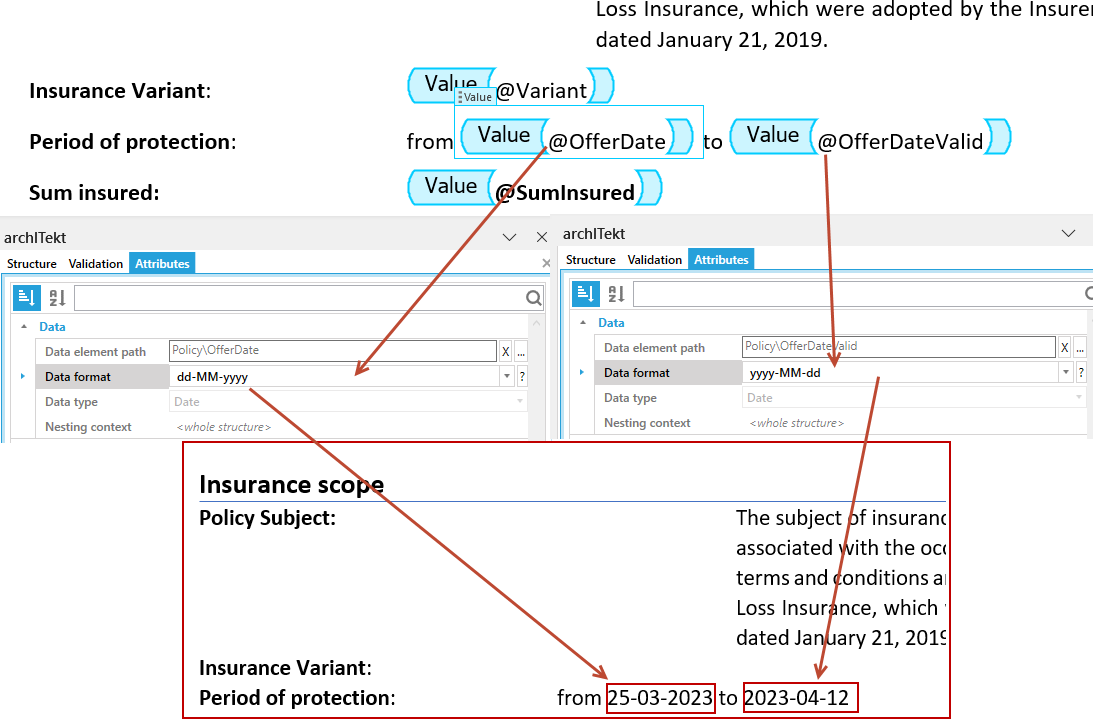
For Number and Date fields, in the Attributes window for the Value tag, in the Data format field, indicate the format in which the number or date should be displayed in the document.
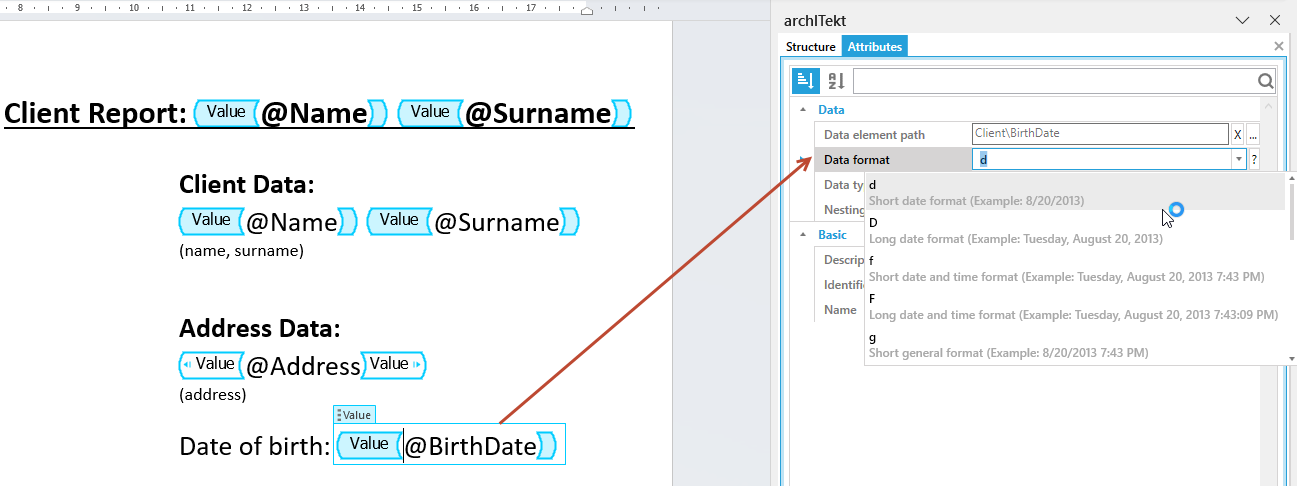
Number and date formatting
In the attributes of the Value tag next to number fields, you can choose the appropriate data format. For example, a fixed-point format for amount values or a percentage format for percentage values.
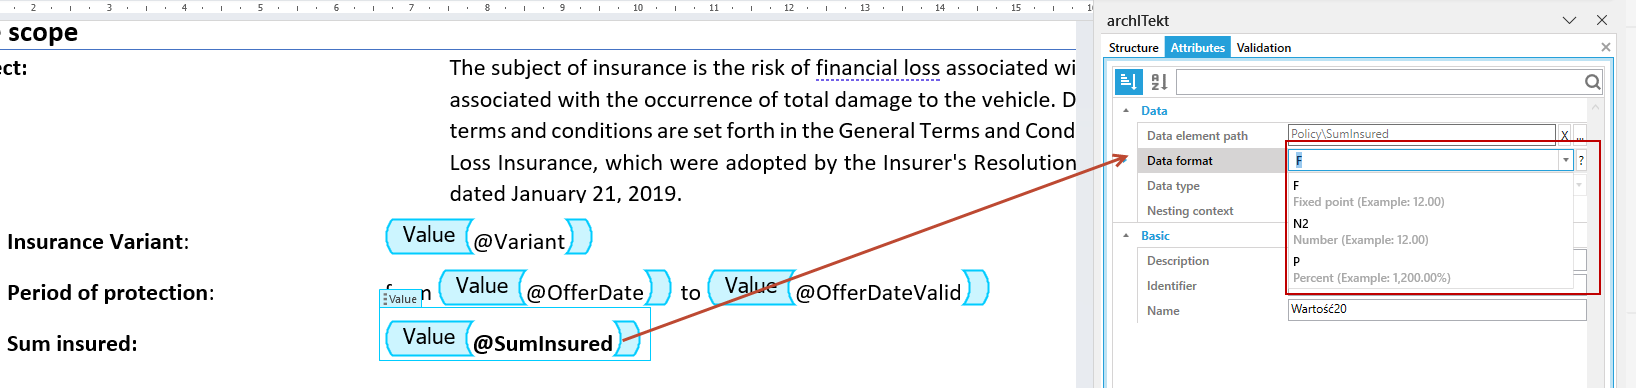
- If you want to enter your own settings and a different format, you can do it directly by entering the data in the Data format field. All values can be formatted using standard .NET formatting strings.
- Check the
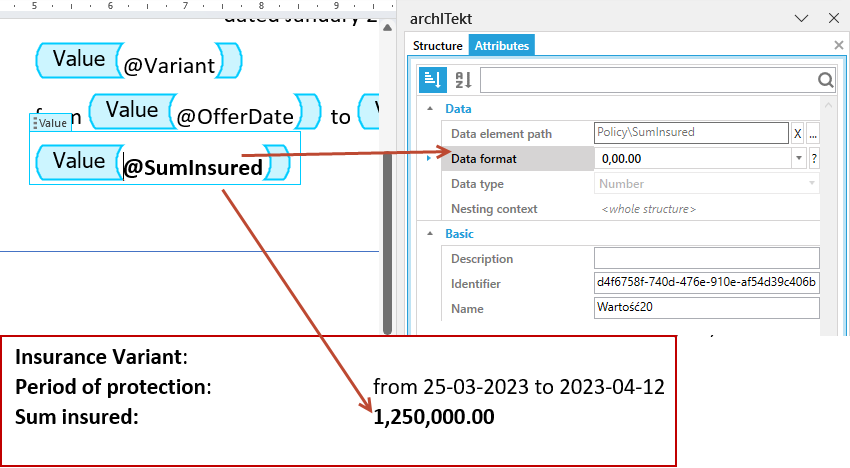
?button , which will redirect to the page: https://learn.microsoft.com/en-us/dotnet/standard/base-types/formatting-types?redirectedfrom=MSDN where formatting for different types of data including numbers is given. - For example, if you want to apply a formatting for numbers that looks like this 1,250,000.00 in the Data format field, enter the appropriate formatting written in this form: 0,00.00.
In the Date data element when choosing to represent the day and month in writing (example: Wednesday, November 28, 2018) information about the language in which this name will be represented is taken from the system settings of the Windows user account. You must set the appropriate culture on your system. The same issue applies to the format of numbers and dates represented by this tag (for example, the language separator may be a period or a comma, depending on the settings, the long date format may be displayed with or without the name of the weekday).
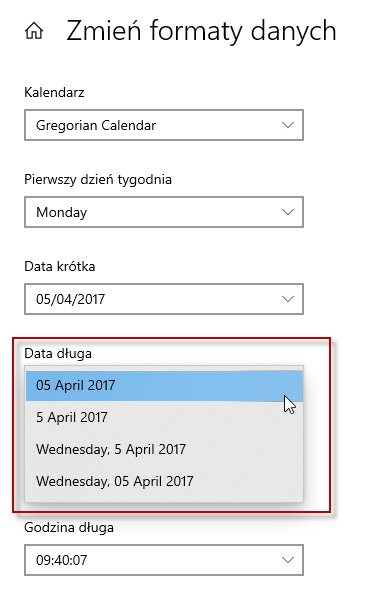
For dates, too, you can enter your own data format.
The List

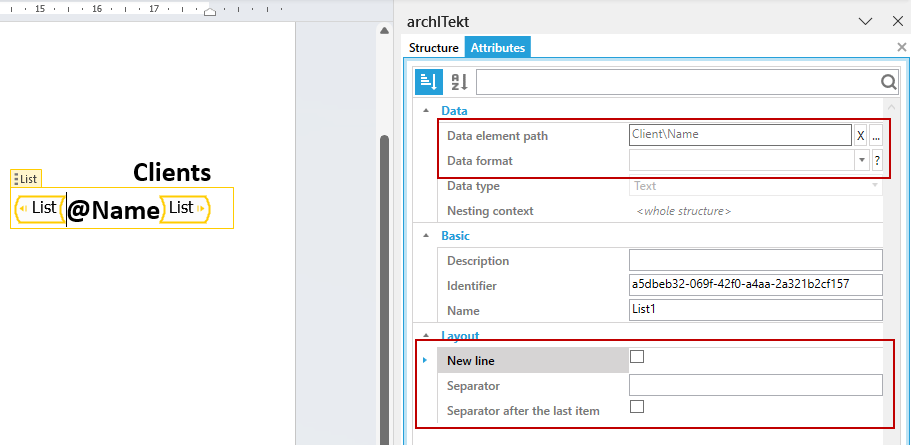
The List tag, like the Value tag, allows you to insert text, numeric, and date values into your document. Unlike the Value tag (by which only one value of a selected field can be passed to a document), the List tag is used to pass several values to a document for a field that is indicated in the tag as a data element.
- In the attribute window of the List tag, in the Data element field select a field from the data structure (Text, Number or Date), the values of which will be repeated in the document within the List tag.
- For numbers and dates additionally set the data format.
For numbers:
Currency (e.g. PLN 12.00), Exponential (e.g. 1200000E + 001), Fixed Point (e.g. 12.00), General (e.g. 12), Number (e.g. 12.00), Percentage (e.g. 12%).
For dates:
Short date format, Long date format, Short date and time format, Long date and time format, Short general format, Long general format, Month and day, Date and time, RFC1123 format, Date and time, Short time format, Long time format, Universal date and time, Universal full date and time, Year and month.
The Layout
- In the Layout section specify how the List tag values should be displayed in the document.
- Selecting the New line check box will display the values one below the other, unchecking them will display them side by side.
- In the Separator field indicate the sign (eg comma, semicolon) to be separated the values passed to the List tag. By checking the Separator field after the last one, the separator indicated in the Separator field above will also be inserted after the last value in the List tag.
For configurations using only the separator:
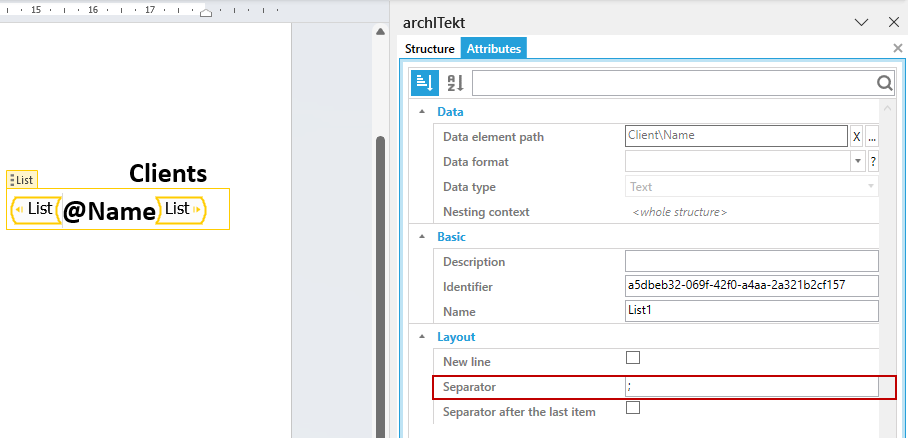
in the generated document, the values will be presented as follows:

On the other hand, for the configuration with the use of separators and the option to generate each of the list elements on a new line:
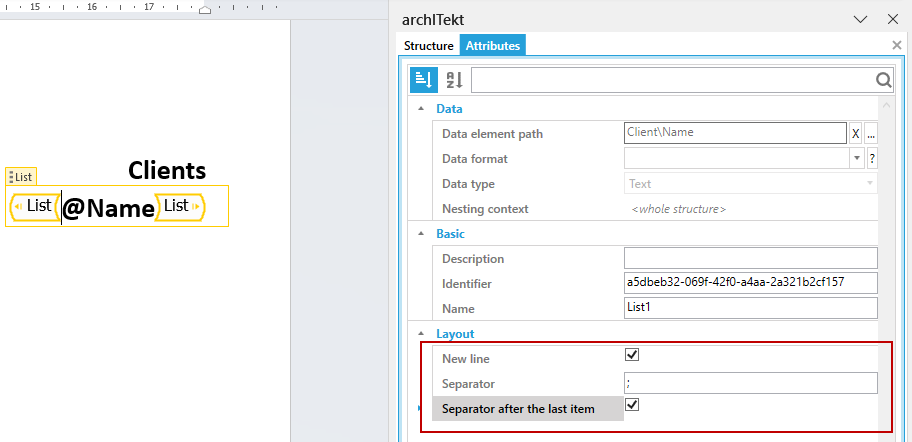
in the generated document, the values will be presented as follows:

The Iteration

The Iteration tag is a tag that repeats its content in turn for each record in the table / relation that has been indicated as the data element on which the tag is based.
You can enter both text and other tags inside the Iteration tag. All tags that are placed inside the Iteration tag must have the data elements indicated in their attributes that are the fields of the table / relation that is indicated as the data element for the Iteration tag.
In the following example, the Iteration tag has been based on the Vehicle table. All tags inside the Iteration tag are based on fields from the Vehicle table.
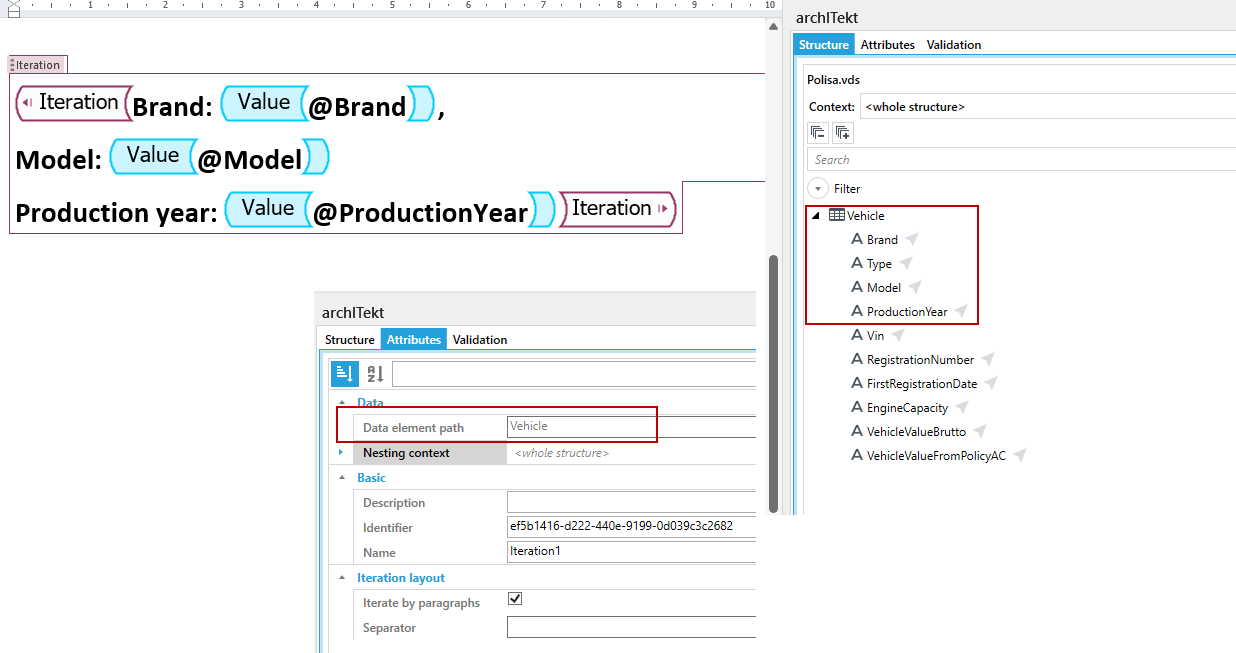
In the generated document, the text fragment inside the Iteration tag will be repeated for each Brand, Model, Production Year data set passed to the document in the Vehicle table.

The Nested Iterations
Iterations can be nested, i.e. you can insert one iteration into another. Scalar fields from the "parent" context can be used within a nested Iteration tag.
For example:
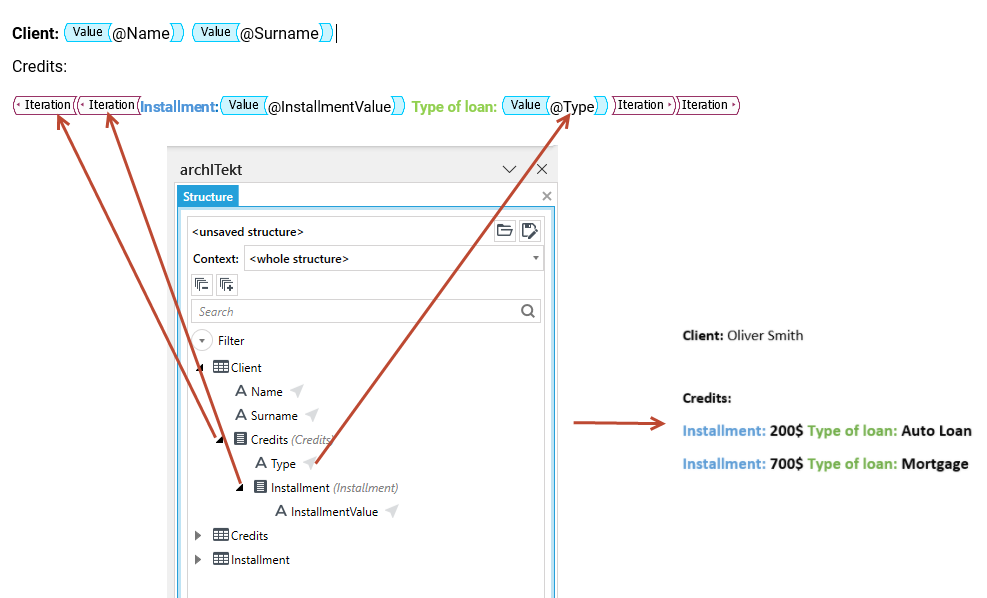
View client charges, i.e. all installments from all credit products he/she has. The document data structure includes client data and relation to client products and installments.
The order of insertion of tags is as follows:
- Iterate Credits as we want to display all the client's credits.
- Installment iteration, because we want to display the amount of each installment if these installments exist.
- Value @InstallmentValue tag for the installment amount.
- The Value @Type tag from the Credits table for the loan. Although we are in the context of the Installment table, we can reach "higher" and insert a credit tag.
The Single-line or paragraph iterations
The Iteration tag can be configured so that the content inside the tag is generated as a single line or as separate paragraphs.
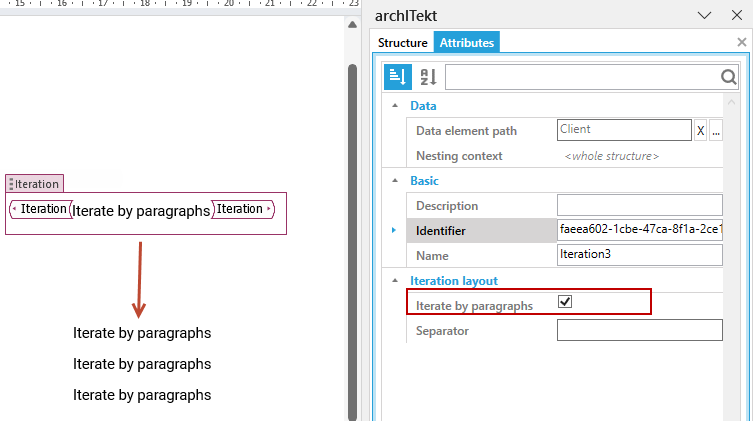
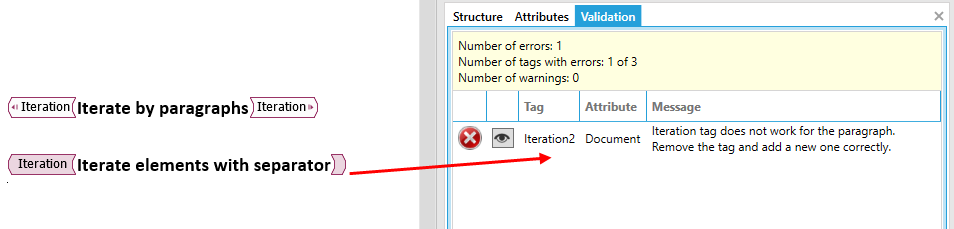
If you want to use a tag in paragraphs, put the full Iteration tag and check the Iterate by paragraphs option. All content inside the tag will be generated in separate paragraphs.
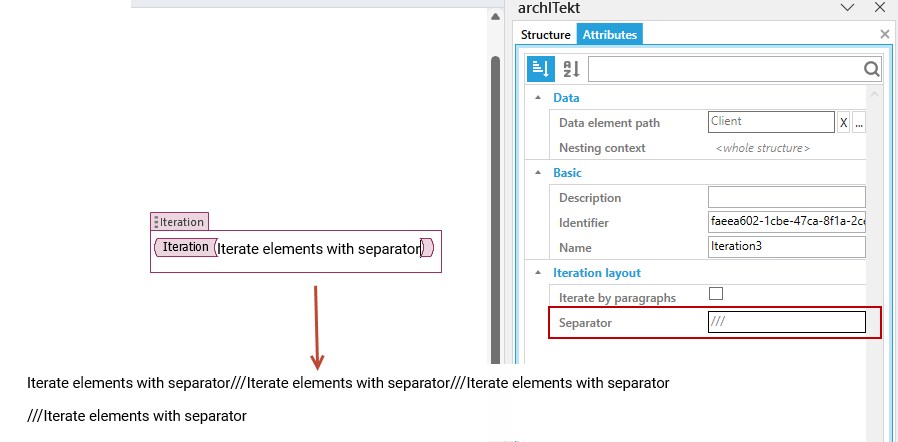
If the content inside the Iteration tag is to be generated on one line, then insert the shortened Iteration tag and specify an optional separator. For a shortened iteration tag, add text or a space after or before the tag. Line breaks cannot be used inside a shortened iteration tag.
The colour of the tag and its full or shortened version indicate that the tag is inserted in a single-line or generation version in paragraphs. If the tag is incorrectly inserted, for example in a shortened version, and the Iterate by paragraphs option is selected, then a message will be displayed in the Validation panel that the tag must be correctly inserted.
For more information on specific cases of adding numbering and bullets to the Iteration tag see Best Practices chapter.
The Condition - Data element

The Condition tag allows you to indicate in the created template a document fragment (e.g. text, other tags, tables, etc.) that is to be displayed in the generated document (or not displayed) if the condition is met (or not met).
- Insert the Condition tag into the document.
- In the Attributes window, select the Logical value field.
- The condition is configured by default in such a way that the text contained in the document template inside the given Condition tag will be displayed when the value of True is passed to the document for the logical field, which is the data element indicated for this tag, or if the defined conditions are met in a formula in the expression editor.
In the Condition tag you can select the type of condition: Data element or Formula.
Data element
The data element of the Condition tag is a Logical value field that takes the values True or False. An empty value can also be transferred to this field, in this case it is treated by the Condition tag in the same way as a False value. A table or a relation from a data structure may also be indicated as a data element - in this case the condition is considered to be met when the table or relation will contain at least one element.
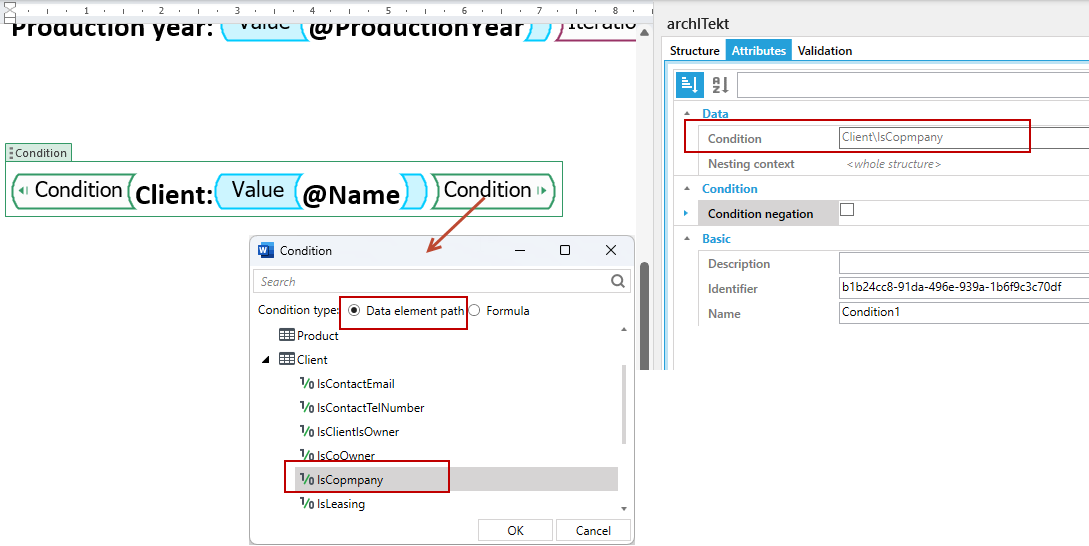
In the example above the content of the document inside the Condition tag will be displayed in the generated document only if the value True is passed to the document for the IsCompany logical field being the data element for this Condition. If False value is transferred to the IsCompany field, the contents of the Condition tag will not be displayed.
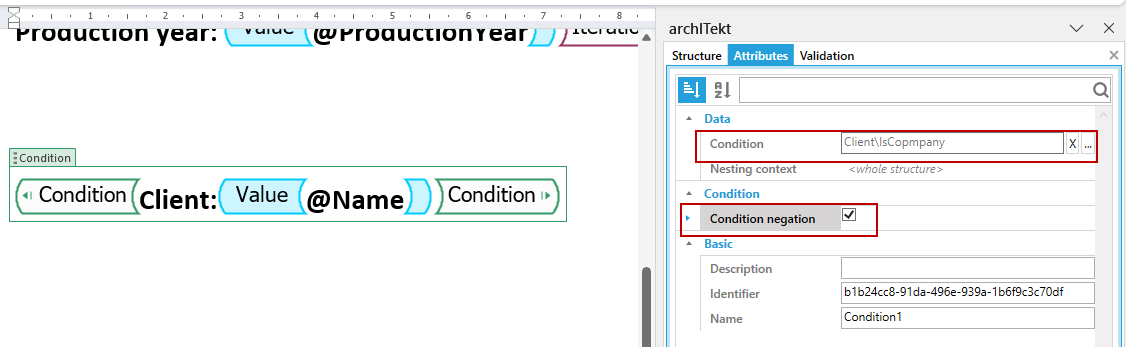
You can also configure the tag to work the other way round - displaying its content only when the logical field it is based on is passed False to the document. For a tag to work this way, select the Condition Negation check box in the Attributes window for that tag.
If you select the Condition negation option for the same condition, then the content of the document inside the Condition tag will be displayed in the generated document only if for the logical field IsCompany being the data element for this Condition, the value False is passed to the document during generation. If the value True for the IsCompany field is passed, the contents of the Condition tag will not be displayed.
If a table or a relation is indicated as a data element for the Condition tag the content of the tag will be displayed if records of the indicated table / relation are passed in the data transferred to the document. If no such records are passed, the tag content will not be displayed.
The Condition - Formula
- Insert the Condition tag into the document.
- In the Attributes window, go to the formula definition editor.
- Select the condition type Formula and enter the condition below in the editor.
- Double-click on a given field, then it will be inserted into the editor.
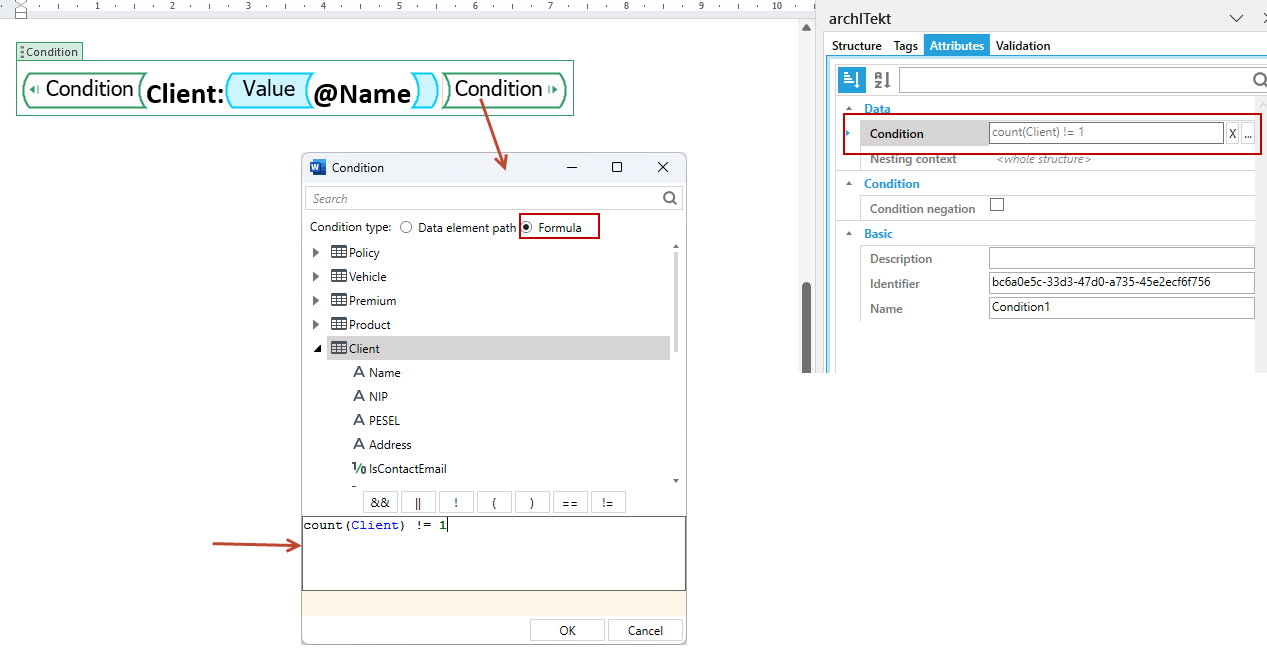
If you select Formula as the condition type, the expression editor will be displayed where you can define a logical expression. Thanks to the use of this type of condition, you can create complex logical expressions by combining various elements that constitute a single condition. For more information about expressions and how to define them, see: Expressions.
For syntax prompts, click Ctrl + Space.
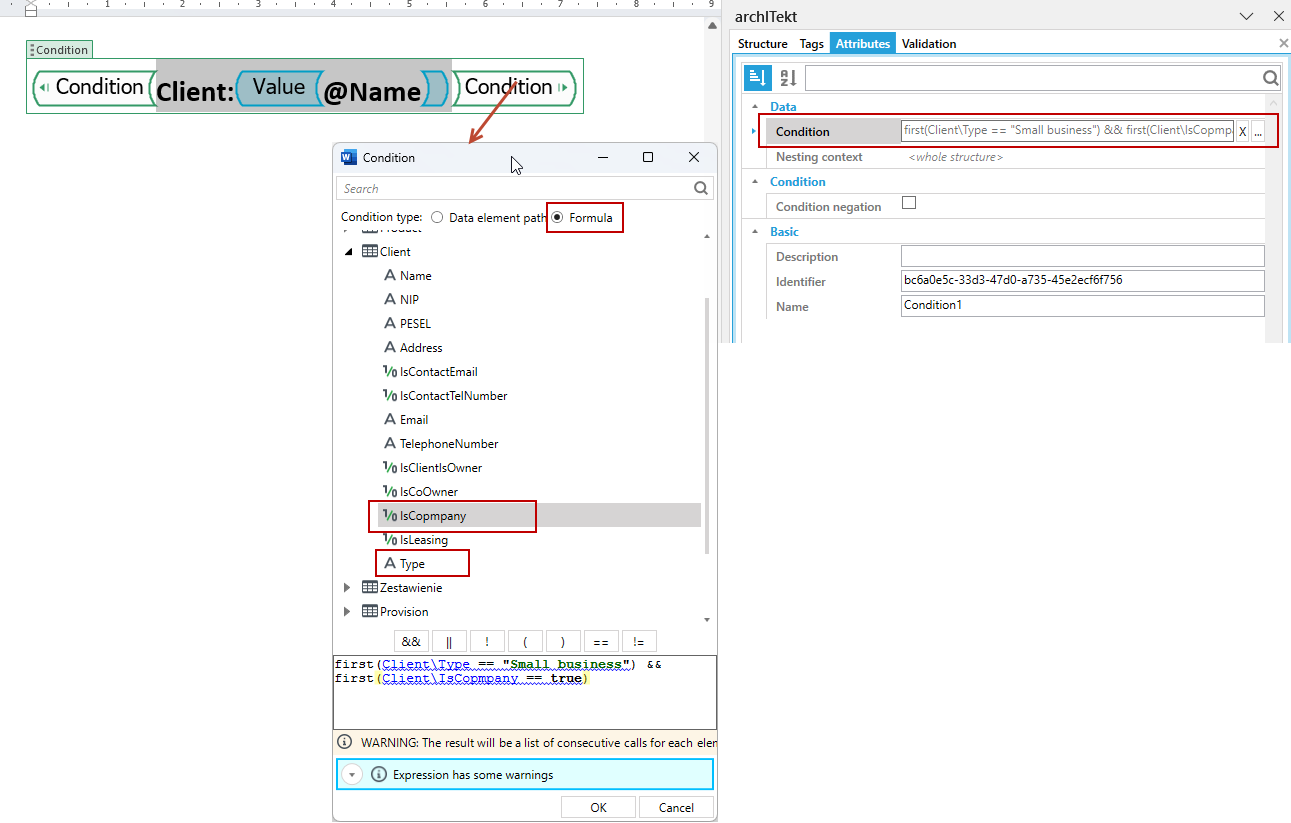
In the above example, the content inside the Condition tag will be displayed if the client runs a company (IsCompany == true) and if the type of business is small business (Type == "Small business"). For example, if the business is a sole proprietorship and such data will be transferred to the document, then the second part of the condition will not be met, and thus the entire condition will also be met, because the operator between the components is && otherwise "and", i.e. both components of the condition must be met.
We also assume here that the type of business activity is in the dictionary system, which is why we compare the value of the type field to a specific dictionary value. Therefore, it is important not to make mistakes in the type entry, such as typos or upper/lower case letters, but to use exactly the same name of the element as is used in the dictionaries of the application being created.
Operators:
&& - and - if you use this operator between the components of the condition, all components of the formula must be met,
| - or - if you use this operator between components of the condition, then it is enough that only one of the formula elements will be satisfied,
! - condition negation / negation - use this sign before the defined condition, then the content of the condition will be displayed when the formula is not fulfilled,
== - equal - the entered data, the components must take exactly the same value as indicated after the operator == i.e. in the above case, the type of activity is exactly true,
! = - miscellaneous - entered data, components can take any value except the one indicated in the formula, then the condition is met.
() - the parenthesis is used to group the components of the formula.
When defining a condition outside of the Iteration tag, you must specify which record of the data structure table the fields used in the expression come from. You can do this by using table select functions such as first(), last(), Any(), All()
The following example displays data for the first client in the Client table that is in business, and its type is Small business.
Within the bounds of the Iteration tag, we use only field names without the table selection function, because the content of the Iteration tag is already limited to a single record from the table: Client\Type == "Small business".
Defining a condition in iteration
When constructing a condition using a formula and iterating elements remember to define the data correctly. If the condition is out of iteration, checking if the specified formula is satisfied is done at the table level. If we want to check individual elements whether they meet the condition specified by the formula, then the condition should be placed inside the iteration.
For example:
View details of those clients associated with the policy for which he is the insurer.
The correct order of defining iteration and condition is: Iterating over the Client table, then inside iteration a condition to check if the role of the client is Insurer (Role == "Insurer"), and then the tag of the value to be displayed if the condition is met.
Due to the fact that the condition is placed inside the iteration, each record of the Client table will be checked against the specified condition and only those clients that have the Insurer role will be displayed.
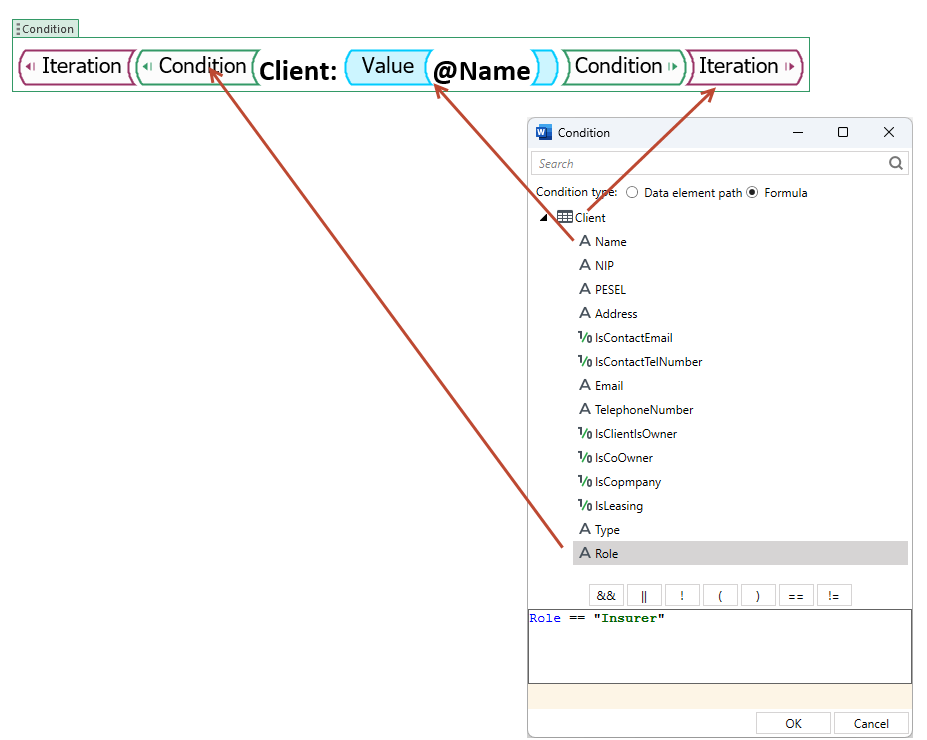
Otherwise, if the condition was placed outside of the iteration, only one selected record from the entire Client table, indicated in the Condition tag formula (for example, first - first (...), last - last (...), etc.) would be checked. If this condition is met, the iteration content will be generated for all records, otherwise the iteration will not be generated at all. For example, with the condition first (Client\Role) == "Insurer", if the policy had 3 clients and the first would be the insurer, all three would be displayed anyway.

The Image

The Image tag is used to insert images of specific formats into the document: bmp, gif, png, jpg. The data element on which the Image tag is based is the binary field.
The example below shows the configuration of the Image tag. In the data structure, the Signature binary field was created, which was then indicated as a data element in the Image tag attributes.
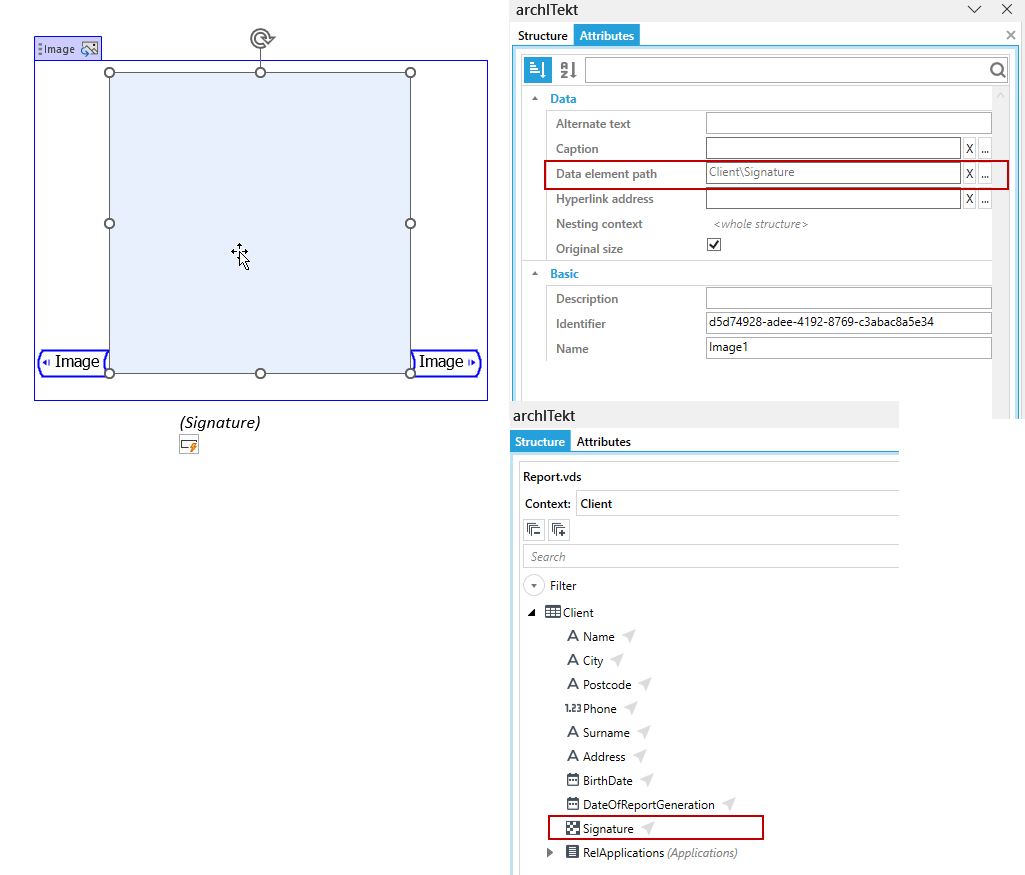
- You can adjust the image size in your document to suit your needs. To do this, resize the image area (marked with a purple square) inside the Image tag. You can also choose Original size, then the picture in its original size will be inserted into the document.
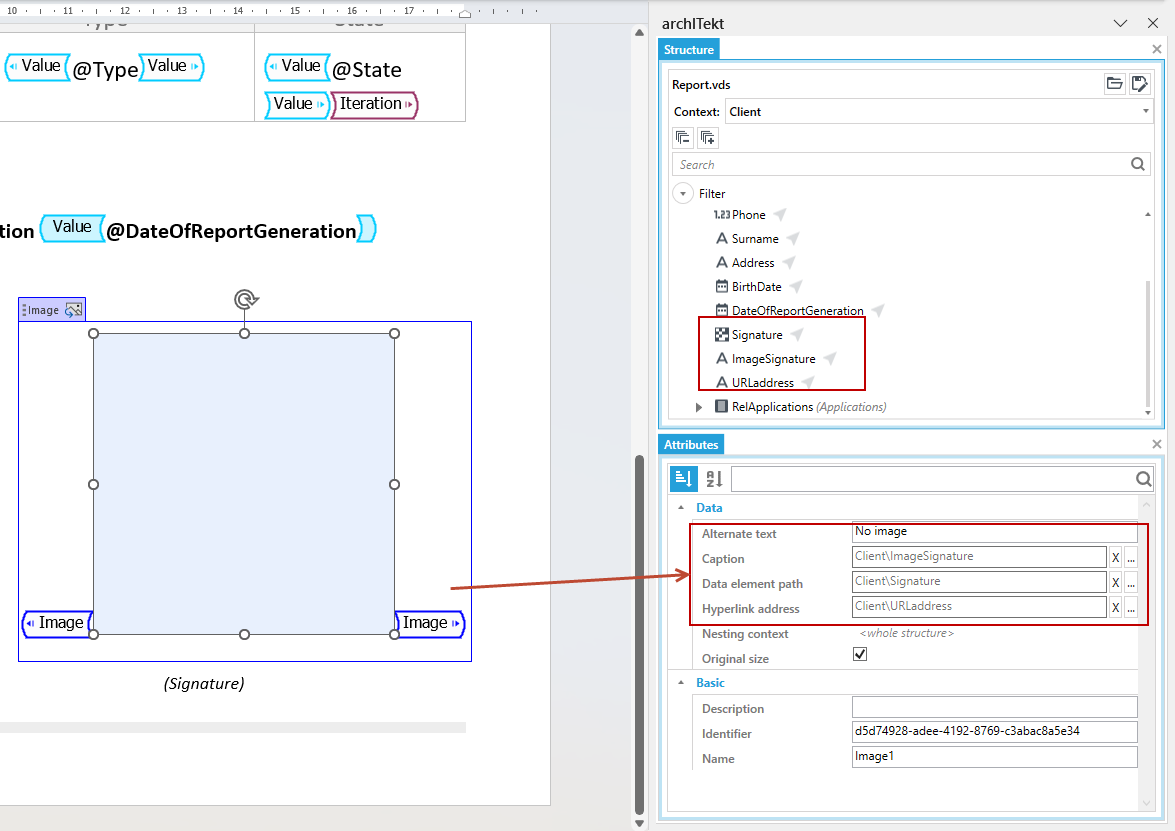
- In the Image tag attributes, you can also indicate a text field in the Caption field, which will provide the document with a text caption for the inserted image.
- In case nothing is passed to the Image tag and the binary field, then you can fill the Alternative text field, that is, what should be displayed where the image is supposed to be shown.
- In addition, you can enter the data source for the Hyperlink address field in case the image should be an interactive element and move to the passed url.
The Document

The Document tag allows you to insert the content / content of another document in docx format into the document template.
You can only insert a document that does not contain any tags. If you want to insert a document with tags, use the Sub-template tag.
The data element this tag is based on is a binary field.
The following example configures the Document tag. First, the ContractTerms binary field was created in the data structure.

Next, this field was indicated as the data element for the Document tag inserted in the document template.
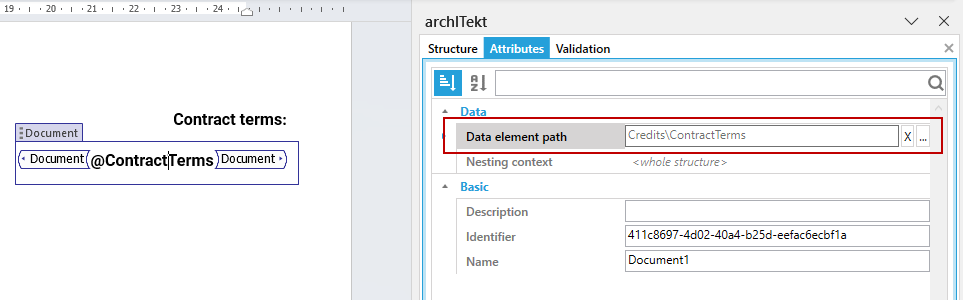
In the generated document, in the place of the Document tag, the whole content of the docx document transferred to the document template in the field ContractTerms will be inserted.
The Document tag must be inserted in its full form, i.e. before and after the tag there must be no white space type characters, etc.
The Sub-template

The Sub-template tag allows you to insert in its place the content of another predefined document template containing other tags.
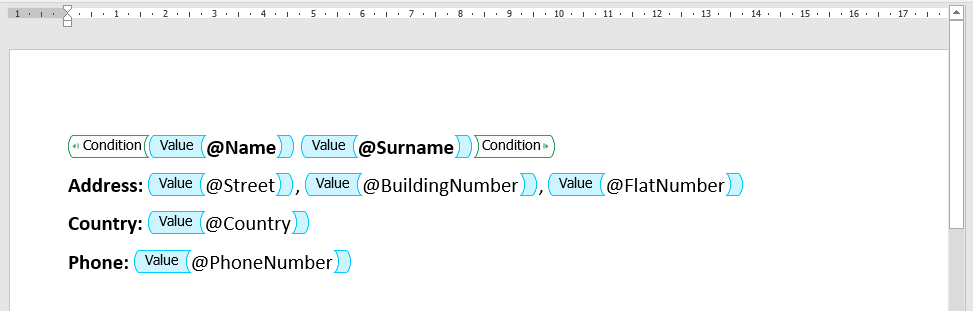
This tag is used primarily when a given fragment of a document template is used many times in various documents. In this case, save the fragment in a separate docx document and, if necessary, create a data structure for it, insert tags into it and configure them accordingly. Then, in other documents, insert the Sub-template and in the tag attributes, indicate the previously configured docx document.
For a tagged sub-template to function properly, both the document that is the sub-template and the document that you insert the sub-template into must be based on the same data structure.
In the example below, the Sub-template has been inserted in the creditor's data. In the tag attributes, the sub-template file has been indicated, the content of which is to be inserted in place of the Sub-template tag at the time of generating the application. Both the sub-template file and the application are based on the same data structure. When generating a proposal, in the place of the Sub-template tag, the content of the sub-template file will be generated, in which the data sent to the document will be inserted in place of the configured tags.
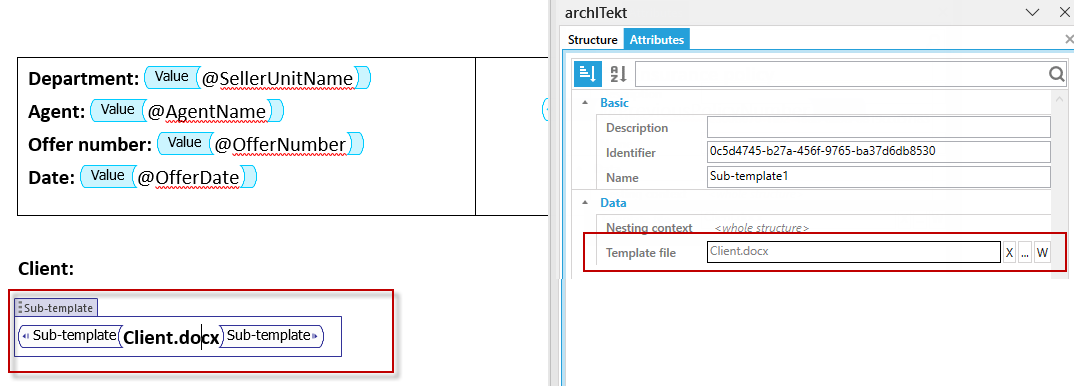
The Subtemplate tag must be placed on a separate paragraph or new line. There must be no spaces or text following the tag.
If you use sub-templates, keep in mind that the sub-template inherits styles from the main template. Similarly, the header and footer are also inherited from the main template. For more information on sub-template limitations, see: Using sub-templates.
The Symbol

The Symbol tag is based on a Logical value field. The tag allows you to configure in its attributes the content or symbol to be displayed in its place depending on the value (True, False or Empty) that will be passed for the logical field on which it is based.
In the example below, logical fields have been created in the structure in the AGREEMENTS table.

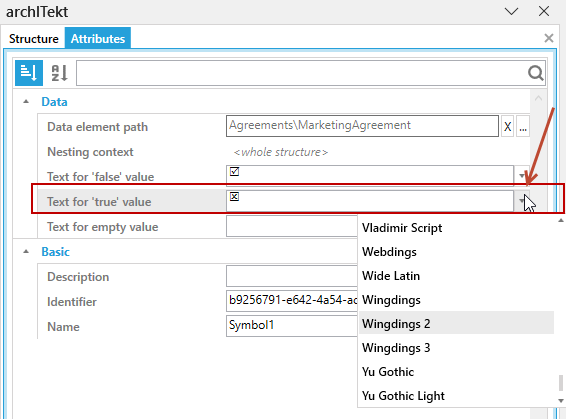
Then, Symbol tags based on the previously created fields were inserted into the body of the document. For each tag, a logical field has been indicated as a data element, the value of which will determine what is to be displayed at the tag position. In the tag attributes, type text (or symbol) for True, False, or Empty value.
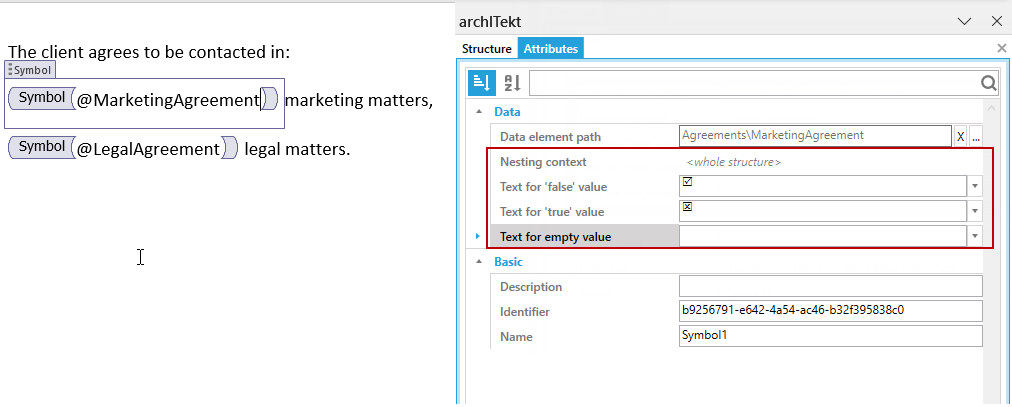
In the Symbol tag attributes, in the Text for False, Text for True, and Text for Empty fields, you can type plain text that you want to display, and then specify a font for each field that you want to use for that text.
To simplify insertion of symbols, you can use the Character map option on the Advanced ribbon. The Character map opens a window where you can browse the fonts available in Word, select a character to copy, copy it, and then paste it into the Text for False, Text for True or Text for Empty field. You should always remember to indicate in these fields the font that displays the copied character.
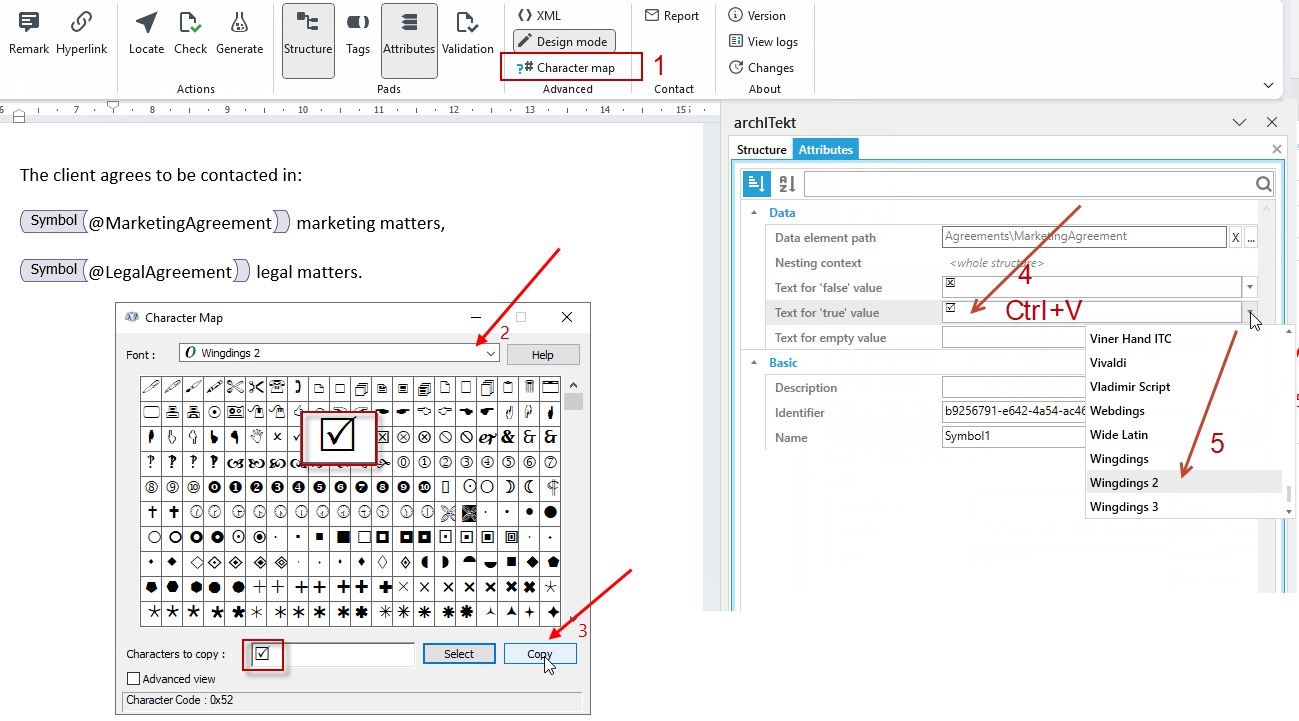
In the generated document, in the place of the Symbol tag, the text indicated in the fields for false, true and empty value is displayed, depending on whether the value of True, False or Empty value was passed for a given logical field.

The Breaker and the Table

The Breaker tag is used in working with the table. Define how many columns a table can have.
Details on the tag are described in the Working with the table chapter.

The Table tag is used when working with a table. Define which columns and which rows are repeated within the table.
Details on the tag are described in the Working with the table chapter.
The Barcode

The Barcode tag allows you to insert certain types of barcodes into your document. As a data element, the tag takes a text field with which the document must pass text in a format suitable for the selected barcode.
In the example below, a text field has been created in the structure, through which the content to generate the barcode in the CODE_39 format will be transferred to the document. This field has been indicated as a data element in the attributes of the Barcode tag.
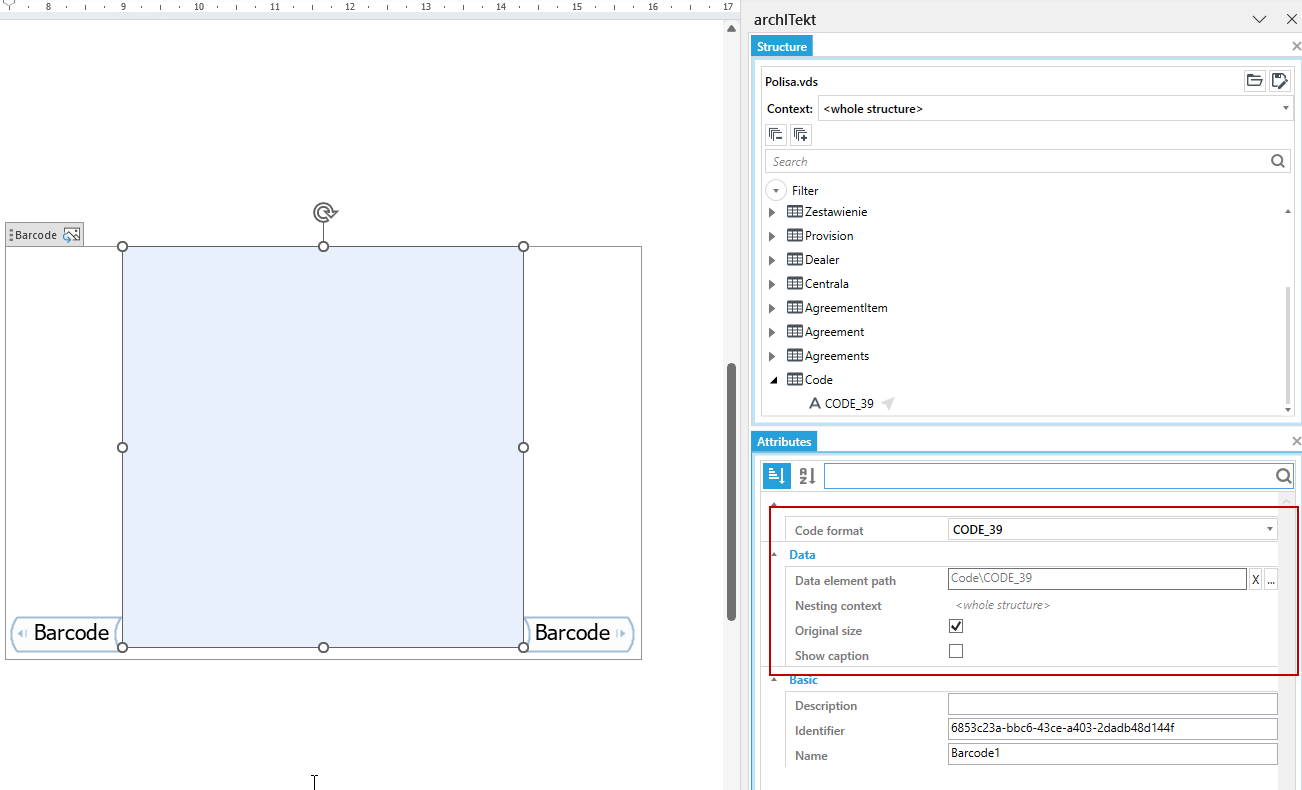
In the generated document, a barcode will be generated at the tag location in the format specified in tag attributes.
For the barcode to be generated correctly, a text value in the format required for the code must be provided in the text field to the document.
Below is an example of the code 39 generated in the document for the value ABC123.

The Chart

The Chart tag enables the insertion of a chart, which in the generated document will be supplemented with data sent to the document.
The Documents generation supports the following types of charts:
- Bar/column,
- Bar/column 3D
- Line,
- Line3D,
- Pie,
- Pie 3D,
- Area,
- Area 3D,
- Scatter,
- Stock,
- Bubble,
- Radar.
The Chart tag requires specified data element attributes of the Chart data.
In the example below, a Chart data has been added to the data structure. Then, the Chart tag was inserted in the document, and the ChartData field was selected as the data element for that tag.
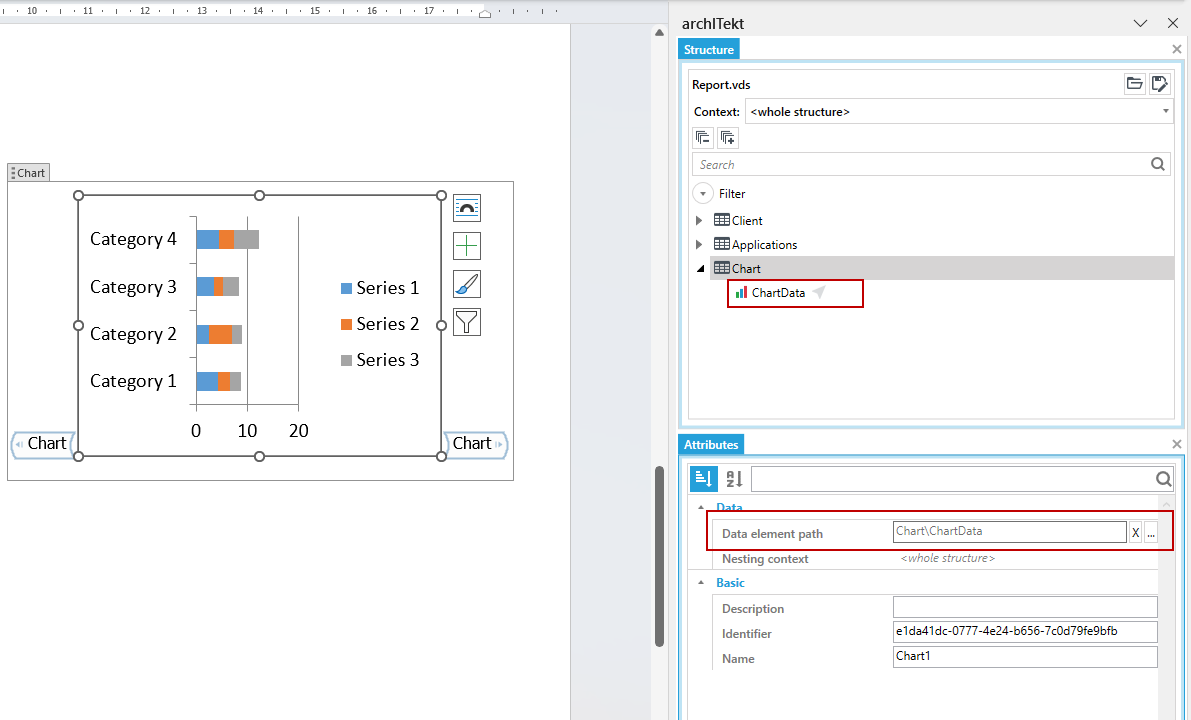
The chart inserted in the Chart tag can be formatted using all Word editing capabilities.
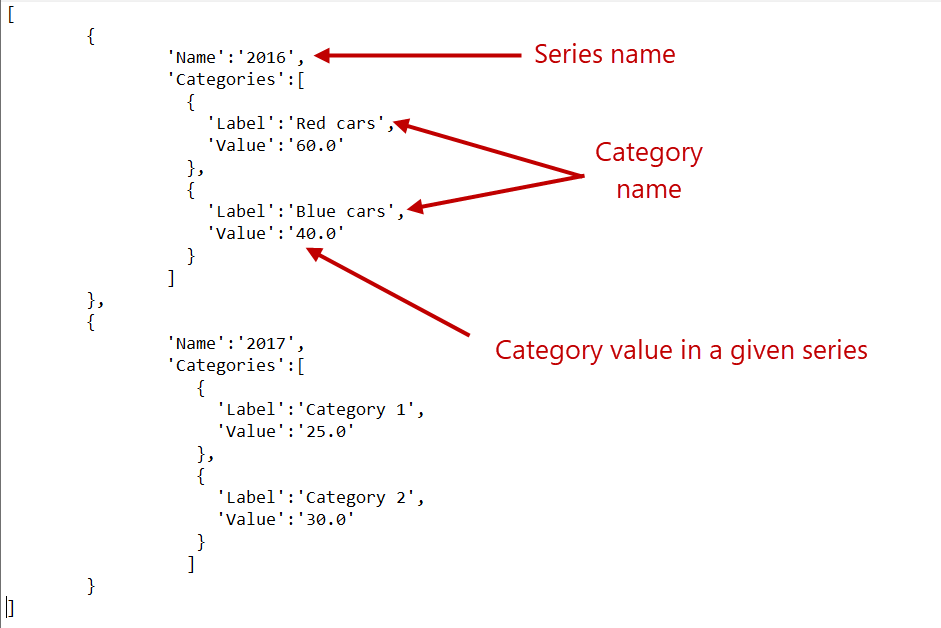
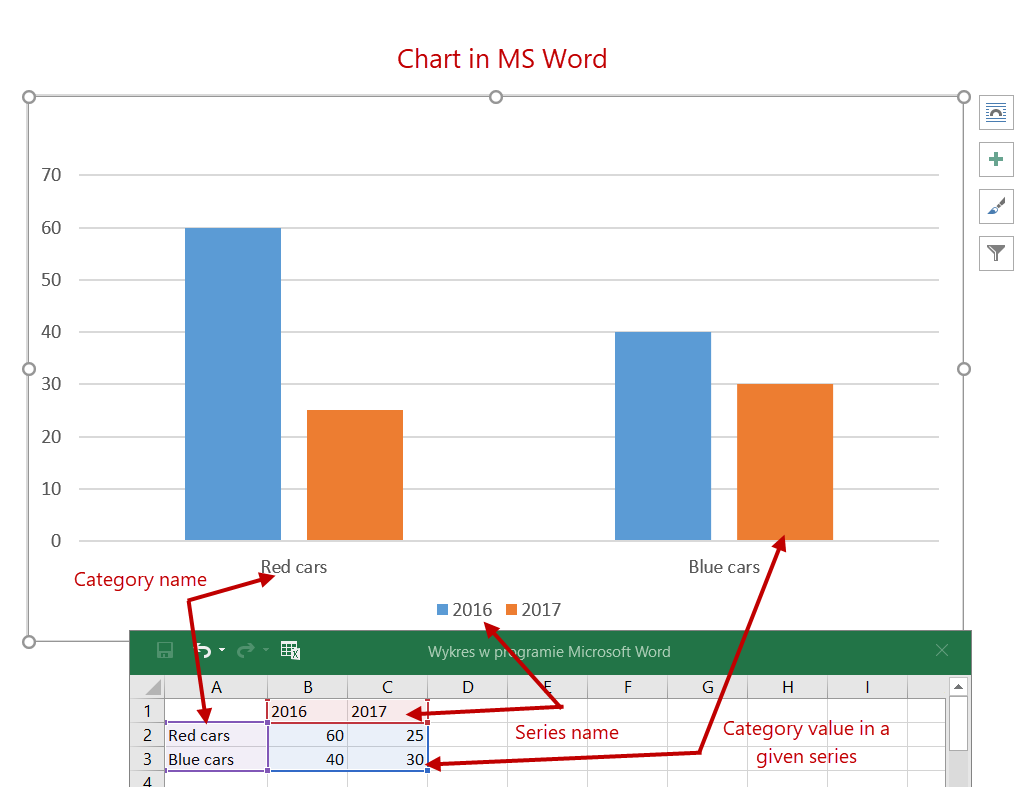
For the chart to be generated correctly, the data in the JSON format must be transferred to the document in the Chart data. The example below shows an example of the format of data sent to the chart in the Chart data field and the generated chart based on this data.
[{'Name':'2016','Categories':
[{'Label':'Samochody czerwone','Value':'60.0'},
{'Label':'Samochody  niebieskie','Value':'40.0'}]},
{'Name':'2017','Categories':
[{'Label':'Kategoria 1','Value':'25.0'},
{'Label':'Kategoria  2','Value':'30.0'}]}]
Hyperlink

The tag allows you to insert hyperlinks into your document.
Depending on how you configure the tag, you influence how the hyperlink is generated.
- Insert the tag into the document template.
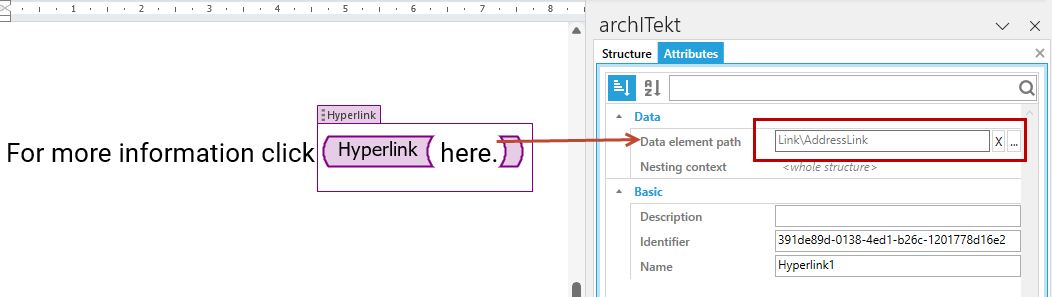
- In inside the tag, enter the text you want the hyperlink to be.
- In the tag attributes, indicate the field from the document data structure that is the data source for the tag. With the tag defined in this way, the text here will be clickable and will link to the address that is passed to the tag via the AddressLink field.
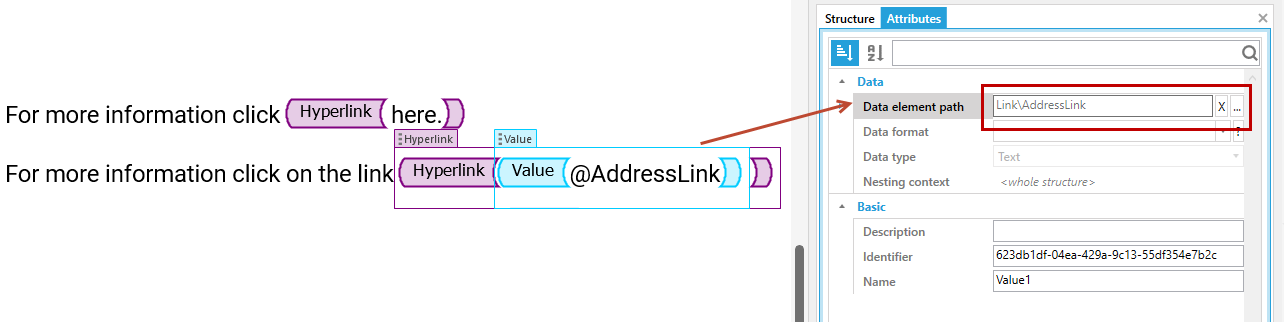
- Insert another Hyperlink tag and a Value tag inside. For both tags, set the same data element - the AddressLink field. With the tag defined in this way, anything inside the Hyperlink tag that is the address passed through the Value tag will be generated as a link.
- Add the Image tag and in the tag attributes indicate the address of the hyperlink by indicating the field from the document data structure AddressLink. Once generated, the image in the document will be a clickable element and will refer to the passed address.
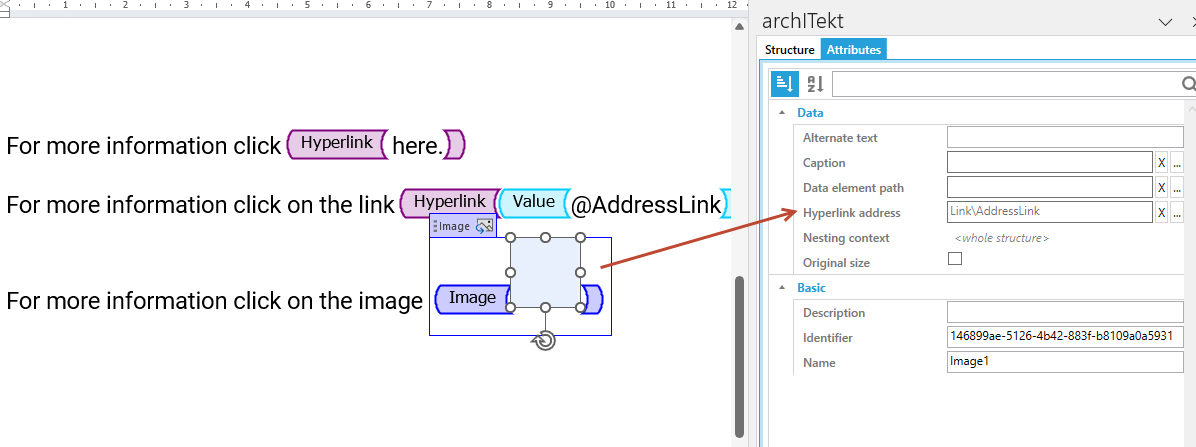
The Hyperlink tag must not be empty inside. Always enter there the text to be hyperlinked or the Value tag, where the hyperlink address will be passed on.
In the generated document, the clickable elements/hyperlinks look as follows:
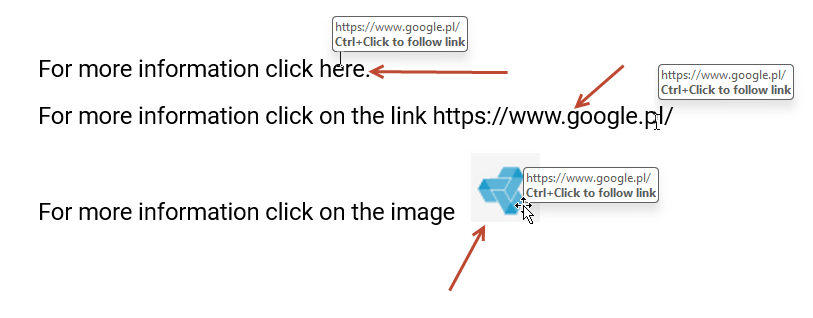
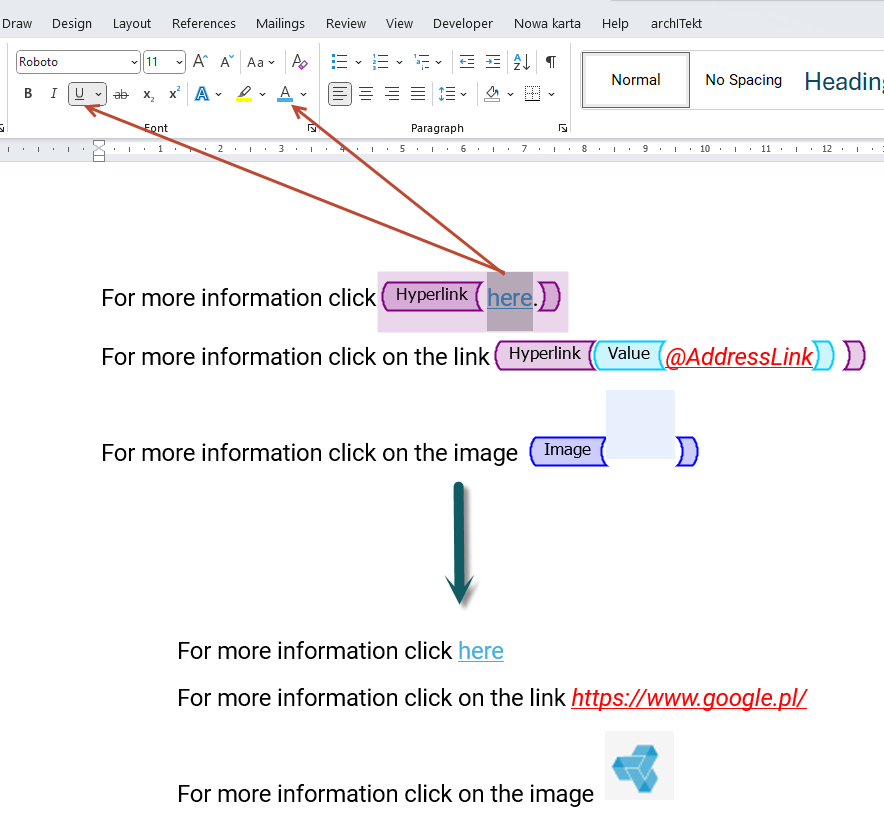
If you do not use any formatting, then the links will be generated as they are defined in the document template. To make the hyperlinks look like a link, format them accordingly via the options available in MS WORD.
Functions that return the url
When you go to archITekt Studio and the expression editor, there are functions that return the full url to the specified form or list.
- Go to the expression editor window and select the
GetFormAddressorGetListAddressfunction. In the middle of the function, indicate the form or list that you want the hyperlink to navigate to. You will find the version server elements in the VS data tree in the expression editor.
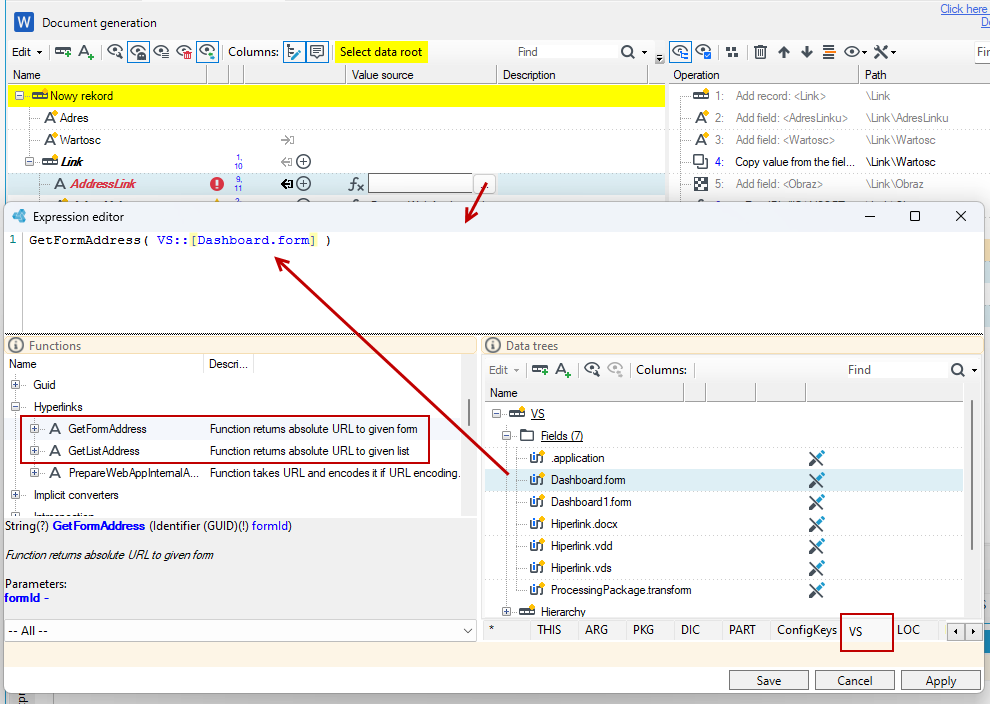
In the generated document, when you click on the link you will be redirected to the specified form/list.
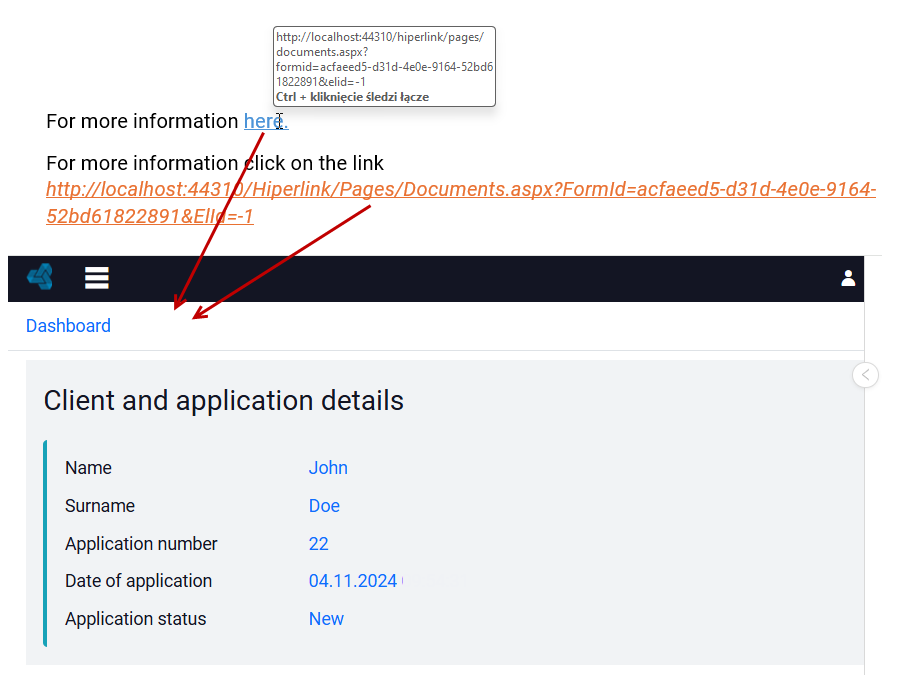
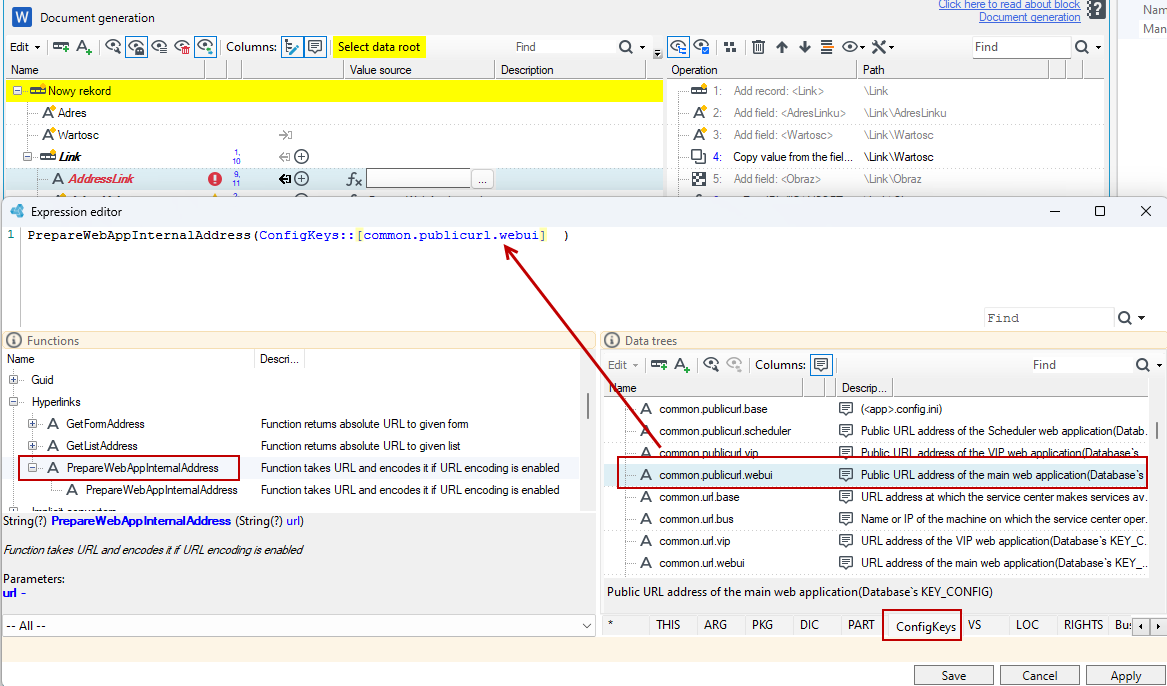
If you have encrypted url addresses, then use the PrepareWebAppInternalAddress function, which encrypts the specified url. When using this function, pass the address to a page in the web application that you have created yourself using the common.publicurl.webui parameter. The function will ensure that the link works well regardless of the flag setting the URL encryption in the application
- As in the example below, select the
PrepareWebAppInternalAddressfunction. - In the middle of the function, specify the parameter
common.publicurl.webuifrom theConfigKeystree.
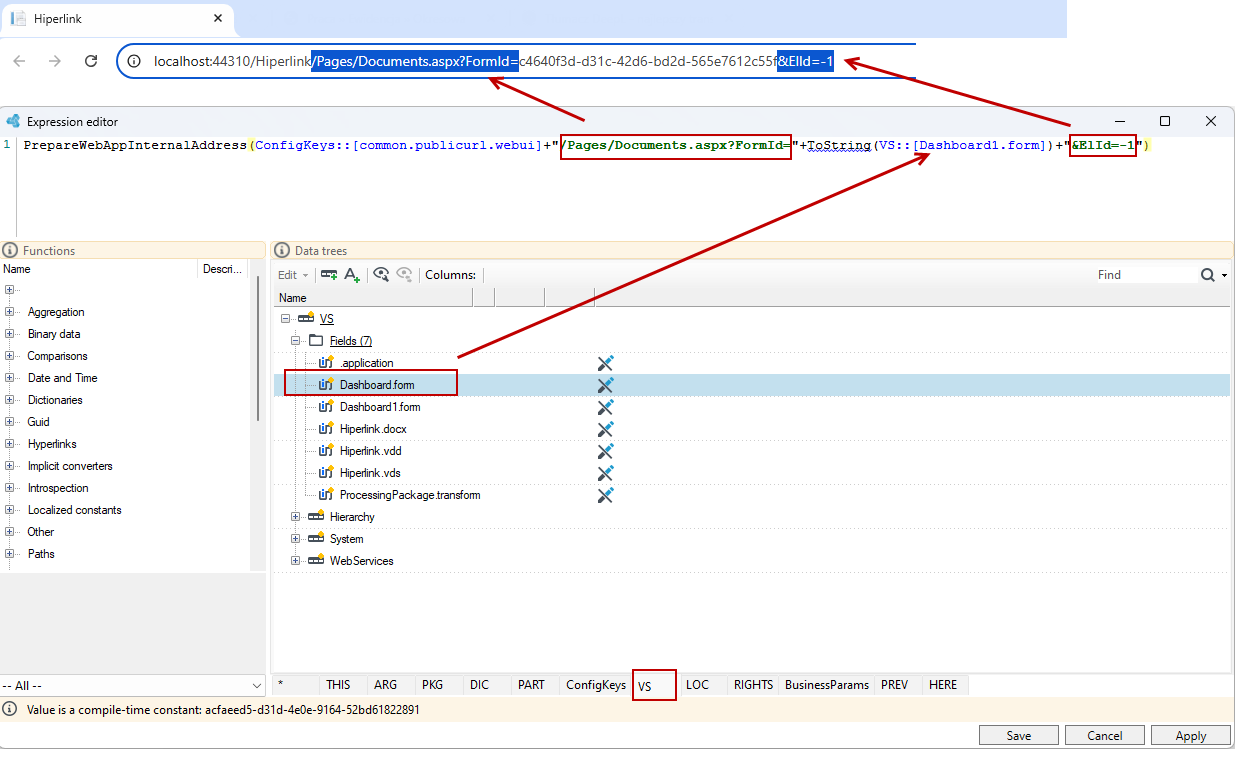
- Next, append the other elements to the address or in this case the constant value
/Pages/Documents.aspx?FormId=, then the form/list or other version server element to which the hyperlink is to redirect and finally another constant element&ElId=-1
The Remark

Remark tag - After generating the document, unlike other tags, it remains unchanged (it is still visible as a tag) and allows you to complete the content in subsequent versions of the document.
This tag does not need to be indicated in the data element attributes. It is not possible to use a tag inside an iteration.
View of a sample document with tags, including a Remark tag before generating (left side) and after generating (right side):
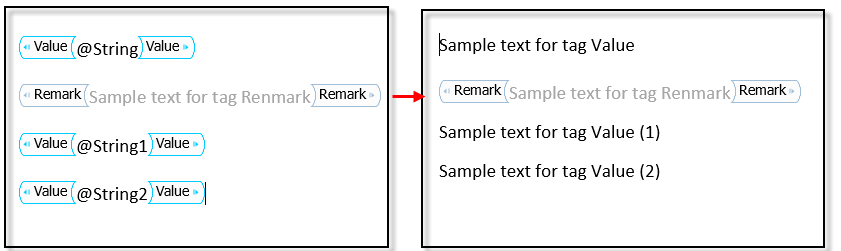
Above you can see that the text was generated from the Value tags, while the Remark tag remained unchanged.
The Placeholder

The Placeholder tag can only be placed inside the Value tag.
The tag content is generated only when the value of the field from the data structure linked to the Value tag is empty.
Inside the Placeholder tag:
- you can place constant text, the text will be generated with the formatting preserved. In the following case, if the IdentityNumber field is empty, text from the Placeholder tag will be generated.
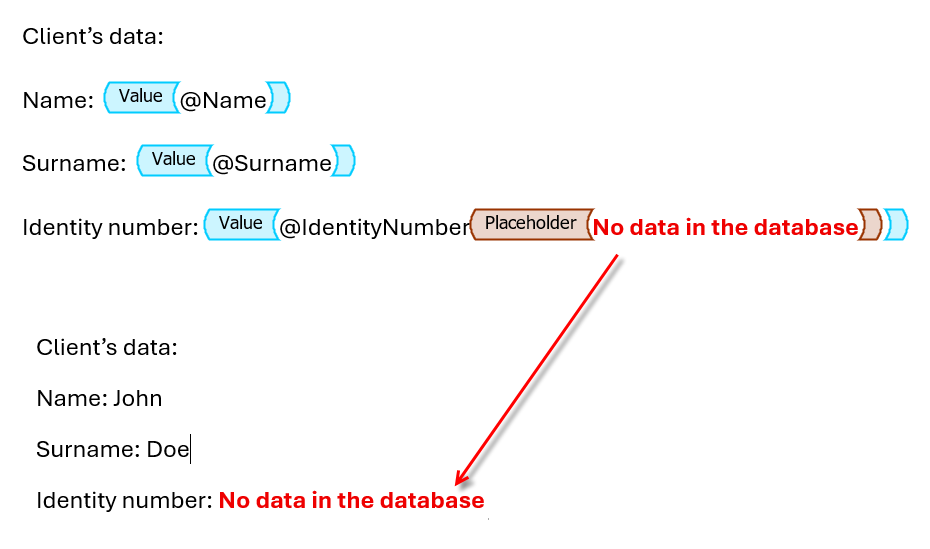
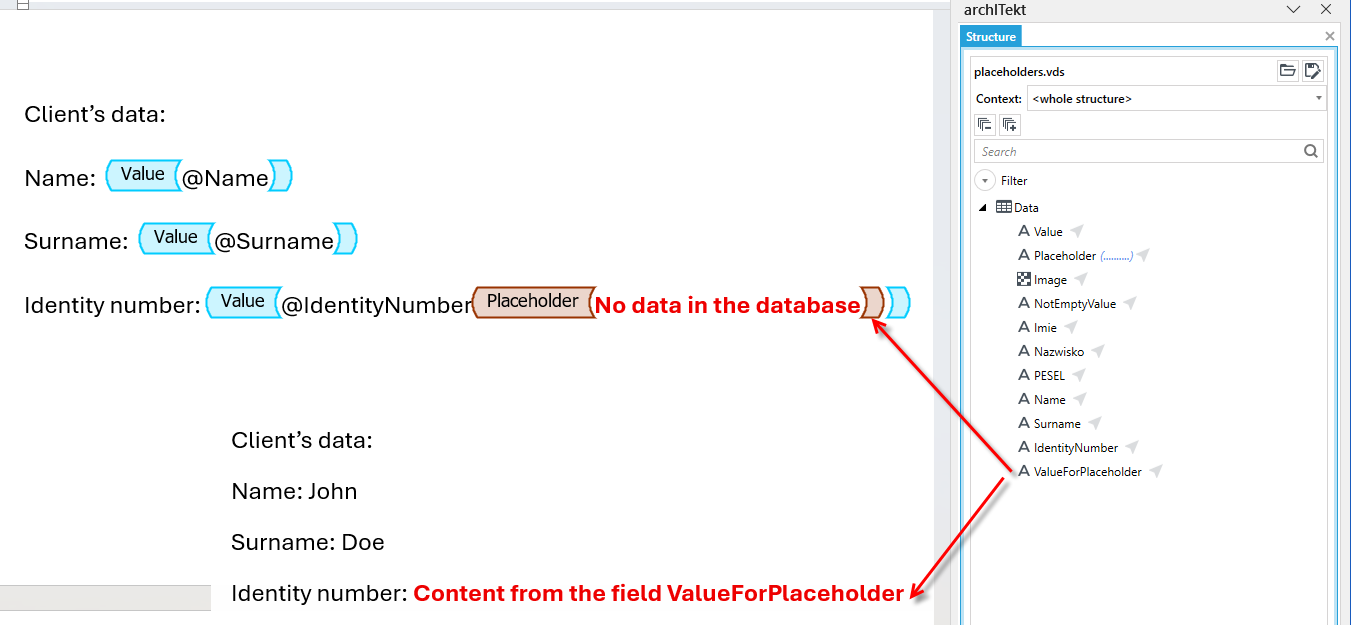
- you can place constant text and additionally attach a field from the data structure to the tag, then the constant text is replaced with the value from the field, preserving the formatting. In the following case, if the value in the IdentityNumber field is empty, then the value from the ValueForPlaceholder field, which is the data source for the Placeholder tag, will be generated.
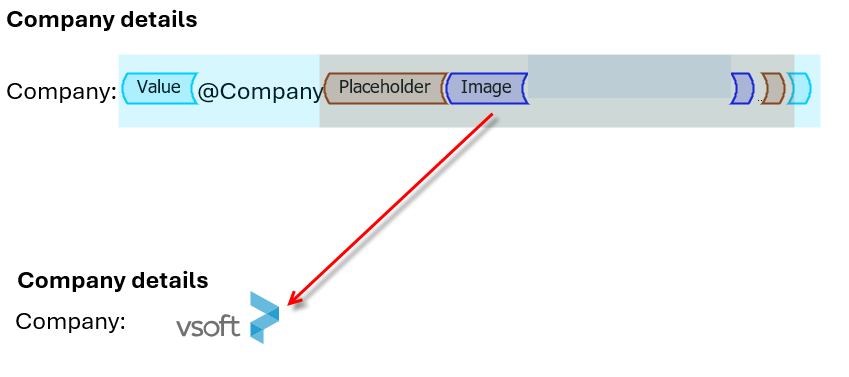
- you can place the Image tag inside the Placeholder tag, and an image will be generated.
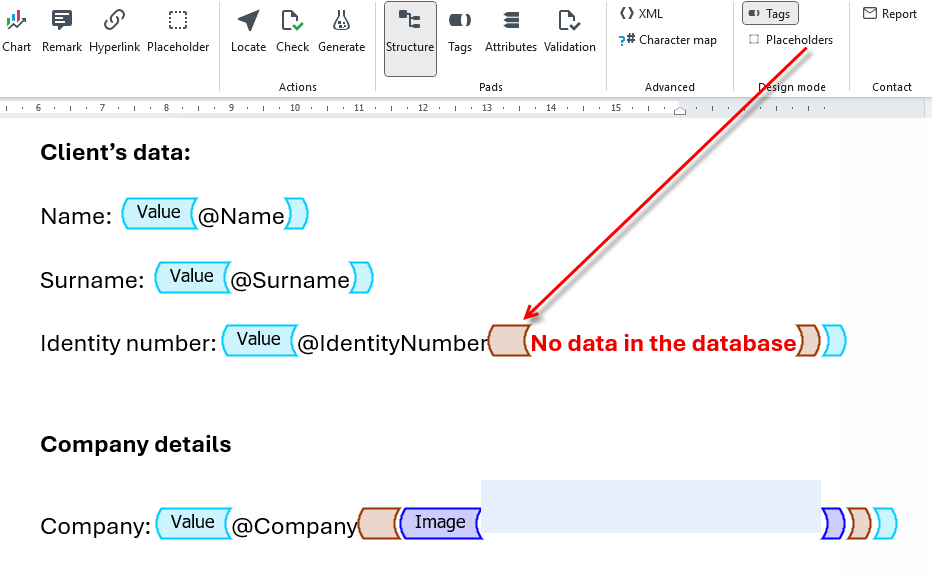
In the Design mode section of the ribbon, you can enable/disable the visibility of Tags and Placeholder tags. You can completely disable the graphical representation of a tag by unchecking the Tags option. You can hide the content and visually reduce the size of Placeholder tags by unchecking the Placeholders option.
HTML
The tag allows you to add text formatted using the advanced Text editor control on the form to generated documents. Since the control saves formatted text as HTML, the tag can also be used to convert any fragment of HTML code into text formatted in MS Word, PDF, or MHTML, but this involves certain limitations described below, which should be kept in mind.
The tag has two attributes:
- Data element path – as with other tags, a text field from the data structure should be attached to this attribute, which will be populated with HTML code when the document is generated.
- Conversion type – defines the behavior of the converter when any errors are detected.
- Strict – if any error is encountered, the conversion is interrupted and the error is reported. This applies, for example, to an unclosed HTML tag, incorrect syntax, use of an invalid tag, and the like.
- Ignore parsing errors – ignores any errors encountered in the HTML syntax and attempts to generate the best possible formatted text. Incorrect or prohibited tags are ignored. An error is only reported if the converter returns an empty result (all tags have been ignored or the passed HTML does not render any text).
- Allow empty output – similar to the “Ignore parsing errors” option, but additionally does not report an error when the generated text is empty (the converter returned an empty value, even though the supplied HTML text is not empty).
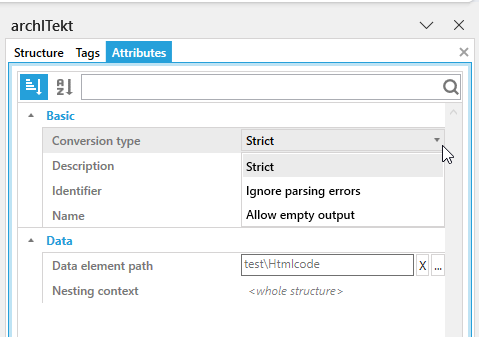
Keep in mind that the main purpose of this feature is to transfer formatting to the document.
The conversion uses existing styles in the document when formatting elements such as headings, quotations, numbering, or bulleted lists. Therefore, depending on the defined styles or their absence, the conversion result may vary between documents, and the HTML converted to Word may differ from the same HTML rendered in a browser. The differences may mainly include font size and spacing or line spacing between elements/paragraphs.
The converted HTML is placed in the main section of the document. It is not possible to place HTML code in the header or footer.
Conversion of formatted text in the Text editor control
The tag supports all formatting options available in the control and transfers the formatting as native formatted text in Word, allowing for further editing of the document.
Converting your own HTML code to a document
Due to the complexity of converting HTML code to formatted text in a Word document, you should first ensure that the conversion result is satisfactory and that there are no discrepancies between the conversion result and the HTML code provided, especially if the Conversion Type attribute is set to anything other than Strict.
Using the tag allows you to convert any HTML code into OpenXml objects that are understood and natively supported by MS Word, but this comes with certain limitations.
The conversion does not support the following HTML tags, and their use results in a conversion error or they are ignored depending on the Conversion type attribute setting:
<button> <head> <input> <script> <select> <style> <textarea> <xml>
Font sizes specified as absolute values (e.g., font-size: x-large, font-size: small) are mapped to the appropriate values in Word according to the rule below. If you want to precisely control the font size, specify the exact font size in HTML.
- xx-small 7pt
- x-small 9pt
- Small 10pt
- Medium 12pt
- large 18pt
- x-large 24pt
- xx-large 36pt
Images in the form of an <img> tag cannot navigate to external resources (the converter does not download images from the Internet) and reports an error or inserts a placeholder in the form of a gray background, depending on the Conversion Type attribute setting. Only images in base64 format can be placed.
In the case of:
- Signature
- Heading 1-6
- Hyperlink
- Footnote
- Bibliography
- Quote
the converter attempts to assign the appropriate style from the Word document to these elements. If it cannot find one, it automatically creates a new style.
Before conversion, HTML is checked for:
- Replacing font size from absolute to numerical
- Adding
<body>and<html>tags if they are missing - Adding the
<!DOCTYPE>tag at the beginning of the document if it is missing
Styles defined in external .css files and <style> tags are ignored. This also applies to CSS variables. In such cases, the styles should be moved to each tag to which they apply.
It is also possible to use an existing style from the document. To do this, add the class property with the style name as a parameter to the tag. You can specify several style names separated by spaces, in which case the converter searches for each style in turn and applies the first one that exists in the document.
- For example, for the element
<p class="My\_Style Normal">the converter tries to find the style My_Style in the document and apply it, and if it does not find it, it applies Normal.
The converter is based on the OpenXML standard, which has no direct equivalents for modern CSS Layout modules (Flexbox and CSS Grid). Therefore, the display: flex and display: grid properties are ignored. It is recommended to use traditional table-based <table> or block-based layouts to preserve the structure of the document in .docx format.
- You can automatically create footnotes at the bottom of the page using the
<abbr>tag.
Delete, select tags
You can delete tags using the Delete or Backspace keys and also using Word's options.
In the case of the iteration tag, keep in mind that everything inside the tag will also be deleted (for example, other tags, text, etc.).
- In this case, go click on the iteration tag (or select the tag) and choose Locate.
- Activate the Tags tab. The iteration tag which you selected in the document is highlighted on the Tags tab.
- Right-click and choose Delete tag from the menu.
- This will remove the Iteration tag and its contents will remain unchanged.
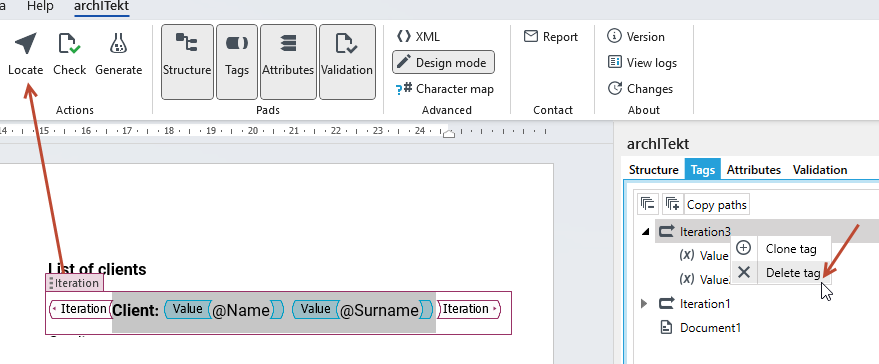
If there are a lot of tags inside an iteration or condition, precise selection of tags is possible:
- using the keyboard (moving through the text with the left and right arrows)

- using the Tags panel. Double-click on a tag, then the cursor will be placed inside the marker on the document. This ensures that you are in the context of the correct tag.