The workflow execution tracking
You can preview the execution of the workflow.
-
Save the workflow.
-
Run the workflow in one of two ways:
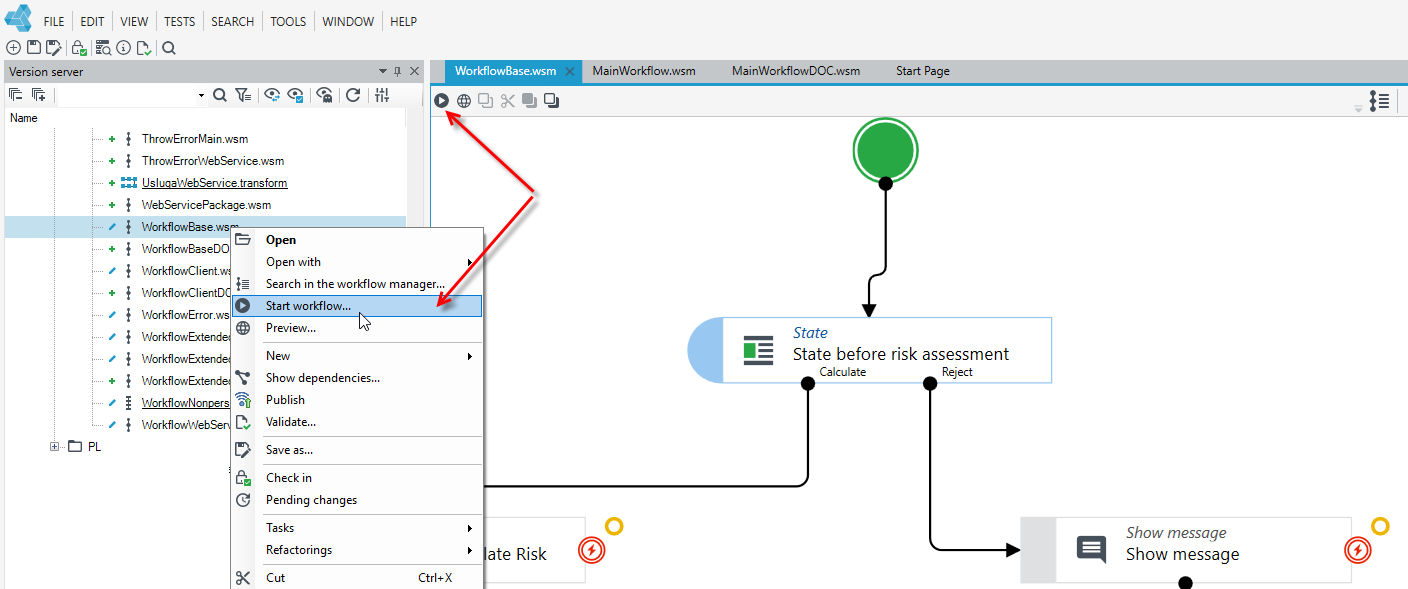
- select the Run workflow button on the toolbar above the workflow workspace,
- in the Version server tree, right-click the workflow and select Run workflow... from the context menu.
The option is available only after saving the workflow version.
-
The workflow execution can be previewed if there are no validation errors in the workflow and the version is correct.
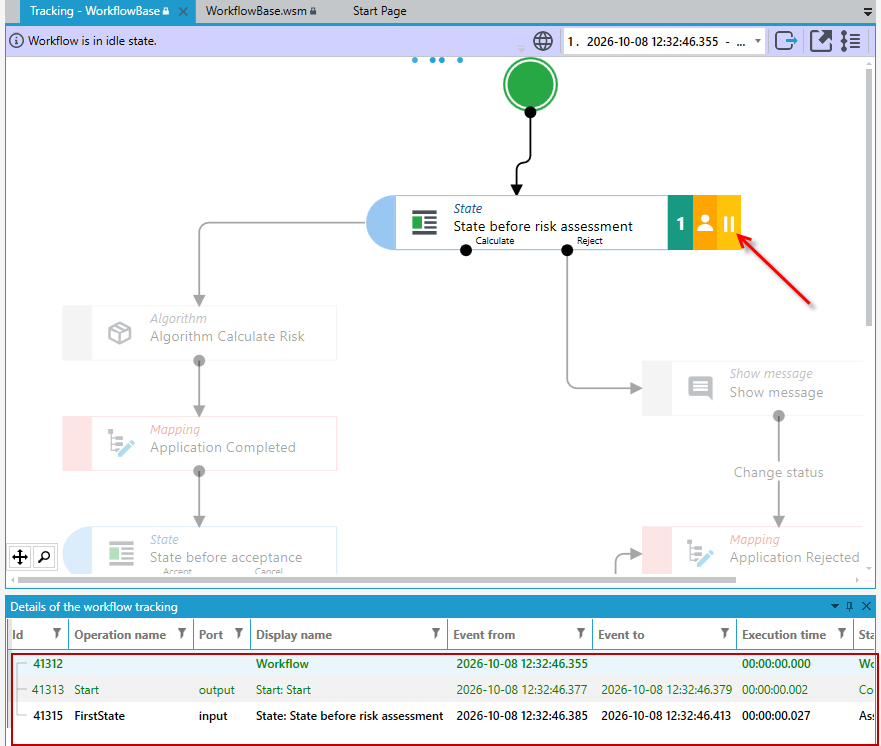
- The preview is displayed in a separate tab, where it is not possible to edit workflow elements.
- While being run, workflow steps that have not yet been executed are greyed out and the execution path is displayed in bold.
- If the workflow uses an activity that requires an action to be performed on a form, the workflow is put to sleep until one of the actions is performed. In this case, you can click the activity and open the form associated with that activity in your web browser.
- After performing one of the actions on the form and returning to the card with the workflow preview, you can see that the workflow has been continued.
- If you close the tab with the workflow preview, you can return to it from the level of the workflow manager. Select Workflow Manager from the Tools menu, find the workflow on the list, right-click and select Track workflow from the context menu.
Details of the workflow
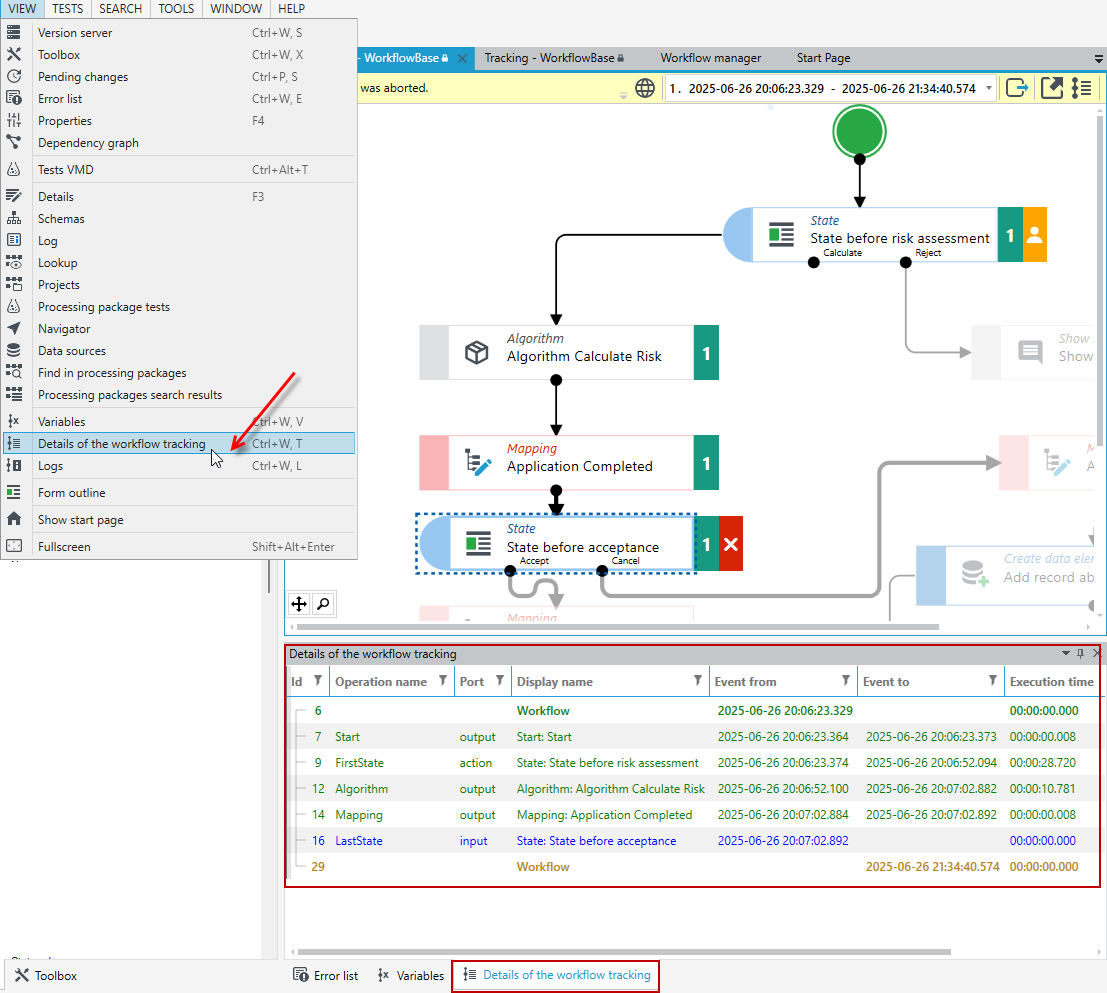
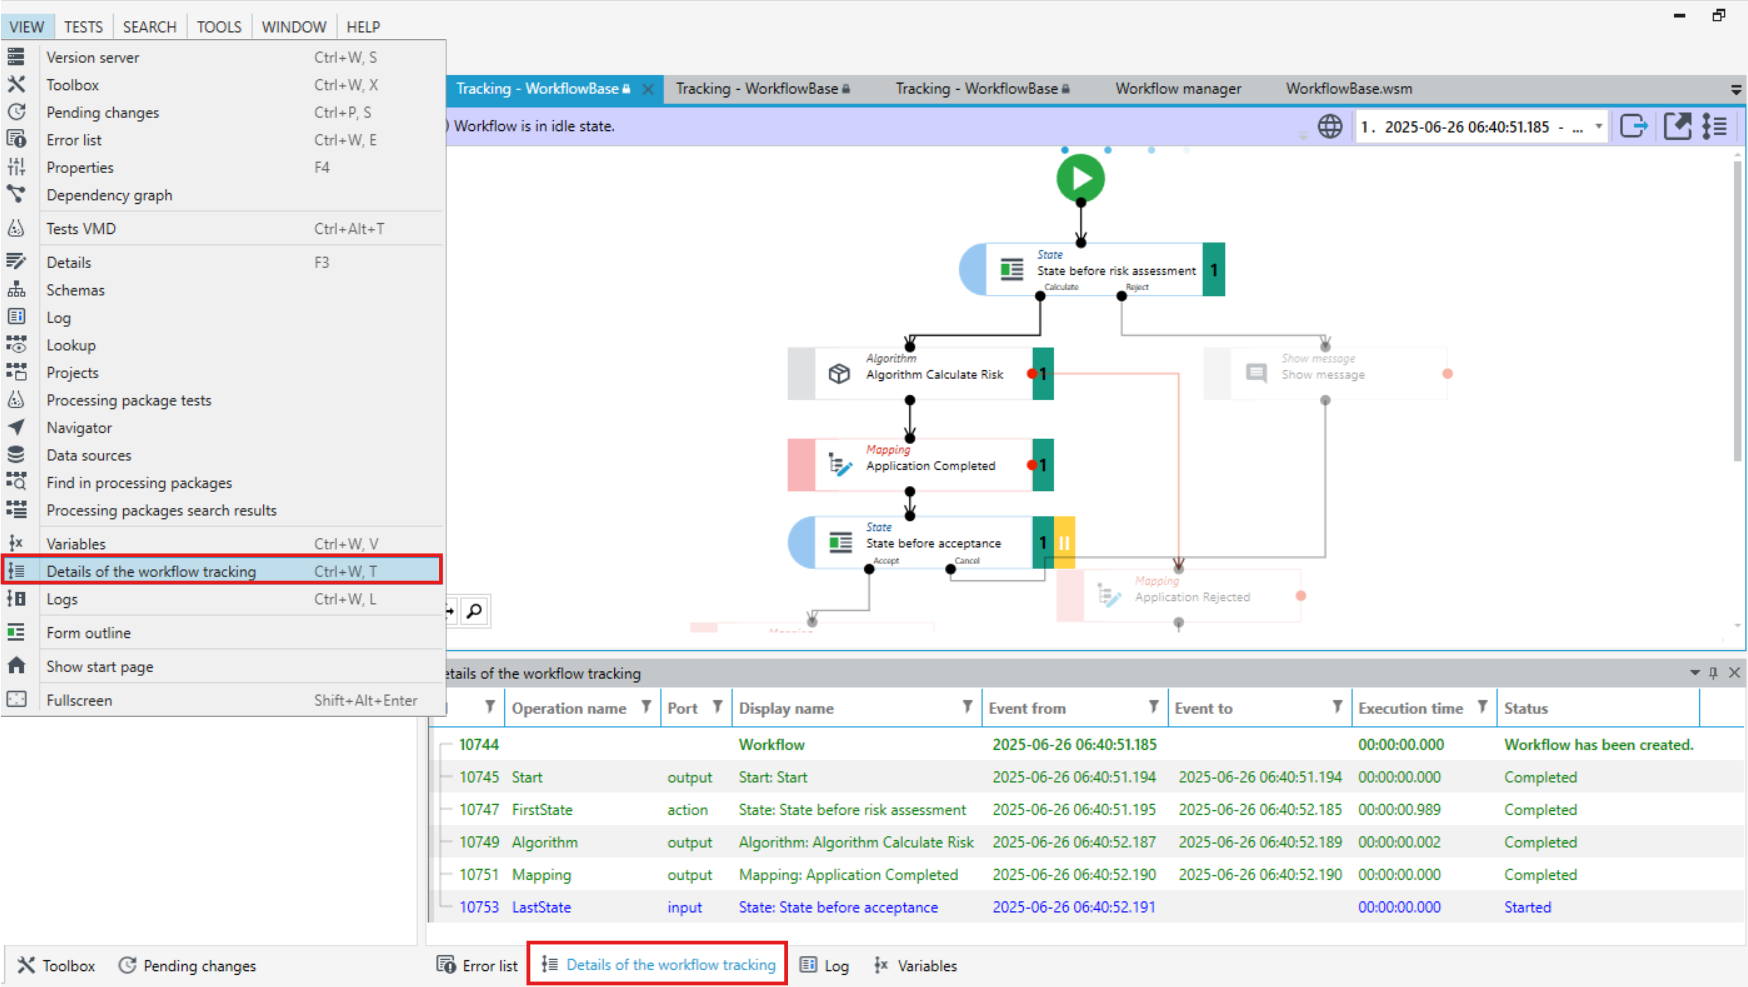
The Details of the workflow tracking panel shows the individual steps that the workflow performs.
- To follow the detailed steps of the workflow, display the workflow tracking details tab from the main menu. Select Details of the workflow tracking from the View menu, or click the icon that activates the tab on the bottom bar.
-
You can follow the workflow tracking in the panel, which is updated as the workflow goes through its subsequent steps.
-
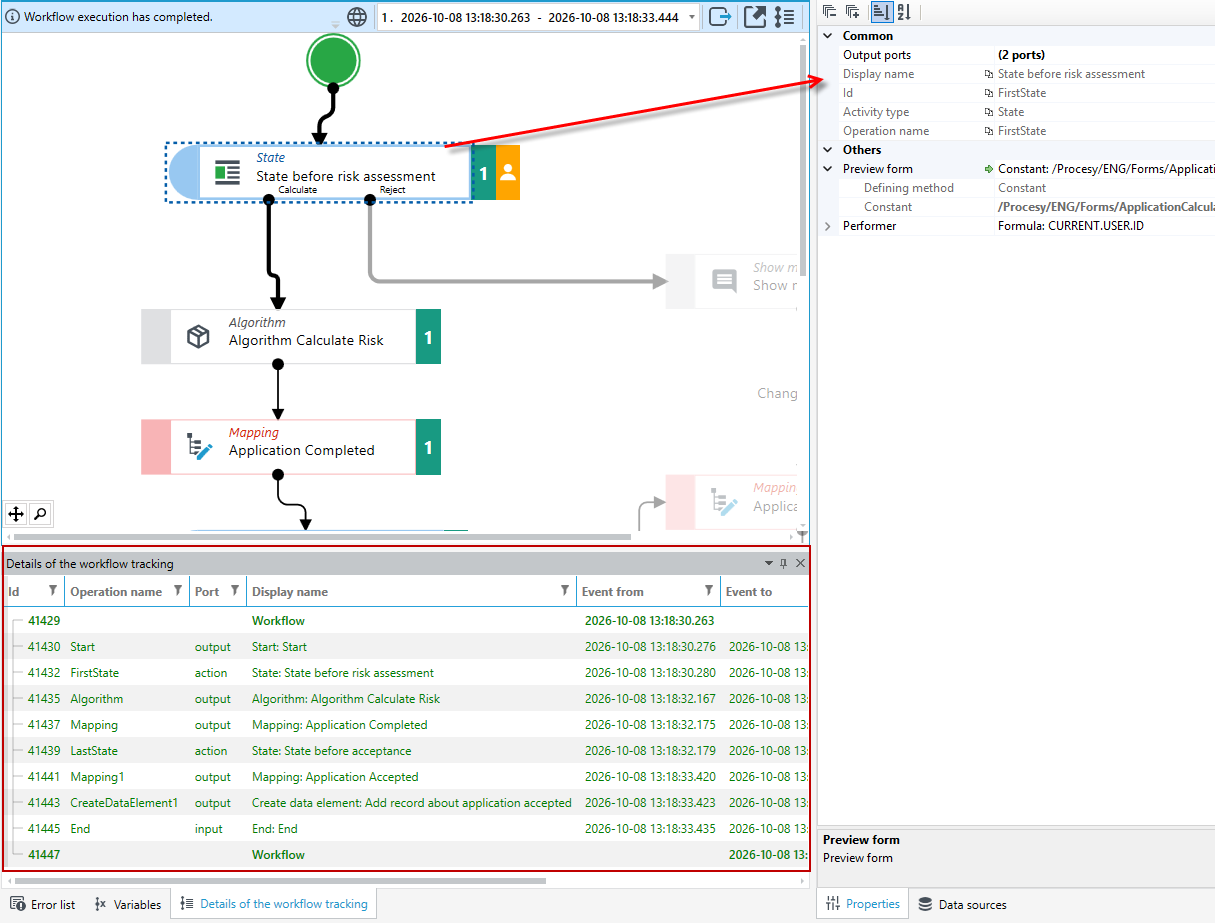
Moreover, after selecting a given activity, you can preview the configuration of the workflow elements in the Properties panel.
Activity details window
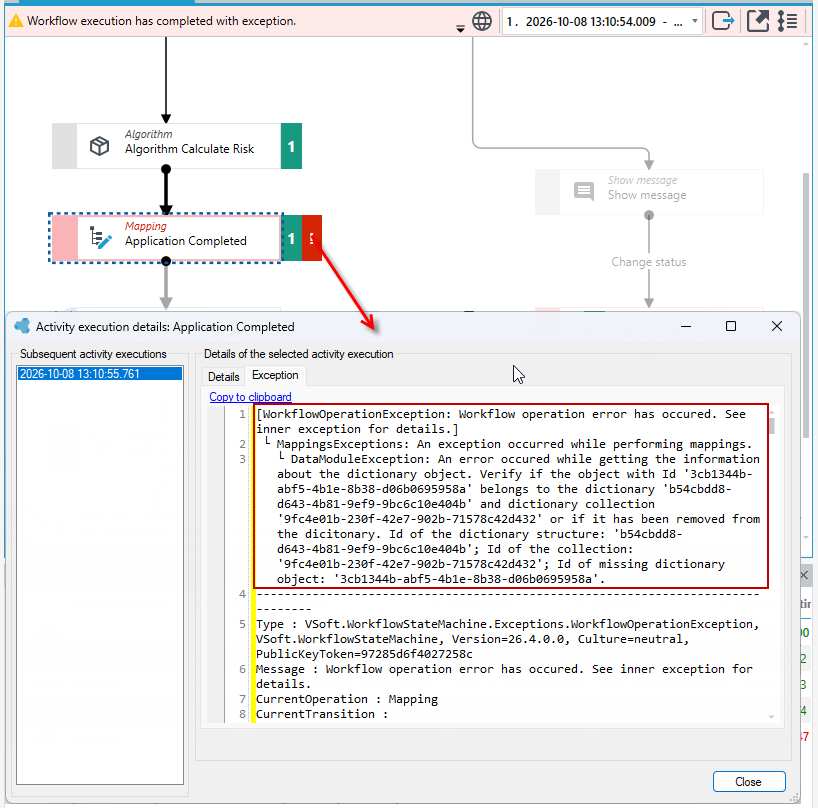
Information about the workflow execution and warnings are displayed next to the items.
- Click on an item to go to the execution details and exception content.
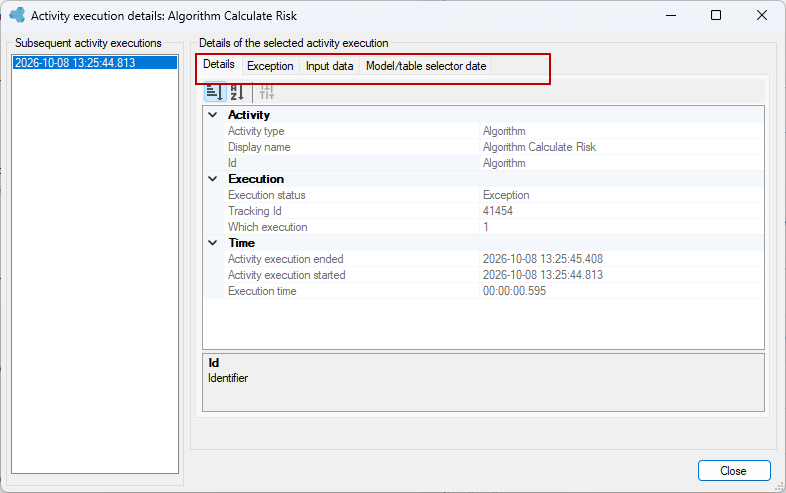
The activity details window contains the following data:
- Details - general basic information on the performance of activities.
- Exception - information if an error occurred in the activity.
- Input/output data - data passed to/from the Algorithm, Table, Web service activities.
- Model/table version selector date - information on the use of the table model from a specific effective date in the Algorithm, Table activities.
Workflow tracking properties
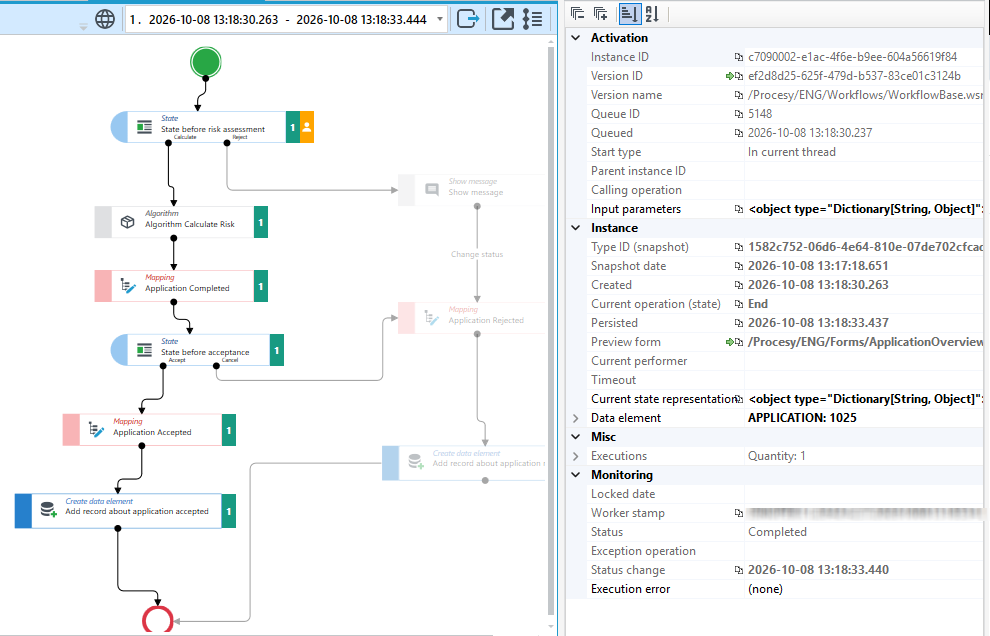
The Properties panel of the Workflow Tracking tab presents detailed information about the workflow.
- Go to the workflow preview.
- Click anywhere on the canvas on an empty space and go to the Properties panel. (It is important that no item is selected, because then the details of the selected item are displayed in the Properties panel).
The tracking of the workflow with the use of the workflow executors mechanism
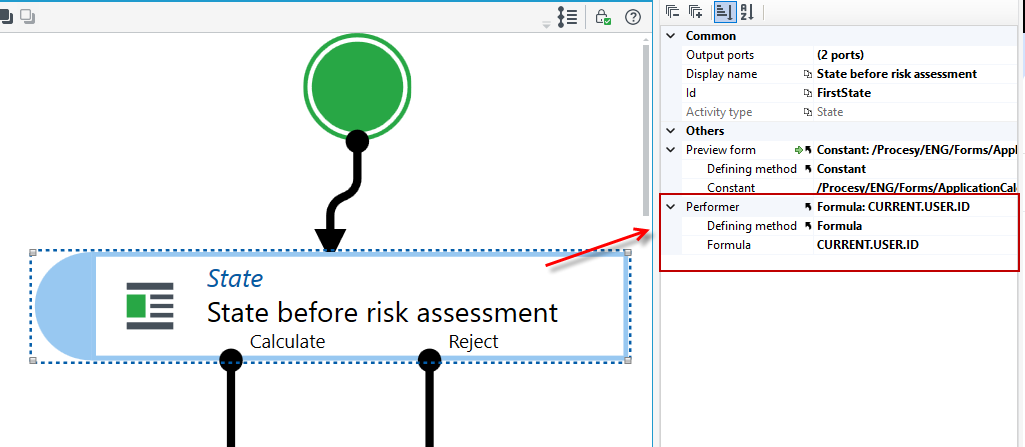
The Workflow has been equipped with the workflow executors mechanism, which enables the indication of the workflow executor in the State activity, in the Properties panel.
The workflow executor can also be specified by an action on the form. See: Workflow Executors Mechanism.
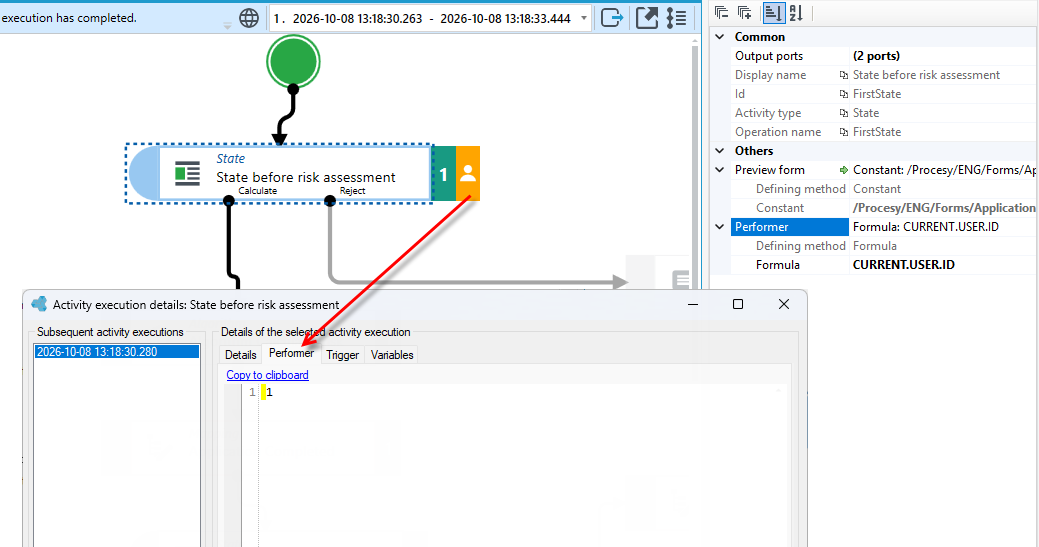
In this case, an executor icon is displayed next to the State activity in the workflow preview. To check who the current workflow executor is:
- On the workflow preview tab, click the executor icon next to the State activity. The Activity execution details window opens.
- In the Subsequent activity executions section, select the run you want to check.
- In the Details of the selected activity execution section, go to the Performer tab. It shows the executor identifier, which you can copy with the Copy to clipboard button.
In the example below, the executor of the State activity is determined by the CURRENT.USER.ID formula (shown in the Performer field in the Properties panel), i.e. it is the current user. The workflow was run by a logged-in application user, so the Performer tab shows that user's identifier – in this case 1.
Workflow tracking export
From archITekt Studio, you can export the tracking of every workflow that has been run.
If you export the tracking of a workflow that has not finished yet, its data may be incomplete.
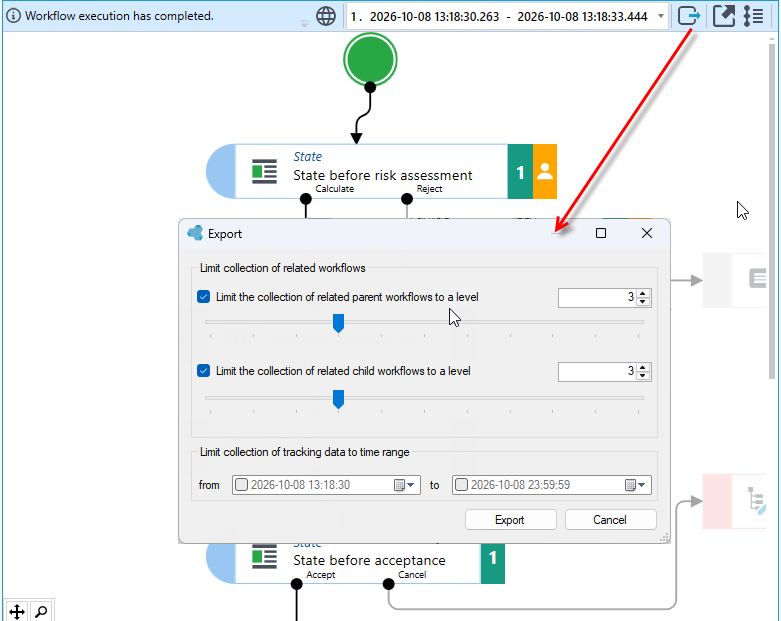
- On the workflow tracking tab, select the Export button on the toolbar in the upper right corner (next to the list of workflow runs). The Export window opens.
- In the Limit retrieval of related workflows section, specify whether and to which level the tracking of related workflows should be exported:
- Limit retrieval of related parent workflows to level – the number of levels of parent workflows (calling the given workflow),
- Limit retrieval of related child workflows to level – the number of levels of subworkflows called by the given workflow.
- Optionally, in the Limit tracking retrieval to a time range section, select the from and to fields and specify the time range of the tracking to export.
- Select the Export button.
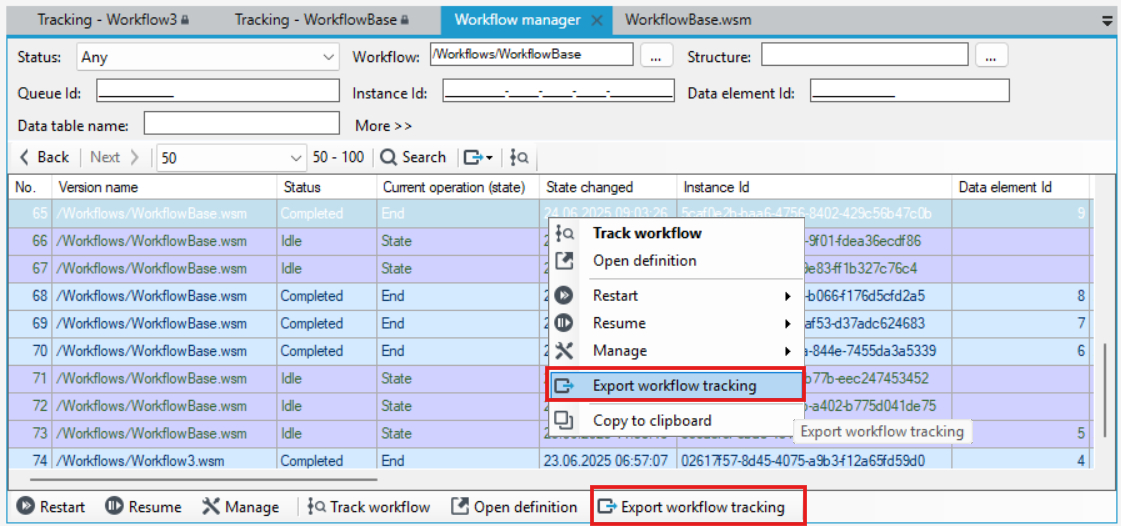
- You can also export a tracking of a workflow or several workflows from the workflow manager.
- Go to the workflow manager (menu Tools > Workflow manager).
- Select the workflow, right click and select Export workflow tracking from the context menu.
- Select several workflows with the Ctrl key held down and select an action from the bottom bar.
Viewing exported workflow tracking
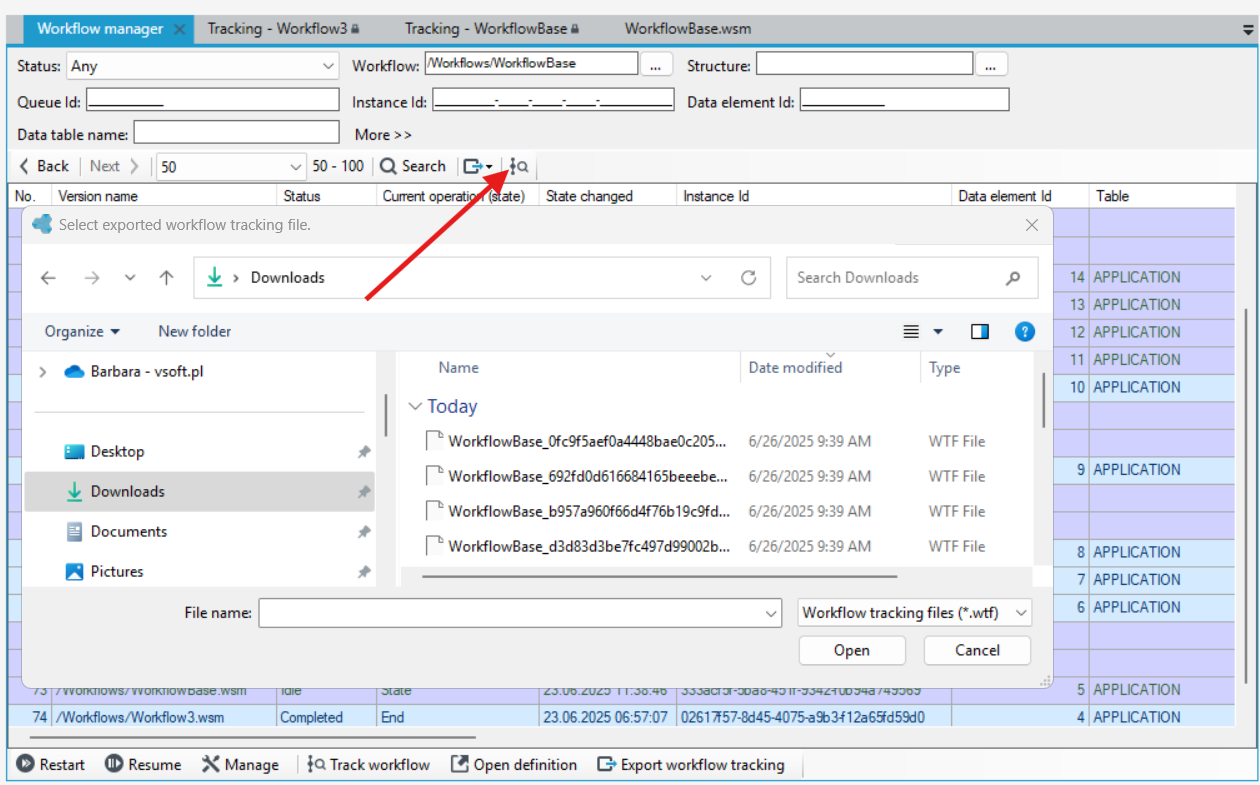
If you have exported the workflow tracking, you can load it into archITekt Studio at any time.
- Go to the Workflow Manager and select the button which allows you to load a file with a record of the workflow progress.
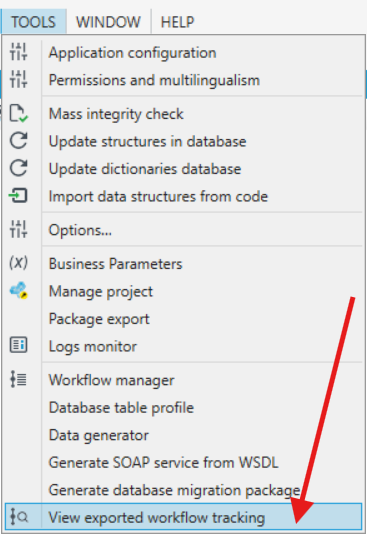
- You can also choose directly from Tools>View exported workflow tracking.
Exporting and viewing the workflow tracking is a useful diagnostic functionality. You can export a tracking from one environment (e.g. production) and then view it at another (e.g. to your own/test environment, etc.). Thanks to this, you can trace how the workflow works in a different environment without access to that environment.
Export of the workflow tracking from the web level
You can also export the workflow from the level of the website.
- Go to the form that uses the workflow and select the Actions tab.
- Activate the Toolbox and in the Workflow section there are actions related to the workflow and you can use them on the form.
- Drag the action onto the designer window. You can add actions in many places, depending on how you want the form to be configured.
- If you add the action in the Buttons and actions section, the action will be a button that you can click on the form.
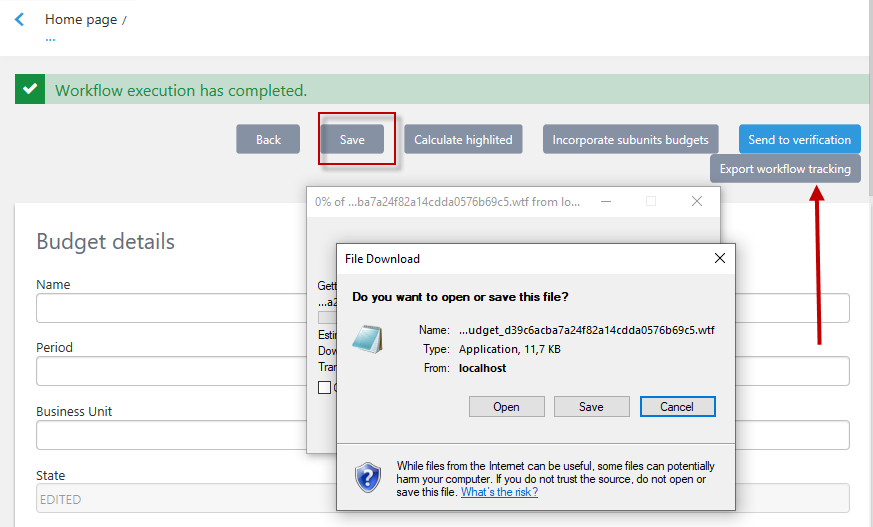
- If you add the action as part of a composite action, the export action will be performed after the composite action button is clicked. In this case, it is the composite action Save and Export workflow tracking, i.e. after selecting the Save action on the form, the data is saved and the workflow tracking export is downloaded.
- In the Properties panel, indicate the workflow whose tracking is to be exported.
Below are different ways of using the Export workflow tracking action.
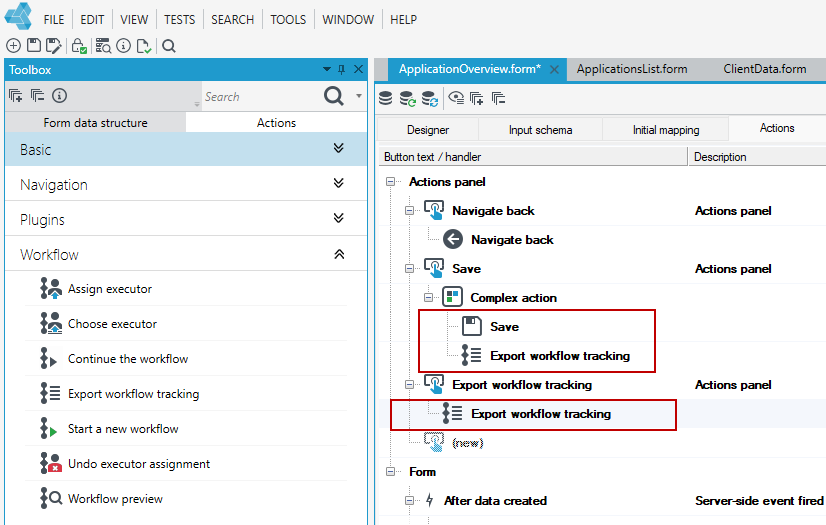
The appearance of the form according to defined actions and events using the Export workflow tracking action.